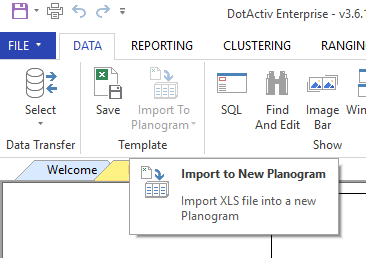
This article will explain the steps you can take to import an XLS or CSV file to a planogram in the DotActiv software.
When importing your XLS/CSV document you have the option of downloading a data template from the software to populate and import or you can upload an existing XLS/CSV document.
For both approaches, you will have to open either an existing gondola/shelf plan or create a new gondola. To do this, navigate to the ‘Space Planning’ tab, as seen in the image below.
How To Upload A Populated Data Template
Step 1: Once you have opened an existing gondola or created a new one, you can import your populated data template by clicking on the ‘Import to planogram’ button in the template section of the data tab as seen in the image below.

How To Import A CSV/XLS File
Step 1: Once the Planogram has opened, navigate to the ‘Data’ tab. Under this tab, click on the ‘Select’ icon and choose ‘CSV/ Excel to Shelf Plan’.
You can also drag and drop CSV files onto DotActiv, both approaches will open the Import Window screen. As seen in gif below.
Step 2: Once the Import Window screen has opened, click on ‘Open File’ and select the directory in which your CSV file has been saved.
Step 3: Map the fields in the CSV to the corresponding fields in DotActiv in the Import Window.
As seen in the gif below, you can do this manually or by clicking the ‘Auto Map’ Function button. Remember to indicate the Key Market and Key product fields. It is advised that you manually Map certain fields as the naming convention in your CSV/XLS may differ from that in the software and will therefore not map automatically.
Make sure that when mapping products that no fields are mapped to more than one field. For example Category can be mapped to Category – Display Structure, and Category – Customer Display Structure. Also ensure that only 1 fields is selected as the key field for example key product idenitifier can be Products ID or Product Code. Do not select more than 1 key fields.
Please note that if you have mapped a field incorrectly, you can double click on the field to remove it.
Step 4: Once you have completed mapping all the necessary fields, you select ‘Import’. Thereafter, you will now need to choose whether you want to ‘Insert’, ‘Update’ or ‘Insert and Update’ the data onto the planogram. Below is a short explanation of each.
- Insert: Where the data is completely new and you wish to populate a new planogram with it, or, in the case of an existing planogram, new data such as new product lines that have been added.
- Update: Where you only wish to update existing data such as pulling through new sales data.
- Insert and Update: This is a combination of the above mentioned. By selecting this option, any new data will be added but all existing data will also be updated with new sales data for example.
Step 5: Click ‘OK’ when you are ready to add your products to your planogram.
The end result should look similar to that demonstrated in the gif. You will notice that your products will be displayed on the green floating shelf. You can then go ahead by dragging your products from the green floating shelf onto your planogram as you please.
Should the above steps not work for you, please create a support ticket and DotActiv support will assist you in resolving the issue.
