The purpose of this article is to explain how you can run the DotActiv software on the Apple macOS. We unpack the various options available to you.
DotActiv is exclusively a Windows-based application. Consequently, the only method to operate it on a macOS device is through a Windows Virtual Machine (VM).
It is crucial to understand that this is a workaround rather than a native fix. While this method does work, running a virtual machine is highly resource-intensive. Therefore, we always strongly recommend using a native Windows device to ensure optimal performance and stability.
If you choose to proceed with a Mac, you must carefully evaluate your system specifications. This is particularly important regarding Apple Silicon chips (such as the M1, M2, and M3 series), as not all VM software is designed to support this architecture.
Please note that this route may require purchasing an additional software bundle (the virtualization software and a Windows license) alongside your DotActiv software before you can begin working.
Below are examples of virtual machines that we can recommend that may allow you to work on the DotActiv software.
VirtualBox
VirtualBox is a free, open-source virtualization tool that is widely used due to its zero-cost entry point that you can download from this link. However, it is effectively incompatible with Apple Silicon (M1, M2, M3) Macs for running Windows.
While a “Developer Preview” exists, it is experimental, lacks stability, and currently does not support the graphics acceleration or performance required to run complex Windows applications like DotActiv. If you have an Intel-based Mac, it remains a viable free option, but for Apple Silicon users, we do not recommend VirtualBox as it will likely result in critical errors or an unusable, slow experience.
System Requirements
- X86 hardware. Any recent Intel or AMD Processor will do.
- 512 MB of RAM minimum.
- 30 MB of free hardware space for the software only. Its recommended that you have a few 100GB’s of free space; and
- A supported host operating system. Currently, VirtualBox supports Windows, many Linux distributions, macOS X, Solaris, and OpenSolaris.
- A supported guest operating system. Read more about guest OSes here.
Pros
- Free;
- You do not need any prior virtual machine knowledge to set up the software as it is very simple to use; and
- The end-user documentation is available to anyone from their website if you do get stuck with the installation.
Cons
- Some features are only available in binary form under a commercial license; and
- Depending on your system, you may experience some lagging. This can be improved by turning off Energy Saving.
Full Disclosure: While VirtualBox is a bit unstable at times, we have found it is easy to work on the software without fuss.
VirtualBox for macOS
Here’s a step-by-step guide to setting up Windows on VirtualBox for macOS.
Step 1: Download and Install VirtualBox
- Download VirtualBox from https://www.virtualbox.org/
- Open the downloaded .dmg file and follow the installation instructions.
- Once installed, launch VirtualBox.
Step 2: Download Windows ISO File
- Go to the official Microsoft website:
https://www.microsoft.com/en-us/software-download/windows10 (for Windows 10)
https://www.microsoft.com/en-us/software-download/windows11 (for Windows 11)
- Select the Windows version you need and click Download.
- Choose ISO file as the download option.
- Save the Windows ISO file to your Mac.
Step 3: Create a New Virtual Machine in VirtualBox
- Open VirtualBox and click “New”.
- Enter a name for the virtual machine (e.g., “Windows 10 VM”).
- Select Type: “Microsoft Windows”.
- Choose Version: “Windows 10 (64-bit)” or “Windows 11 (64-bit)”.
- Click Next.
Step 4: Allocate System Resources
Memory (RAM):
- Minimum: 4 GB (4096 MB).
- Recommended: 8 GB (8192 MB) for better performance.
- Click Next.
Hard Disk:
- Select “Create a virtual hard disk now” → Click Create.
- Choose VDI (VirtualBox Disk Image) → Click Next.
- Select “Dynamically allocated” → Click Next.
- Set at least 50 GB of disk space → Click Create.
Step 5: Load Windows ISO and Start Installation
- Select your newly created VM in VirtualBox and click “Settings”.
- Go to “Storage” → Click “Empty” under “Controller: IDE”.
- Click the CD icon → Select “Choose a disk file”.
- Browse and select the Windows ISO file you downloaded.
- Click OK and return to VirtualBox.
- Click “Start” to boot the VM and begin Windows installation.
Step 6: Install Windows
- When the VM starts, the Windows Setup screen will appear.
- Select Language, Time, and Keyboard Layout → Click Next.
- Click “Install Now”.
- If asked for a product key, click “I don’t have a product key” (Windows can be activated later).
- Choose Windows version → Click Next.
- Accept the license terms → Click Next.
- Select Custom: Install Windows only (advanced).
- Choose the virtual hard drive (Drive 0) → Click Next.
- Windows will begin installing. Wait for the process to complete.
Step 7: Complete Windows Setup
- After installation, Windows will restart automatically.
- Follow the on-screen instructions to set up user preferences, create an account, and configure settings.
- Once setup is complete, Windows will load in the virtual machine.
Step 8: Install VirtualBox Guest Additions (Recommended)
- In VirtualBox, click “Devices” → “Insert Guest Additions CD image”.
- Inside Windows, open File Explorer → This PC.
- Open the VirtualBox Guest Additions drive and run VBoxWindowsAdditions.exe.
- Follow the installation steps and restart the VM when prompted.
Step 9: Install DotActiv Software
- Open the Windows VM.
- Download DotActiv from https://updates.dotactiv.com/dotactivsetup.exe
- Install and follow any setup instructions.
Parallels Desktop 19
Parallels is the most popular virtual machine on this list. This is because of the seamless switching between macOS and Windows. You can visit the website to download and read more about the virtual machine here.
System Requirements: Minimum
- Any Apple silicon chip Intel Core i5, Core i7, Core i9, Intel Core M, or Xeon Processor.
- 4 GB of RAM.
- 600MB for installation. Additional disk space for the guest operating system (16 GB minimum required for Windows OS).
- Apple M2, M2 Pro, M2 Max, M2 Ultra, M1, M1 Pro, M1 Max and M1 Ultra chips. Intel, AMD Radeon, or NVIDIA graphics cards.
- macOS Sonoma 14.0 or newer, macOS Ventura 13.2 or newer, macOS Monterey 12.6 or newer, macOS Big Sur 11.7 or newer, macOS Catalina 10.15.7 or newer or macOS Mojave 10.14.6 or newer.
System Requirements: Best Performance
- Apple M2, M2 Pro, M2 Max, M2 Ultra, M1 Pro, M1 Max and M1 Ultra chips. Intel Core i5, Core i7, Core i9 or Xeon processor.
- 16 GB of RAM or more.
- 600 MB for installation. Additional disk space for the guest operating system (16 GB minimum required for Windows OS).
- Apple M2, M2 Pro, M2 Max, M2 Ultra, M1, M1 Pro, M1 Max and M1 Ultra chips. AMD Radeon Pro graphics card.
- macOS Sonoma 14.0 or newer, macOS Ventura 13.2 or newer, macOS Monterey 12.6 or newer, macOS Big Sur 11.7 or newer, macOS Catalina 10.15.7 or newer, macOS Mojave 10.14.6 or newer.
Pros
- Seamless and easy to use;
- You can run the virtual machine in windowed mode and also in full screen. You can set a hotkey to switch back and forth between your virtual machine and macOS;
- When minimised, there is an icon in your Mac Dock for easy access; and
- It’s easy to set up. When the software is installed it will prompt you what you would like to use it for (e.g Windows) and download it for you.
Cons
- If you have an older Mac that does not have at least 8 GB of RAM, you might struggle a bit with running the software; and
- It can get quite pricey with yearly renewals.
Pricing
There are three editions available, namely Standard, Pro and Business. There is also a 14-day trial available for free with all the basic features of the software.
- Standard: $99.99.
- Pro: $119.99 per year.
- Business: $149.99 per year.
Compare the editions and their various features here.
VMware Fusion
VMware Fusion is the one virtual machine software that we have not tested ourselves. However, this does not mean that you should not consider using this software to run our DotActiv software.
Many experts have argued that it is the perfect balance between Parallels Desktop and VirtualBox. You can visit the website to download and read more about the VM here.
System Requirements
Fusion 12.1.2 and earlier
- All Macs launched in 2011 or later except for the Intel® Xeon® W3565 processor when used on the 2012 Mac Pro Quad Core. On 2010 Mac Pro Six Core, Eight Core, and Twelve Core.
- Hardware Requirements: MacBook, Early 2015 or later; MacBook Air Air, Mid 2012 or later; MacBook Pro, Mid 2012 or later; Mac Mini, Late 2012 or later; iMac, Late 2012 or later; Mac Pro, Late 2013 or later.
- Software Requirements: macOS 10.12.5 or later.
- macOS 10.15 Catalina and newer versions to the host OS
- Operating system installation media for virtual machines.
- 4 GB of RAM, but 8 GB of RAM is recommended.
- 750 MB of free disk space for Fusion, and at least 5 GB of free disk space for each virtual machine.
Fusion 12.2.0 And Later
- Any Intel-based Mac that officially supports macOS 11 Big Sur or later.
- 8 GB of RAM, but 16 GB of RAM is recommended for running multiple virtual machines.
- Operating system installation media for virtual machines.
- 750 MB of free disk space for Fusion, and at least 5 GB of free disk space for each virtual machine.
Fusion 13.0.0 And Later
- Any Mac that officially supports macOS 12 Monterey or later.
- 8 GB of RAM, but 16 GB of RAM is recommended for running multiple virtual machines.
- Operating system installation media for virtual machines.
- 1.5 GB of free disk space for Fusion, and at least 5 GB of free disk space for each virtual machine.
Pros
- You can run as many VM machines concurrently as you want. The only limit is your system’s RAM and storage; and
- You can create an unlimited amount of virtual machines from a single VMware Fusion license.
Cons
- There are known issues with running it in Utility mode on Mac. Some experts claim that it’s not reliable and it’s challenging to launch a Windows app;
- Fusion doesn’t provide any operating systems for installation on virtual machines that you create with it. You must provide the operating system installation media;
- It can get quite pricey with yearly renewals; and
- Running it continuously requires a large amount of RAM.
Pricing
There are two editions available to you, namely Fusion Player and Fusion Pro. There is also a 30-day trial available for VMware Fusion Pro with all the basic features of the software and a free personal use license for Fusion Player.
- Fusion Player 13: $149 for a new license.
- Fusion Pro 13: $199 for a new license.
Compare the two editions and their various features here.
UTM
UTM is an open-source virtual machine software that we have not tested ourselves. However, it is a popular option in the Mac community because it is free and built on the powerful QEMU emulation software.
Unlike the other options, UTM is a “sandbox” virtualization tool that allows you to run Windows on Apple Silicon. While it does not offer the same level of polish or speed as paid competitors, many users find it sufficient for running basic Windows applications without a subscription fee. You can visit the website to download and read more about the VM here.
System Requirements
UTM 4.0 And Later
- Hardware Requirements: Any Apple Silicon Mac (M1, M2, M3 chips) for running Windows 11 ARM. (Intel-based Macs are supported but operate differently).
- Software Requirements: macOS 11.3 (Big Sur) or later. macOS 12 (Monterey) or later is recommended for better performance.
- RAM: 4 GB of RAM minimum, but 8 GB or more is highly recommended to ensure the Windows VM runs smoothly alongside macOS.
- Disk Space: 1 GB for the UTM application, plus at least 32 GB (64 GB recommended) of free disk space for the Windows installation.
- Operating System Media: UTM does not download Windows for you. You must provide your own Windows 11 ARM ISO file (often acquired via the Windows Insider Preview or third-party tools like CrystalFetch).
Pros
- Completely Free: The standard version is free to download and use with no feature restrictions;
- Open Source: It is built on open-source technology (QEMU), offering transparency for privacy-conscious users; and
- Emulation Capabilities: Unlike others, it can emulate older x86 operating systems (like Windows XP or 7) on Apple Silicon, though this is significantly slower than running Windows 11 ARM.
Cons
- No 3D Graphics Acceleration: UTM does not support hardware graphics acceleration (DirectX 12) for Windows. This means graphically intensive applications (like DotActiv) may run slowly, lag, or fail to render 3D floor plans correctly;
- Manual Setup Required: There is no “one-click” installer. You must manually source, download, and mount the Windows ISO file, which requires more technical knowledge;
- Lower Performance: Without the proprietary optimizations found in Parallels, Windows may feel sluggish; and
- No Official Support: As free software, it lacks a dedicated support team for troubleshooting enterprise issues.
Pricing
There are two ways to obtain UTM:
UTM (Mac App Store): $9.99 (One-time purchase). This is identical to the free version but includes automatic updates via the App Store and supports the developers.
UTM (Website): Free. You must manually download updates from their website.
Comparison
Parallels Desktop – Fully supports Apple Silicon (M1, M2, M3). This is the only Microsoft-authorized solution for running Windows on Mac. It offers the best performance and includes full 3D graphics acceleration (DirectX 12), which is critical for graphic-heavy applications like DotActiv. (Requires a paid subscription)
VirtualBox – Not compatible with Apple Silicon (M1, M2, M3) for Windows. VirtualBox currently cannot run Windows 11 effectively on Apple Silicon chips. While a developer preview exists, it is unstable, lacks 3D acceleration, and is not suitable for production work. This option should only be used if you have an older Intel-based Mac.
VMware Fusion – Supports Apple Silicon but with graphical limitations. VMware Fusion is now free for personal use and does support running Windows 11 on Apple Silicon. However, it relies on older graphics standards (DirectX 11) and may not offer the same seamless performance as Parallels for demanding software.
UTM – Free but slow. UTM is a free, open-source option that can run Windows on ARM. However, it lacks robust 3D graphics acceleration. This makes it significantly slower and unsuitable for graphically intensive tasks, though it may suffice for basic file management.
Conclusion
If you need Windows on an M1, M2, or M3 Mac, Parallels Desktop is the best and only fully supported option for a stable and optimized experience.
Navigating Between Windows And Mac On Your Device
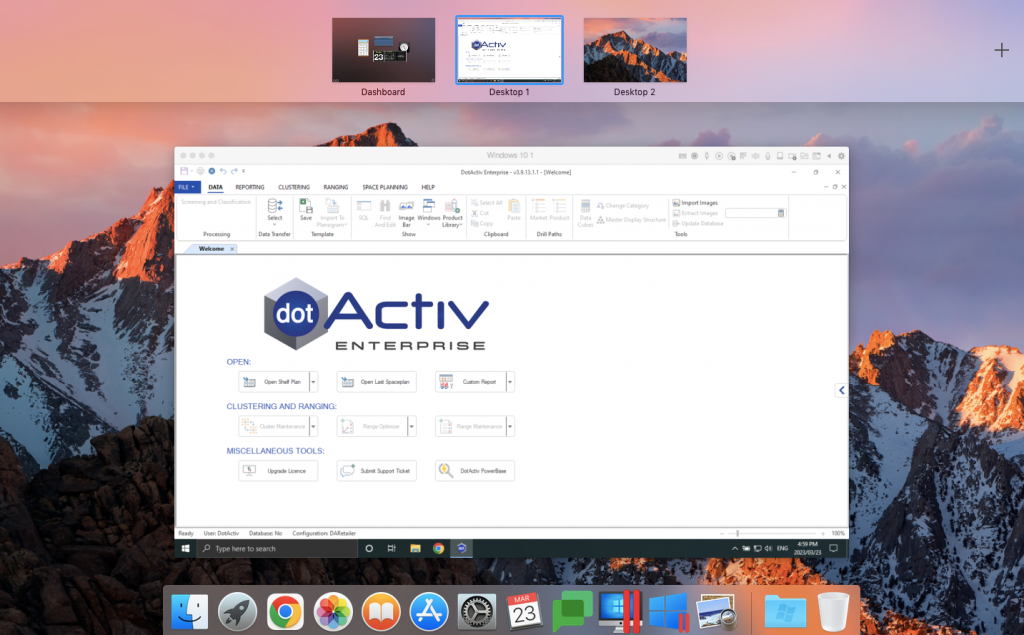
To navigate between windows, swipe up on the trackpad with three fingers to open Mission Control, which shows all the windows that you have open. Click on the window you want to access.
For example, in the below, we’d click on ‘Desktop 1’, which is our virtual machine that has Windows and DotActiv on. We currently use Parallels. To navigate back to your Mac, swipe up on the trackpad with three fingers to open Mission Control and choose the appropriate window – in this case, ‘Desktop 2’.
In order for the above steps to work accurately, you need to your VM open.