The purpose of this article is to explain how you can set up different schedule types in the Activ8 software. We also unpack how you can archive and edit schedules.
Sometimes you may want to set up a recurring schedule for store visits – whether it is for stock taking, evaluating store performance, inspections and so on. Alternatively, you may only need to set up a once-off schedule.
Activ8 makes it easy to set up either which in turn translates into tasks being created for specific users to complete store visits.
Setting Up A Store Visit Schedule (Store Visit Cycle)
After opening the Activ8 software, naviagte to the ‘Scheduling’ tab in the left-hand panel. From there, select ‘Schedules’ from the drop-down list.
In the ‘My Schedules’ window, click on the blue ‘+New Schedule’ button to begin creating your new schedule.
You’ll have two tabs that you need to fill out before saving your schedule:
- Event Details; and
- Schedule Details.
Event Details
First, choose the type of event from the drop-down list – ‘Create Visit Task’.
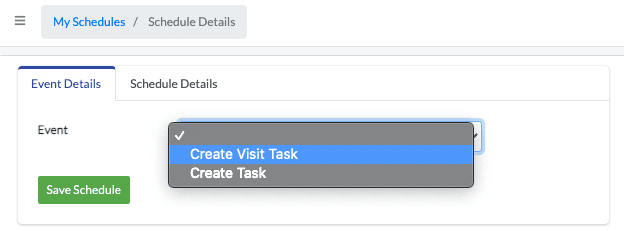
Choosing ‘Create Visit Task’ opens the below window where you need to fill in all the necessary details.
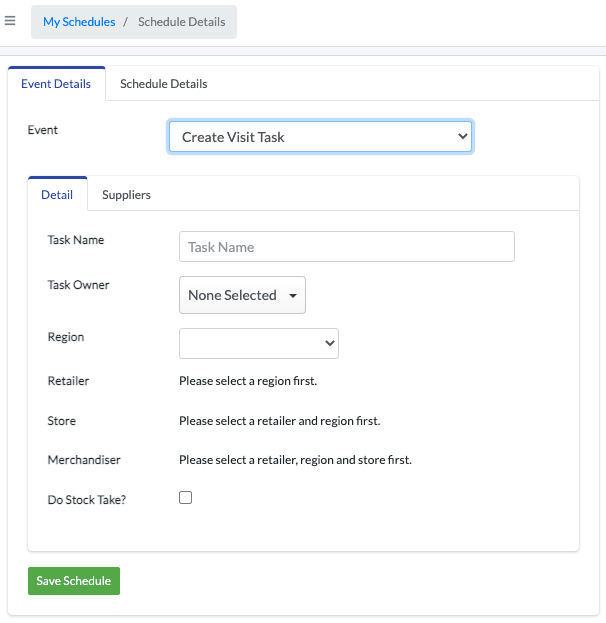
That includes adding a name for your task as well as an owner. Only after you select a retailer, you can select a region. Only once you’ve selected your retailer and region can you select your store.
Before selecting a designated merchandiser, you must select your region. If you want to include a stock take task in your schedule, ensure that you have ticked the box, ‘Do Stock Take?’
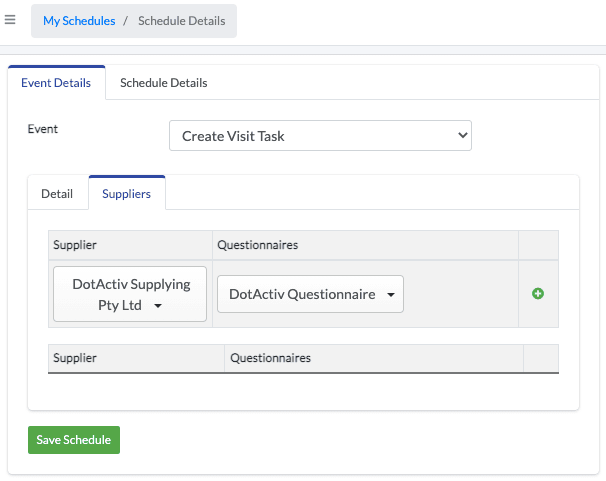
If you want to do add a questionnaire, navigate to the ‘Suppliers’ tab. Once there, select the supplier and questionnaire from the drop-down lists.
Schedule Details
Once you have added all your event details, you need to add the details of your schedule.
First, give your task a name. In the ‘Type’ field, select between ‘Recurring’ and ‘Once-Off’ from the drop-down list.
If you choose ‘Once-Off’, you’ll see the following window. Choose the date of the task and a time.
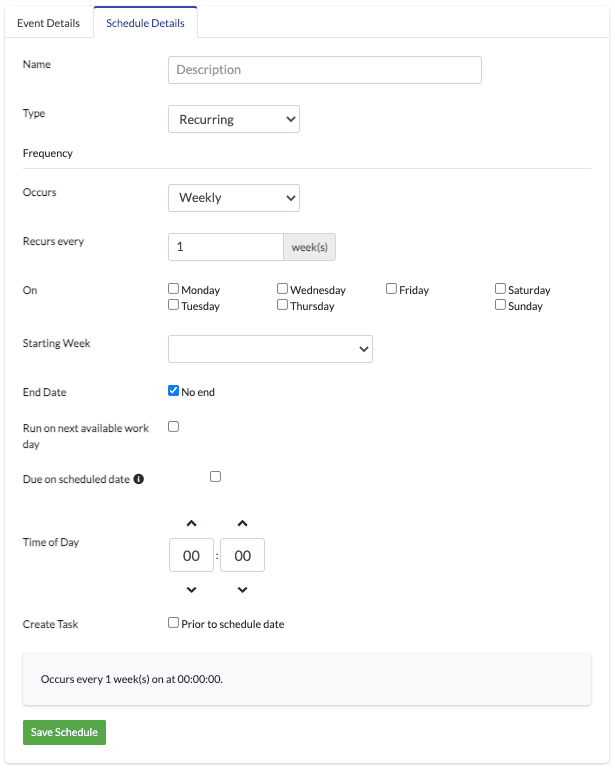
You can also create a task prior to the scheduled date. Selecting this option allows you to choose how far in advance you want to create a task.
Once you have added all the necessary details, click on ‘Save Schedule’.
Setting Up A Task Schedule (Repeat Tasks)
After opening the Activ8 software, navigate to the ‘Scheduling’ tab in the left-hand panel. From there, select ‘Schedules’ from the drop-down list.
In the ‘My Schedules’ window, click on the blue ‘+New Schedule’ button to begin creating your new schedule.
You’ll have two tabs that you need to fill out before saving your schedule:
- Event Details; and
- Schedule Details.
Event Details
First, select ‘Create Task’ from the drop-down menu, as seen in the image below.
As you would with a store visit schedule, fill in all the necessary information.
This includes adding a ‘Task Owner’, ‘Task Name’, ‘Description’, ‘Type’, ‘Assigned User’, ‘Observers’, ‘Company’ and ‘Estimated Hours’.
You can also choose to include a checklist in which you can assign different checklist items or ‘Activities’ to different users. You will find this under the ‘Checklist’ tab. Please see the image below.
Schedule Details
Once you have added all your event details, you need to add the details of your schedule.
First, give your schedule a name. This is the name that will be displayed under the list of your schedules and can thus be different from the task name. In the ‘Type’ field, select between ‘Recurring’ and ‘Once-Off’ from the drop-down list.
If you choose ‘Recurring’, you must also include how often you would like it to occur. You can choose to have the task occur ‘Daily’, ‘Weekly’, ‘Monthly’ or ‘End of Month’.
Selecting either of the options will also allow you to choose on which day of the week or which day of the month the task reoccurs. The day or date you select here will be the scheduled date and in other words, the date you wish the task to be completed.
Next, you can specify the start date and, if applicable, choose an end date for the schedule.
If you choose a task to recur ‘weekly’, ‘monthly’ or ‘end of month’, the starting date will be either ‘Starting Week’, or ‘Starting Month’.
You can choose to run the schedule on the next working day by ticking the box next to ‘Run on next available work day’. However, if the task is set to run on a specific day as the task must be completed on that day regardless of a public holiday or the person being on leave then you would leave that option unticked. Please see the image below.
Please note by ticking this box you can avoid scheduled tasks going overdue on public holidays.
You can also choose the time of day that the task should be created on the specified date.
Please note that in the case that the total hours estimated in the ‘Event Detail’ section is set to an amount that exceeds the total working hours available, the system will automatically adjust the schedule date once the task is created to ensure that there is enough time for the task to be completed.
If you have set your estimated hours within your ‘Event Details’ to exceed working hours, but you would like the task to still be due on the scheduled date, then you can do so by simply ticking the ‘Due on scheduled date’ box.
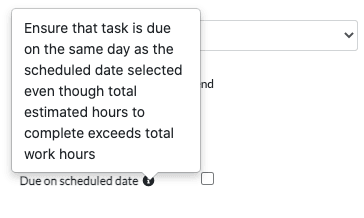
Lastly, you might want to have the task be created a day or so before the deadline date. You can choose to have the task generate hours, days, weeks or months prior to the scheduled date. This means that the task will be created hours, days, weeks, or months prior to the scheduled date that you have set above.

For example, if you have set your scheduled date to Friday, but you would like the task to be created on Monday, then you would set the task to be created 4 days prior to the scheduled date. The task will then be created on Monday, but it will only due on Friday as per your scheduled date.
Once you have added all the necessary details, click on ‘Save Schedule’.
A recurring task will now be created for the chosen assignee or merchandiser on the specific date you have chosen, and there is no need to create the same task multiple times.
Editing A Schedule
If you want to edit an already created store visit or task schedule, go to the ‘Scheduling’ tab in the left-hand panel and select ‘Schedules’ from the drop-down list.
Next, select the specific schedule that you’d like to edit. The same window will open as the one you used to create the schedule.
Once you have made all the necessary edits, click on ‘Save Schedule’.
Archiving A Schedule
If you want to archive a store visit or task schedule, go to the ‘Scheduling’ tab in the left-hand panel and select ‘Schedules’ from the drop-down list.
Next, in the ‘My Schedules’ window, locate the schedule you want to archive and click on the red trash bin icon next to it.
To archive, the schedule, click this icon. You will see a green pop-up bubble at the bottom right hand which confirms that the schedule has been archived.
Task Questionnaires vs Visit Questionnaires
Task Questionnaire
These are Questionnaires that can be added to normal tasks and assigned to one of the members of the task. This is just to provide certain feedback on the task itself. The above applies to both web and mobile applications.
To create a Task Questionnaire, navigate to the ‘Questionnaire’ tab.
Once this is done:
Step 1: Select ‘New Questionnaire’
Step 2: Enter applicable ‘Questionnaire Name’
Step 3: Enter ‘Questionnaire Description’
Step 4: Select ‘New Section’ – Please note, this step needs to be completed in order for the Questionnaire to be saved.
Step 5: Enter the ‘Question Name’.
Step 6: You will notice two tick boxes, namely ‘Required’ and ‘Grid’:
- You will select ‘Required’ if an answer to the question is needed, and
- ‘Grid’ if you would like the answer to be in a Grid format (If ‘Grid’ is selected, you would need to enter your preferred rows and columns)
Step 7: Select an appropriate ‘Question Type’.
Step 8: Repeat ‘Type’ ( By product, By Question, Number of times).
Step 9: Visibility
- This is based on the same principle as ‘Repeat Type’. i.e. The question will only be shown based on the previous question’s answer.
Step 10: Click on ‘Save Question’.
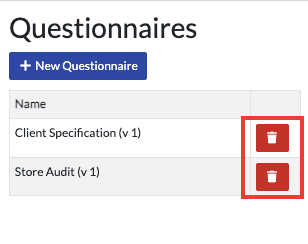
Please note if you wish to delete a Questionnaire, you will need to navigate to the desired Questionnaire and click ‘Archive Questionnaire’ by clicking on the red button highlighted in the screenshot below.
Visit Questionnaires
Visit Questionnaires can be set up as store visit tasks for merchandisers. These are assigned per supplier when creating a store visit, and the merchandiser assigned to the visit will need to complete each one accordingly. The above applies to mobile applications.
If you want to add a ‘Visit Questionnaire’:
Step 1: Navigate to the ‘Suppliers’ tab.
Step 2: Select the supplier and questionnaire from the drop-down lists as seen below.
