The purpose of this article is to provide you with steps on how to step up your ribbon or status bar to display your data while working in DotActiv.
When working on or presenting a planogram, it is always handy to see your data fields in the status bar. After setting this up, when you hover your mouse cursor over a product, you’ll see data fields like weekly movement or days of supply. This information will come in handy when determining the space you must give to each product.
What Is The Status Bar?
A ‘Status Bar’ can be defined as a horizontal bar, usually at the bottom of the screen or window, showing information about a document being edited or a program running.
Below, the status bar in DotActiv Enterprise can be seen at the bottom of the screen (the blue ribbon).
This ribbon can be set up, as explained below in more detail, to provide all sorts of information about products, fixtures, and the gondola in general. This assists greatly when presenting or producing a planogram.
When hovering over a product, valuable information including Days of Supply, Weekly Movement, Brand, Description, Size, and Unit of Measure and Barcode can be seen in the blue ribbon on the bottom of the screen.
See below an example of what the Status Bar looks like after it has been set up accordingly when hovering over a product.
Setting Up Your Status Bar
With DotActiv open, click on ‘File’, then ‘Setup’ and open the ‘Applications Settings’ found under the ‘Settings’ section.
The following window will appear:

Status Text
Select the ‘Status Text’ button in the ‘Applications Settings’ window. The following window will appear:

Select ‘Status Bar’ in the above window.

All new users need to remove and re-add the fact fields from the status bar to ensure that all fact fields populate correctly. For example, Days Of Supply will show as 100 until the fact field was removed and re-added.
Next, select the fields you wish to view in your status bar.
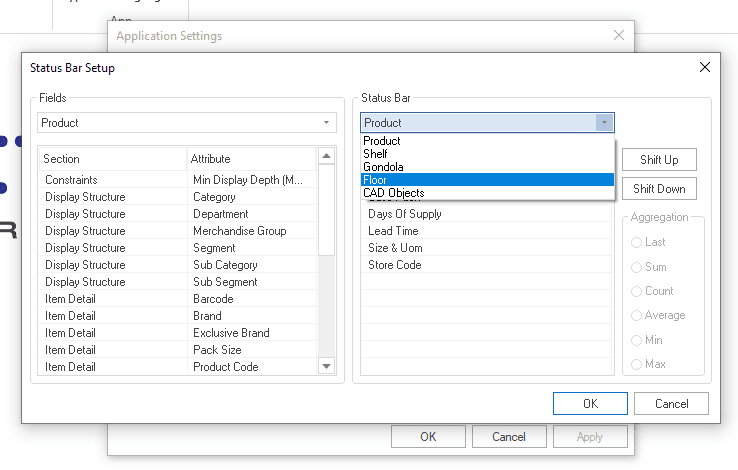
The above window – ‘Status Bar Setup’ – is where you can set up which data fields you wish to see displayed. On the right-hand side are all the fields that you can currently view in the status bar. On the left-hand side are all the fields that you can add to the status bar.
From the Status Bar drop-down menu, you can choose from different items in the software such as Shelf, Gondola, Floor and CAD Objects.

There are also different fields from which to choose, including Market, Product, Fact, Period, and Other.
To add any field to the status bar, double-click or drag that field from the left-hand side to the right-hand side. You can also change the order you wish to view the data. To do so, select the field and click on ‘Shift Up’ or ‘Shift Down’.
Once you have selected all the fields you wish to view, click on ‘OK’. You should now be able to view the data of any product by hovering your mouse cursor over it.
Should the above steps not work for you, please create a support ticket. DotActiv support will assist you in uncovering the issue.
