This article will provide you with a clear step-by-step process on how to create a support ticket within the DotActiv and Activ8 software.
Creating a Support Ticket in DotActiv
Step 1: Open the DotActiv application and navigate to the ‘Help’ tab.
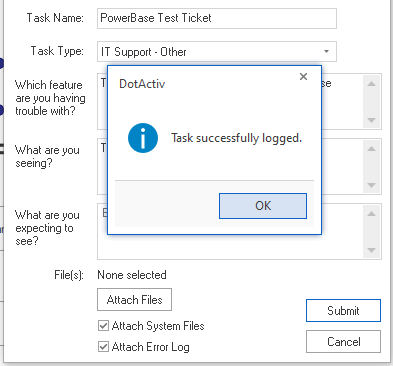
Step 2: Select ‘Create Ticket’ in the ribbon.
Step 3: A pop-up screen will appear asking you to fill in certain information. That includes:
- Task Name; and
- Task Type (Choose between IT Support – Other, Software – Bug, and Software – New Feature).
Please note that you will find a direct link to the PowerBase on the top of this window. The PowerBase is the official DotActiv knowledgebase where you can search for quick answers to specific questions you have to make the most out of DotActiv’s products and services.

You will also be asked three questions designed to help us understand the issue you face so that we can fix it as soon as possible. As seen in the image above, the questions include:
- Which feature are you having trouble with?
- What are you seeing?
- What are you expecting to see?
Please add as much relevant information as possible to your ticket to help our support team diagnose the issue quickly.
You can also attach any necessary files, including system files and an error log.

Once you have completed all the above steps and clicked on ‘Submit’, a support ticket will be logged and sent to one of our dedicated customer success consultants upon where further assistance will be provided.
Please note, that should you experience a .dll error, you can log a support ticket for our IT Support Team.
I Am Unable To Create A Support Ticket
DotActiv’s built-in ticket creation tool in our DotActiv software allows for easy accessibility and fault logging.
In the event that you are unable to log a ticket in the DotActiv software, please try one of the following steps:
- Restart your DotActiv software. You can do this by closing and re-opening your DotActiv software application in Microsoft Windows, or
- Do a complete restart of your computer or laptop.
If you are unable to log into the DotActiv software to log a support ticket, please log into Activ8 and create a support ticket from there. If you’ve forgotten your password, please use the ‘Forgot Password’ function.
Please note that logging a support ticket for DotActiv software related issues, should be done within the DotActiv software. Logging a ticket via Activ8 should only be used as a last resort, or when the problem is not related to the DotActiv software.
Creating Support Ticket on Activ8
Steps for Creating a Task on Activ8:
Step 1: Log into your Activ8 profile.
Step 2: Navigate to ‘New Task’ (This can be seen on the top right-hand corner of your dashboard).
You should see the following icon that we have highlighted in red below:

Step 3: Once you select ‘New Task’, a pop-up screen will appear where you will be required to fill in the necessary information. This will include both the ‘Detail’ tab as well as the ‘Checklist’ tab.
As seen in the GIF above, under the ‘Detail’ tab, you will be required to complete:
- Task Name
- Description
- Task Type
- Company
- Assigned User
- Observers
- Estimated Hours
- Complete By
- Urgency
- File(s)
Please note when seleting a task type, you must select one of the following headings related to the ticket being logged: IT Support Data, DotActiv Software, Hardware, Other Software Bug, Customer Success, New Feature.
This will automatically be assigned to IT support.
Step 4: Once you have completed all the necessary information, you can click ‘Save’. A new task will then be logged and sent to the assigned user(s) and observer(s) as per your request.
Please note if you have started filling in information for a new task, and would like to discard the task, you click on ‘New Task’.
