The purpose of this article is to help guide you on how to get started with adding tasks to your own projects within Activ8. Tasks will allow you to prioritise the order of events within your project. This article also includes how to create a dependency between tasks.
Creating Tasks
First, navigate to ‘Workflow’ in the left-hand panel. From the drop-down menu, select ‘Project Management’.
Create a new project or select an existing project from the ‘Active’, ‘Planning’ or ‘Template’ sections.
Now you can start creating tasks. To do this, navigate to the right-hand side of your screen and select the blue ‘New Task’ button.

You must fill in the following:
- Task Name (Limited to 50 characters);
- Description – insert a detailed description of the task;
- Type – select the most appropriate task type;
- Assigned User – select the user that will be assigned to this task;
- Observers – select the users who will be observing this task;
- Company – select the company that this task is linked to;
- Estimated Hours – select the estimated hours needed to complete this task (hours and minutes);
- Start Date – select the start date for this task;
- Complete By – select the deadline for this task;
- Milestone – select the milestones that this task may fall/be grouped under or leave it as ungrouped if this task is not part of a milestone; and
- File(s) – add any relevant files.
Adding Checklists
If you have a checklist that you would like to create or add, then you can select the ‘Checklist’ tab and create your checklist items. Alternatively, load the relevant checklist template.
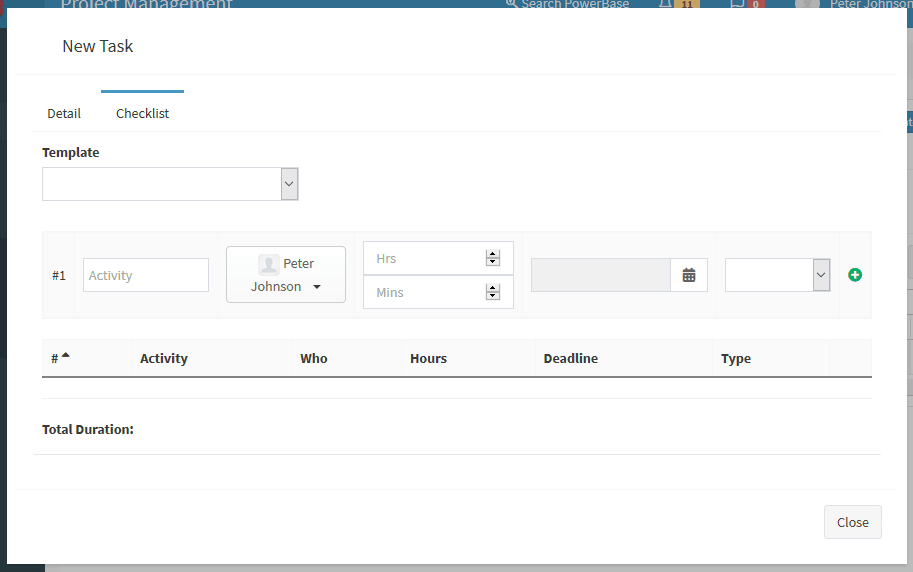
In the ‘Checklist’ tab, describe the activity/task required, the user who will be assigned this checklist item, the time required to complete this item, the deadline of this item, and the task type.
To add the line item, select the green plus at the end of the line and continue this until your checklist is complete.
To delete a line, select the red line next to the line item. You can also reorder these lines by using the up and down arrows next to the line item number.
How To Create A Dependency Between Tasks
Please note that tasks are linked on a project plan in order to show flow or to create a dependency.
Step 1: Once your tasks have been created, open the ‘Plan’ tab.

Step 2: Hover your mouse over the task you would like to create a link with, two white circles on both sides of the task will appear, as seen below.
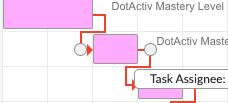
Step 3: Click, hold and drag the mouse to the task you are linking it with. A blue arrow will appear as seen below.

Step 4: Click on the blue arrow. The below options will appear. Click on the ‘Links’ icon to create dependency.

Once a dependency has been created, the arrow will turn red.

Please note the dependency can also be removed by clicking on remove dependency ‘Trash Can’ icon.
Once you are happy with your checklist, navigate back to the detail section of the task and select ‘Save’. Your task will now appear under the selected milestone, or at the end of your project if you have chosen to leave this task as ‘Ungrouped’.