The purpose of this article is to explain the procedure of viewing specific product data in DotActiv.
One of the easiest ways to find data on a product is by double-clicking on the relevant products and viewing the information in the ‘Product Properties’ pop-up window.
The problem happens when the data needed isn’t displayed in a field, or the field is not available for viewing.
Troubleshooting Missing Data
Let’s say your Product Description field is missing.
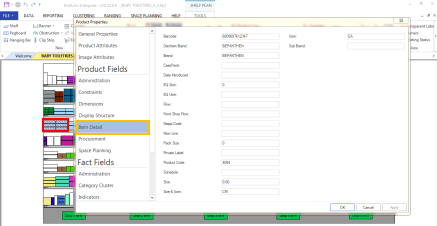
When you double-click on the relevant product to open the ‘Product Properties’ window and click on ‘Item Detail’, as seen below, there is no information in the product description.
Adding Missing Information
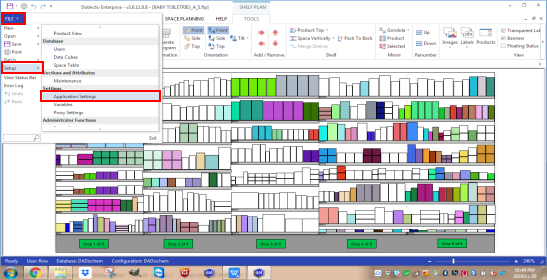
First, click on ‘File’ and then on ‘Setup’ and select ‘Application Settings’.
Next, open the ‘FLP Format’ settings in the ‘Administrator Settings’ section.
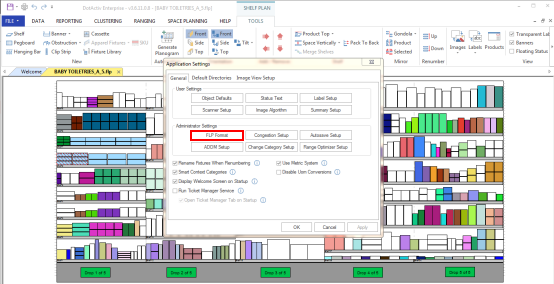
Please note that if you are a DotActiv Enterprise or Pro user and the FLP Format is disabled, you must contact the person in your company who has the authority to access and change these settings.
If you are a DotActiv Lite user, you should always have access to the ‘FLP Format’ icon.
As the product information is a product variable, you can choose ‘Product’ from the drop-down menu. Next, search for the relevant field – Product Description – in the available list.
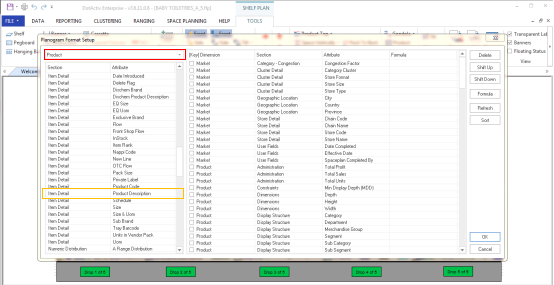
Double-click on the Product Description for it to appear in the right-hand section. This will link the field to the Product Properties pop-up window. It will also allow you to view the Product Descriptions when double-clicking on a product.
Scroll down and find the newly added field at the bottom of the right-hand section.
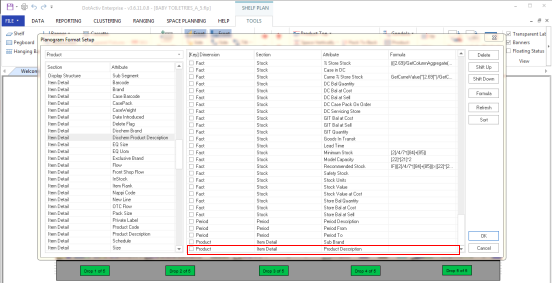
Next, drag the Product Description field to the rest of the ‘Item Details’ fields. You have to drag, stop, scroll the list up, and drag again. The position you drag it to, will be the position in which you view it in the ‘Item Detail’ information in the ‘Product Properties’ window.
For example, below, you can see we dragged it to display it above the ‘Brand Description’ as part of the ‘Item Detail’ section.
Click ‘OK’ and then ‘OK’ on the ‘Application Settings’ window.

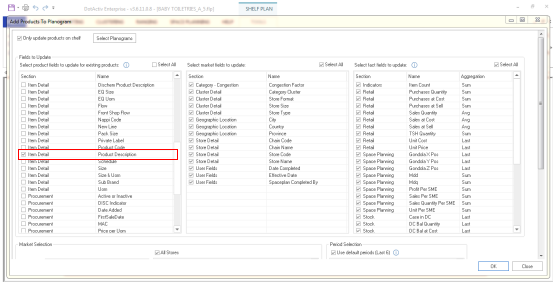
Next, you will need to update the planogram data from the database for the correct information to link to the newly added field. Click on the ‘Data’ tab, choose ‘Select’ and click on ‘Database To Shelf Plan’.

In the pop-up window that appears – Add Products To Planograms’ – tick the Product Description field in the ‘Fields To Update’. In the ‘Market’ selection, choose the relevant planogram data to use for the update.
Click ‘OK’.

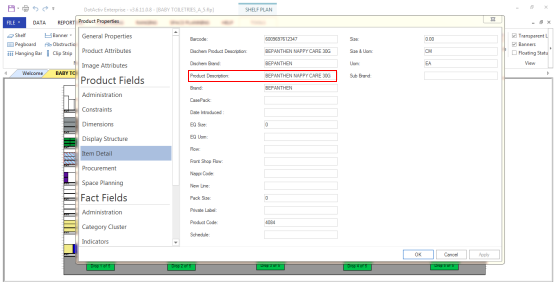
Once the planogram has been updated, you can double-click on the relevant product again to open the ‘Product Properties’ window. Click on ‘Item Detail’ and view your newly added product information.
Should the above steps not work for you, please create a support ticket. DotActiv support will assist you in uncovering the issue.
