The purpose of this article is to provide you with a step-by-step process to help you set up your general application settings within DotActiv’s software.
To find the ‘Application Settings’, click on ‘File’, scroll down to ‘Setup’ and from there select ‘Applications’ under the ‘Settings’ section.
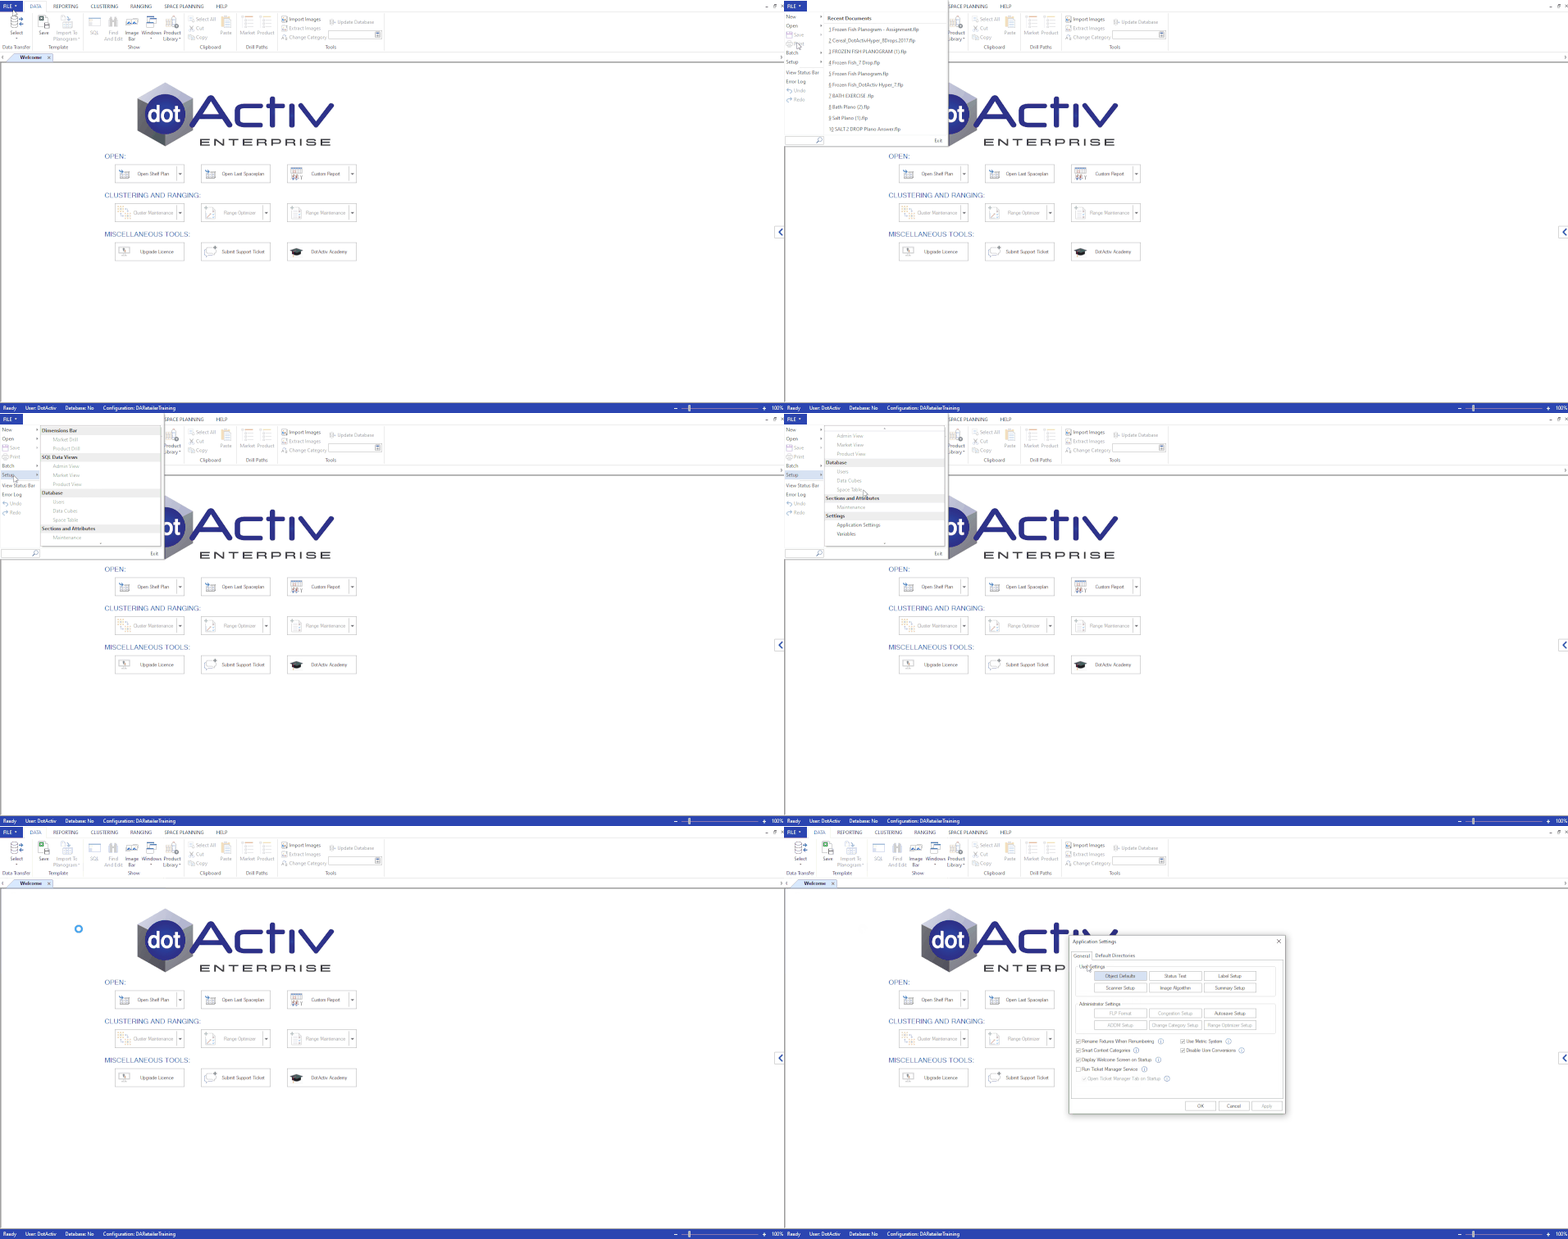
Administrator Settings
In this box, you will find the ‘Autosave Setup’, as highlighted in red below.
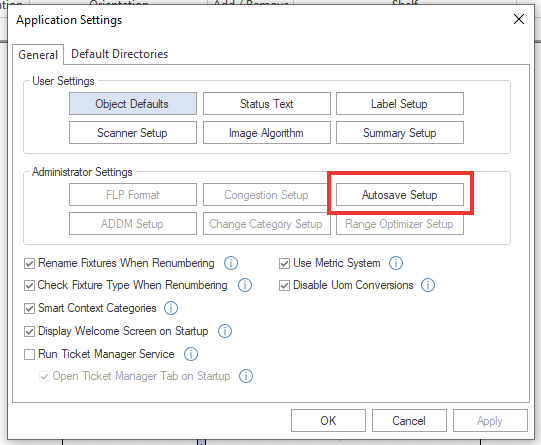
To set up the ‘AutoSave’ function for your device, you can click on the ‘AutoSave Setup’ button on the bottom right side and you will be presented with the screen below.
Each of these functions is set to the above by default. However, it can be altered as well.
- Save frequency (in minutes): This is basically a timer that you can set to autosave your current item of work after (or every) X minutes.
- Max number of autosaves: This is the maximum amount of temporary files the DotActiv application will store (which consist of your autosaved files), once it reaches the maximum number that you have set, it will start replacing the oldest one.
- Directory: This is where your autosaved files will be saved on your device.
- ‘Enabled’ tick box in the bottom left corner: Tick this to enable autosave or untick to disable autosave (Not recommended).
General Application Settings
Here you will find the following options:
- Rename Fixtures When Renumbering;
- Check Fixture Type When Renumbering (Beta);
- Smart Context Categories;
- Display Welcome Screen On Startup;
- Run Ticket Manager Service;
- Use Metric System; and
- Disable UOM Conversions.
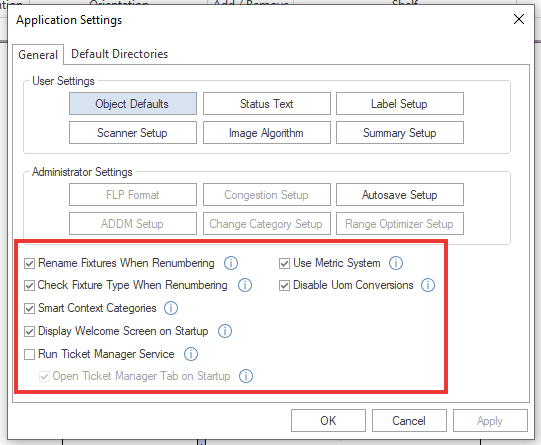
Rename Fixtures When Renumbering
If this is ticked, fixture labels will automatically include the fixture type and number when renumbering.
Check Fixture Type When Renumbering (Beta)
If you check the box next to Check Fixture Type When Renumbering (seen in the image below) each fixture type will have its own count. When unchecked, all fixtures will be included in a single count.
Read more about this feature here.
Smart Context Categories
If this is ticked the relevant ribbon car context category will automatically become active when moving between windows.
Display Welcome Screen On Startup
If this is ticked, the welcome screen will display each time you open the DotActiv edition.
Run Ticket Manager Service
If this selection is ticked, the ticket manager will run in the background to monitor open tickets and notifications. There is also another tic box that allows you to open the ticket manager in a new tab on startup.
Use Metric System
If this box is ticked, the system will use centimetres as the base of the Unit of Measure for positions and sizes as opposed to inches. By unticking this box, you will use the Imperial system.
Please be careful that changing this setting will affect imports and existing planograms.
Disable UOM Conversions
This displays any auto conversions of the display of size or positions value to a UOM other than the base centimetres or inches.
Image View Setup
Please note that this section is only applicable to the DotActiv Pro and Enterprise editions.
On the Application Settings, you will see the third tab labelled: “Image View Setup”
You must set up the image view in order to configure a product view to allow for the different sides of an image to be set up as a field for a product view.
When you first select the Image view setup tab, you will see this screen
Select either Product or Market in the drop-down menu. Depending on what you select will determine what fields you can use to create your image algorithm. The DotActiv standard is to use the barcode, so it is suggested that you ensure Product is selected here unless you have a special case in which a Market field is used.
To add a new image algorithm to the image view click the “Add” button. A pop up will appear requesting you to name the image view. DotActiv standards suggest that you name the view depending on what side of the product this image will be representing. For example, if you are looking to add an image that is for the front of a product you can name it “Front View”.
Once you have named the view and clicked “OK” the edit algorithm window will appear
This is where you will determine the algorithm that will pick up your images from your folder. In the right block, you will see a section called “File Functions”, this section lists the 3 different GetImageName functions that we offer: the suggested function for standard cases is the GetImageNameHH function. Please double-click on the function you will be using.
You can then navigate to the left block and here you will see all the Product fields (they will be market fields if you selected the Market value in the dimensions drop-down). DotActiv standard is to use the Barcode field under the Item Detail section for image algorithms, but if you use a different field then please select the correct field for you.
You will then need to manually type in the file extension. Please click in the editing box and ensure your cursor is set to type after the comma. You will then need to type a value from .1 to .6 in double-quotes. These values refer to the different sides of your images:
“.1” – Front View
“.2” – Side View
“.3” – Top View
“.4” – Tray Front View
“.5” – Tray Side View
“.6” – Tray Top View
In the screenshot above you will notice that we used “.1” for the front view. Once you are sure your algorithm is correct you can then click OK.
A third and final pop-up will appear and this is where you will select the directory where your images are situated on your computer. For example, if the images you will be using are under the default Image folder installed with DotActiv then you will need to navigate to/type this directory C:\DotActiv Data\Images
Once you are happy with the director, click OK. You will be redirected back to the Image View Setup page where you will see your newly added image algorithm. You will need to perform this process depending on how many different image views you have (Front, Side, Top, Tray views, etc)
When you have successfully created your image views, you can then navigate to a product view setup to add your images to the view.
FLP Format
If you would like to change the fields that are accessible on a planogram, navigate to the Application Settings window by clicking on ‘File’ > ‘Setup’ > ‘Application Setting’. In the Application Settings pop-up, you will be able to open the ‘FLP Format’ setting.

When you click on ‘FLP Format’ you will be greeted with the following window:
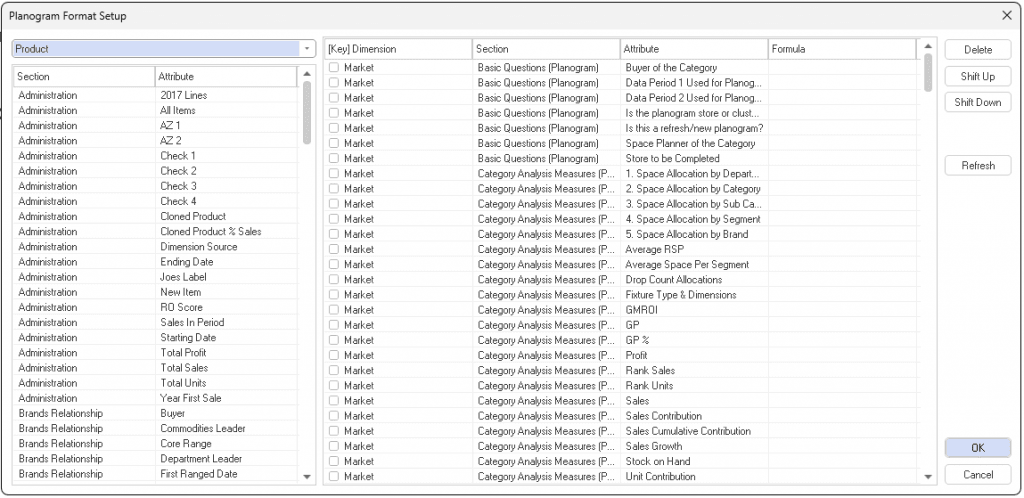
From here, on the left-hand side, all the possible attributes can be seen that can be added to your planogram. On the right, all the attributes that are already available in your planogram are indicated. If there are any fields that you would like to add to the planogram you can do so from the left by double-clicking on a field to add it.
For example, if you would like to add the “Roles & Strategies” section to your planogram, find the section under “Market” and double-click on all the attributes that form a part of that section. Then, confirm that everything has been added by locating the attributes on the right-hand side as can be seen below.
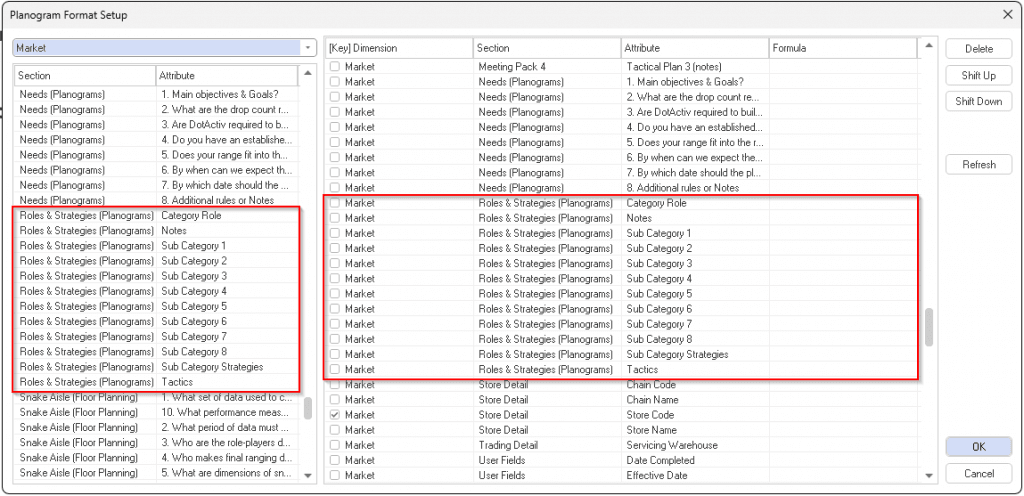
Once all the relevant attributes have been added, you can click ‘OK’. Then I can close out of the Application settings window. In order for the new changes to reflect in your FLP, close and re-open the DotActiv software window and your planogram. When you re-open your FLP, the ‘Map Fields’ window will appear. Select the ‘Dimension’ you edited, in this case, “Market”. Ensure that all the fields you have newly added are listed on the right. Once everything is confirmed, select ‘Convert’.

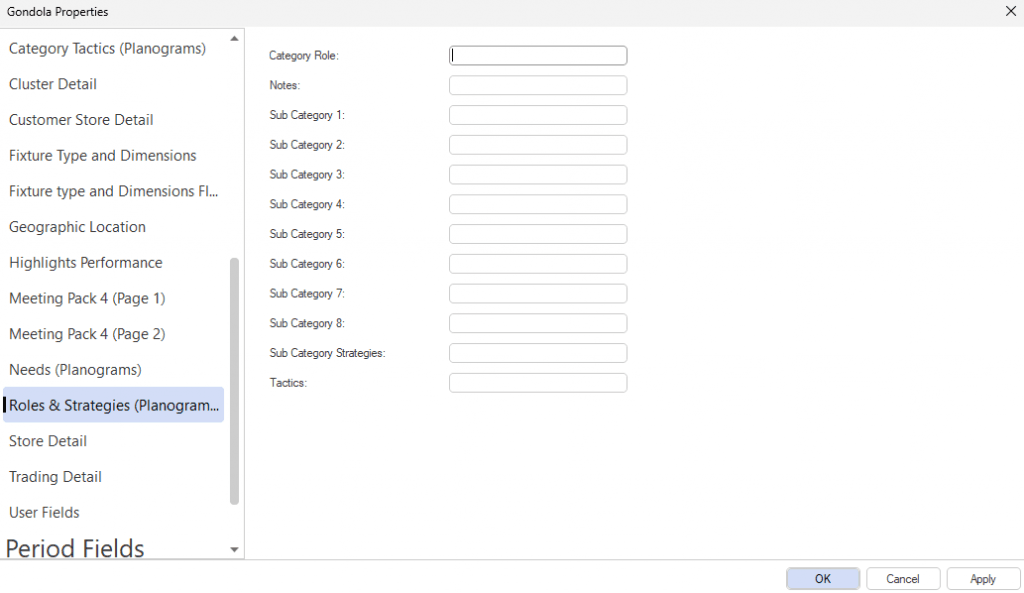
Double-click anywhere on the FLP and the new fields should be listed and available to edit. The new fields can now also be used in any reporting.
Should you require further assistance with the above settings, please create a ticket for support.
