This article will explain how to create fixtures in the DotActiv software. We will also explain what the fixtures are used for and how to add or copy each to a planogram.
Getting Started With Fixtures
In the DotActiv software, fixture selections can be found when you open a planogram. Please follow the following steps to find the fixture selections in your top drill:
1. After opening the DotActiv application, look for the Tools tab at the top of the window and click on it

2. After clicking on it, you will find the following terms on the left-hand side, which indicate all the fixtures you can choose from to add to your planogram:
- Shelf,
- Pegboard,
- Hanging Bar,
- Banner,
- Obstructions,
- Clip Strips, and
- Counter Units
Adding Shelves
Shelves are used to display products that can stand upright, lay down, or be backed lying on its side. Shelves can either be fixed or adjustable depending on the gondola fixture in the store. Shelves can also be made out of different materials such as wood, sleet, glass, and plastic.
Before adding any fixtures, you must have an existing planogram open or select a new gondola.
To do so, select the ‘Space Planning’ tab and then ‘New Gondola’ as seen in the GIF below.

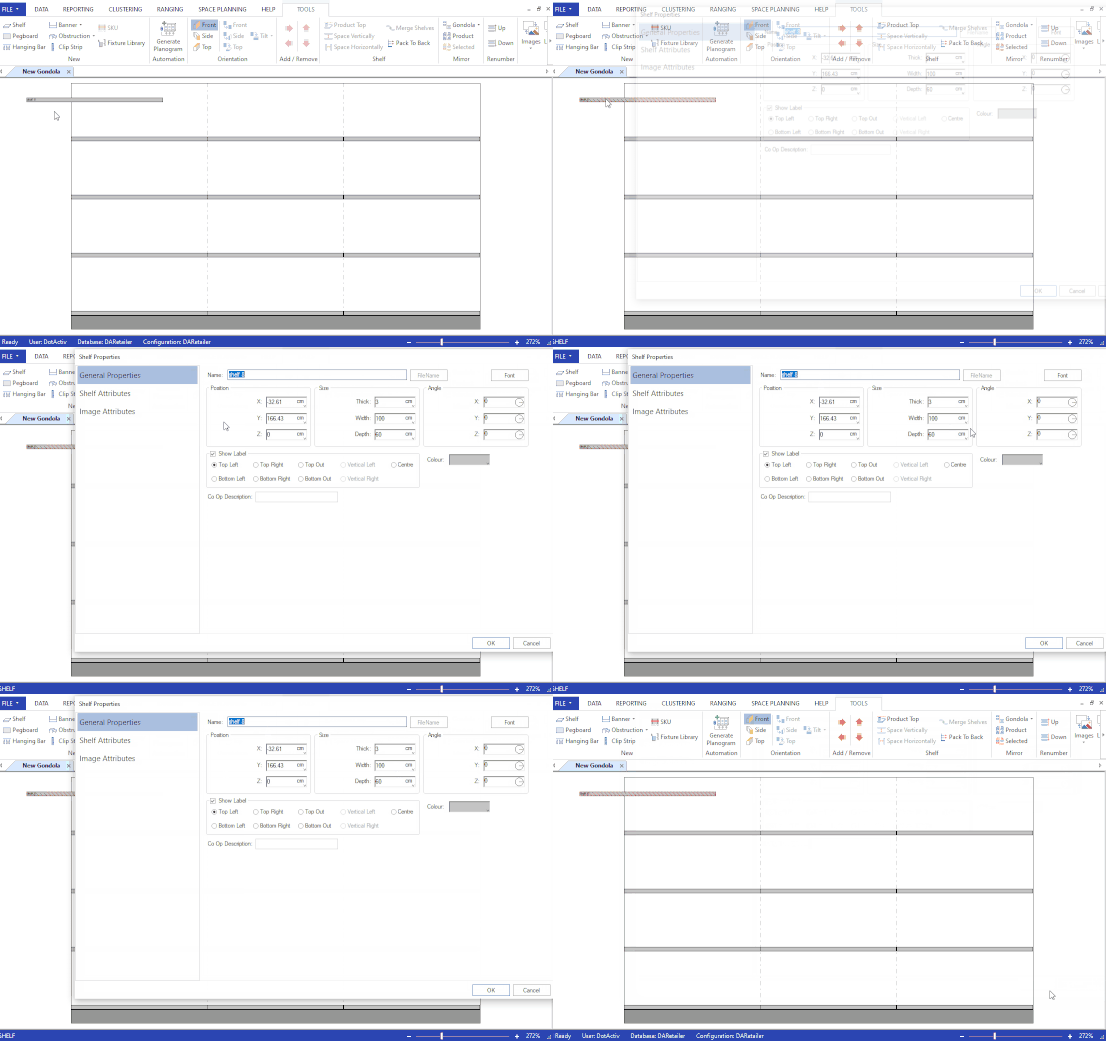
To add a shelf to the gondola, click on the ‘Shelf’ icon and click again anywhere on your gondola. A grey shelf appears where you have clicked as seen in the GIF below.

You can adjust the Height, Width, and Depth of your shelf to accommodate the gondola’s dimensions by double-clicking on the shelf and changing its dimensions in the size field.

You can also change the colour of the shelf by clicking on the arrow in the colour box and selecting the colour you wish to use.
Extra Fixtures With A Shelf
There are a few fixtures that can be added to a shelf.
Dividers
You can use dividers on a shelf to separate products or illustrate a product tray.
To add a divider, double-click on the shelf. On the left-hand side of the ‘Shelf Properties’ window, select ‘Shelf Attributes’.
In this window, you will see a block called ‘Dividers’. Here, you can change the Height, Width, Colour, and Spacing between each divider.

If changes have been made, click ‘Apply’ and ‘OK’ to save.
Shelf Grills
Shelf Grills are a metal mesh clipped onto the front part of a shelf to prevent small or flimsy products from falling off the shelf. The picture below illustrates how a Shelf Grill will look on the planogram.
Shelf Grills can also be personalised to create ‘baskets’ by adjusting the dimensions thereof.

To add a shelf grill, double-click on the shelf. On the left-hand side of the ‘Shelf Properties’ window, select ‘Shelf Attributes’.
In this window, you will see a block called ‘Shelf Grill’. Here, you can change the Height, and Colour of your grill.

If changes have been made, click ‘Apply’ and ‘OK’ to save.
Counter Units
Counter units are used in a similar manner as cassettes. They are box-like units used to display products neatly on a shelf or a counter. The user will be able to add and rearrange products in the counter unit via a top view.
The counter unit fixture can be found in the ‘Tools’ section when Space Planning. Double-click on the newly added counter unit fixture to open the Properties. Adjust the fixture dimensions as required.
The products that are to be displayed in the counter top fixture can be dragged and dropped into it.
To easily view the products in the counter unit, change the colour of the unit. Thereafter, you can view the gondola from the top. You can zoom out for a broader view of your gondola.
You will then be able to drag around the products to place them as desired. Ensure that the Counter Unit’s Attributes are set to move around products manually.
You can also add an image to the Counter Unit by linking it to the image directory on your PC.
Deleting Shelves
To delete a shelf or any other fixture on your gondola, you first need to click on the shelf or fixture that you would like to delete. By doing so, the shelf or fixture will be highlighted with red stripes.
Once you have selected the shelf or fixture that you want to delete, press and hold both ‘Shift’ and ‘Delete’ on your keyboard at the same time and the shelf will be deleted.
Alternatively, if you are using an Apple device, you can delete a shelf or fixture by clicking and holding ‘fn’ and ‘Delete’ at the same time.
Adding Pegboards
Pegboards are fixtures placed at the backing of the gondola and used to add pegs (a metal rod).
A pegboard is used to add products that can only be hung and cannot stand upright on a shelf.

To add a pegboard, click on the ‘Pegboard’ icon as shown above. Then click on the planogram. If you want to change the dimensions of the pegboard, double-click on it to open the ‘Pegboard Properties’ window.
To change this, double click on the pegboard, if you wish to change the size of the pegboard the dimensions can be changed in the ‘Size Block’.

If changes have been made, click ‘Apply’ and ‘OK’ to save.
If you wish to change the colour of the pegboard you can change it in the section that states Colour. Click on the down arrow and select the colour you wish to use.

If changes have been made, click ‘Apply’ and ‘OK’ to save.
If you want to change the placement of the Pegs on the Pegboard, you can do so by selecting the ‘Segment Tab’ in the ‘Pegboard Properties’ window as seen below.

Here you can also change the notches’ Spacing and the Segments as shown in the GIF below. If you wish to change the dimensions and lengths of your Pegs, you can do so by selecting ‘Pegboard Attributes’ on the left.
Please ensure that your gondola is facing the right direction when adding products to pegboards.
Creating A Slatwall Panel
A Slatwall panel is a slatted surface fixture that can be fixed to the wall from which shelves or hooks can be hung at varying heights to display merchandise.
To create a slate wall panel, select the Pegboard fixture and edit the segments as shown in the gif below.
Adding Hanging Bars
A Hanging Bar has the same function as a Pegboard. It is used to hang products that cannot stand upright on a shelf. The one exception is that a hanging bar is used to hang products in a straight line rather than to be placed on pegs in a random sequence.

To add a Hanging Bar, first, click on the icon in the ‘Tools’ tab, and then click on the gondola.
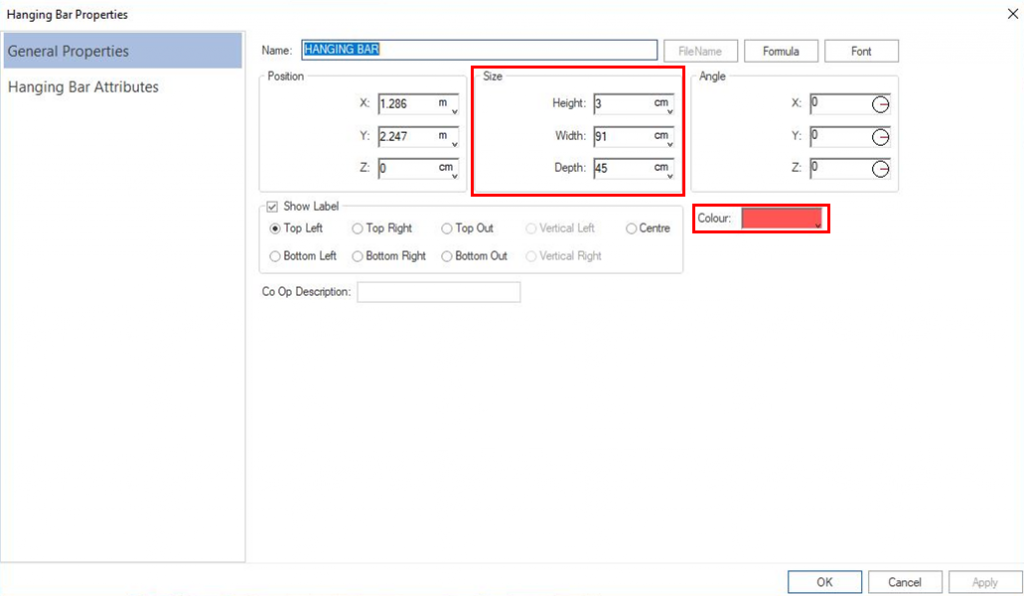
If you would like to change the dimensions of the Hanging Bar, double-click on it. Doing so opens the ‘Hanging Bar Properties’ window.

You can also change the dimensions of the Hanging Bar in the Size block within the ‘Hanging Bar Properties’ window, as seen above.
If you wish to change the Colour of the hanging bar, you can do that too by clicking on the arrow in the colour box.
If changes have been made, click ‘Apply’ and ‘OK’ to save.
Adding Banners
Banners can be used for all kinds of reasons. It is a handy tool to use when you want to include an object to the planogram, block some space out or add pictures that serve as lightboxes, display units, and so on.

To add a banner, click on the ‘Banner’ icon in the Tools tab. If you would like to drag your banner (already creating the size of the banner you would like) you can click on the arrow next to the ‘Banner’ icon and select ‘Drag for Size’.

If you would just like to create a Banner with an automated size setting, select the Banner icon and click anywhere on the gondola to create it.
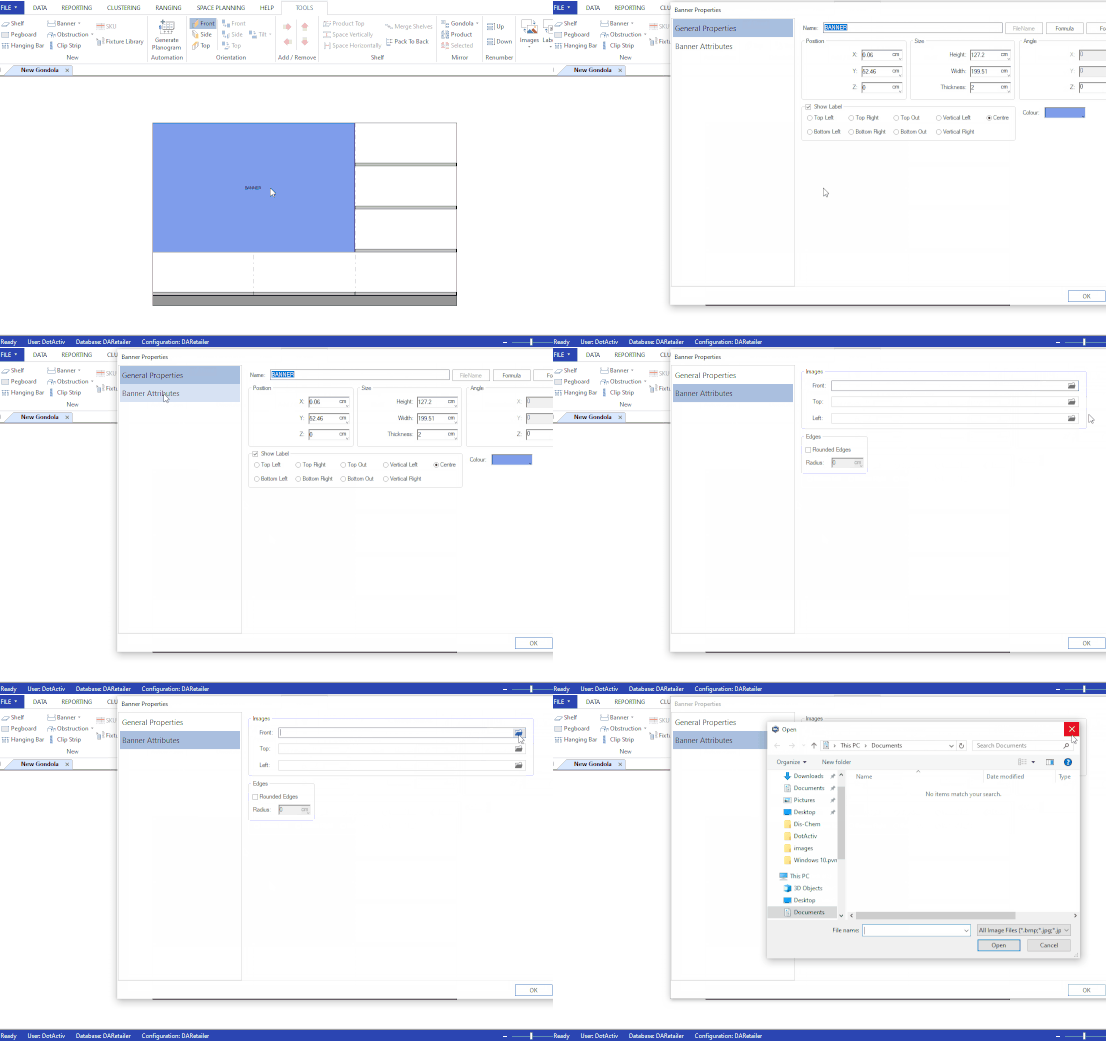
If you created an automated banner and want to change the dimensions, double-click on it and change the dimensions in the Size block on the ‘Banner Properties’ window. If changes have been made, press ‘Apply’ and ‘OK’ to save.
You can also add an image to your banner by double-clicking on the banner.
In the ‘Banner Properties’ window, select ‘Banner Attributes’. You can then browse for an image by clicking on the folder on the right side of each side you would like to add an image to.

Adding Obstructions
The Obstruction fixture can be used for unfamiliar objects that are found in the run where the planogram has to be implemented. This can be for Fire Extinguishers, Pillars, or any solid permanent fixture.

To add an Obstruction fixture, either click on the arrow pointing downwards and select ‘Drag for Size’ or create an automated ‘Obstruction’ by clicking on the icon.
To change the dimensions of the ‘Obstruction’, double-click on it and the ‘Obstruction Properties’ window will appear.

In this window, there is a block called Size where you can change the Dimensions of the Obstruction. You can also change its colour.
If changes have been made, click ‘Apply’ and ‘OK’ to save.
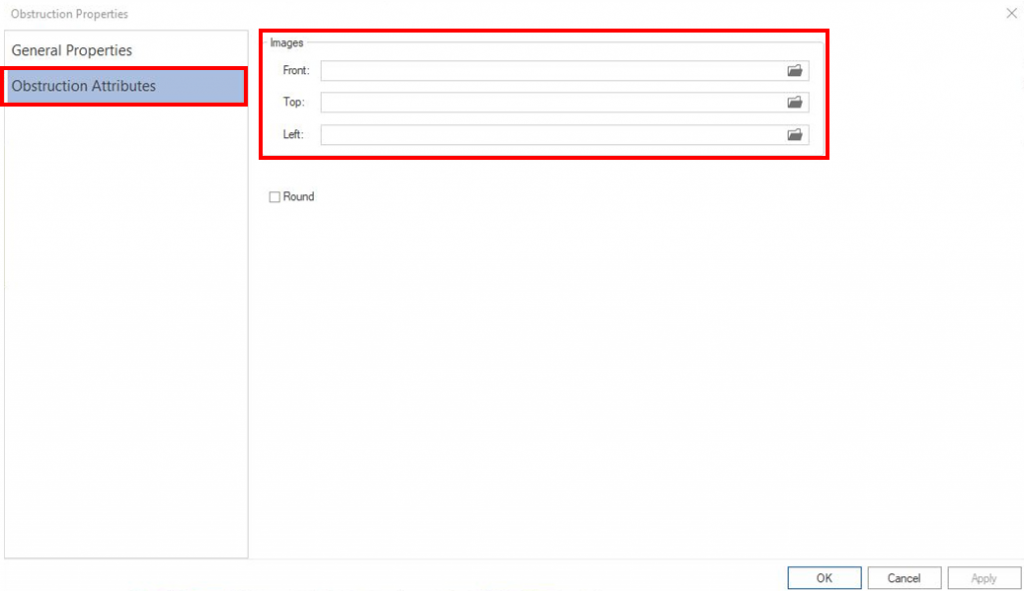
You can also add an image to the obstruction. To do so, select the ‘Obstruction Attributes’ tab on the right hand of the ‘Obstruction Properties’ window. To browse for an image, you would like to add to the obstruction you can click on the window folder and add the product.

If changes have been made, click ‘Apply’ and ‘OK’ to save.
Adding Clip Strips
Clip Strips are additional secondary fixtures you can add to the gondola to either cross-merchandise products to add value to the products on the planogram, or products that hang and cannot be merchandised on the shelf.

To add a clip strip to the gondola, click on Clip Strip in the new section in the Tools Bar. Once clicked, click again on a shelf.
Please note that you can only add a clip strip to a shelf.
After adding a clip strip to the shelf, you can change the dimensions by double-clicking on the product to open the ‘Clip Strip Properties’ window.

If you want to change the Hook’s Spacing, Depth, or Height, select ‘Clip Strip Attributes’ on the left-hand side of the ‘Clip Strip Properties’ window.

How To Copy A Fixture
Once you’ve added your new fixture, you can copy and paste these fixtures or objects via the right-click menu or shortcut keys.
You can do so by pressing the shortcut keys ‘Ctrl’ and ‘C’ at the same time to copy a selected fixture. Similarly, you can use the shortcut keys ‘Ctrl’ and ‘V’ to paste the fixture.
This can be accessed once a Fixture has been added to a new or existing gondola. Once the desired fixture has been added, you can proceed to ‘Copy’ and ‘Paste’ different fixtures on your gondola with ease.
Adding fixtures within the DotActiv software is easy and is a helpful tool to help you complete your planogram.
