This article will help guide you on the different ways in which you can upload product images to a planogram using the DotActiv software. We also unpack the possible issues that may occur.
Different Approaches To Uploading Images
There are three possible ways in which you can upload images to your planogram:
- Link image folders to the planogram based on an image algorithm,
- Drag and drop images from a file onto the product in the DotActiv software,
- Bulk import images, or
- Batch update / upload product images from the database.
Image Algorithm
After receiving the cropped and renamed images from the scanner, you can download and save them either in a folder on your (C:) Drive or in a shared network folder as depicted below.

The images are linked from one of these folders to the planogram based on an algorithm. Below are the steps that should be followed in order to upload images to a planogram.
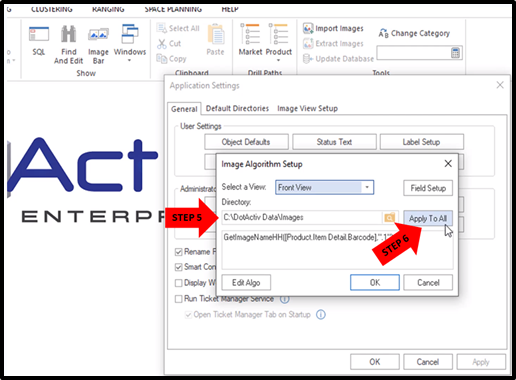
1. Go to ‘File’, then ‘Setup’, ‘Application Settings’, and lastly click on ‘Image Algorithm’, as seen below.

2. Select which file the image algorithm should link to in the directory option and click ‘Apply to All’ for it to use the same directory for all orientations (Front, Side, Top).
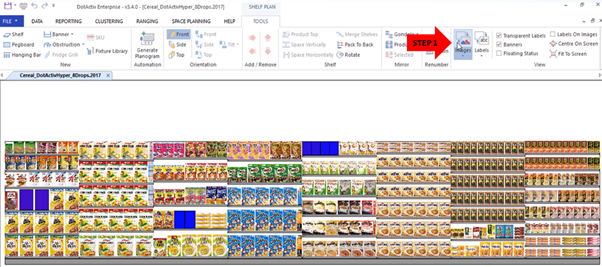
3. You can switch the images on by clicking the ‘Images’ icon in the Tools tab.

What To Check For If a Problem Occurs
Please find below a few things that you should double-check if your images are not uploading when using the image algorithm step.
Image Algorithm Not Linked To The Correct Folder
You can double-check this by determining where the DotActiv software is looking for your image file. Below are the steps that should be followed which will indicate the exact directory and file name that links the image to the product.
1. Double click on the product. A ‘Product Properties’ window will appear. Click on the ‘Image attributes’ tab in this window.
A green tick indicates there is a file found. A red cross shows there is no image for that particular product and orientation.

Incorrect Naming Convention
The naming convention of the images should be the Barcode and the number that identifies whether it is a Front, Side, or Top view.
- For a Front view of the product, the barcode will follow with a .1 (POINT 1)
- For a Side view of the product, the barcode will follow with a .2 (POINT 2)
- For a Top view of the product, the barcode will follow with a .3 (POINT 3)
Drag and Drop Images
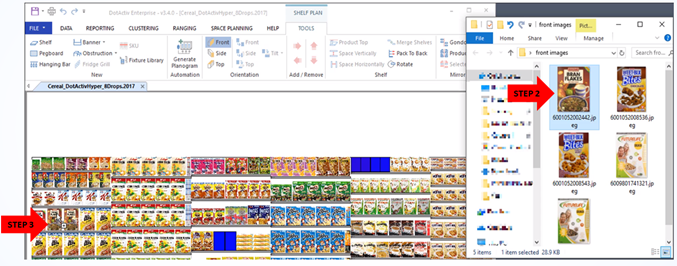
Another way of adding images to a planogram one by one is by dragging it from your desktop or any other folder and dropping it on the product in the DotActiv software.
It is advised to only follow this process if there are very few images to be added or if you would like to update old images that need to be replaced with new ones.
1. Switch your images on by clicking the ‘Images’ icon in the Tools tab.
2. Drag and drop the image from a folder on your device to a product in the DotActiv software.
What To Check If a Problem Occurs
Please find below a few things that you should double-check if your images are not uploading when using the dragging and dropping method.
Images Not Switched On
Images must be switched on for this function to work. Please refer to step one of the drag and drop method to confirm if you want to use this method.
Oops, I Added The Wrong Image
If you drag and dropped the wrong image to a product on your planogram, you can simply drag the correct image to the product and it will update and save the new image to that product.
Bulk Importing Images
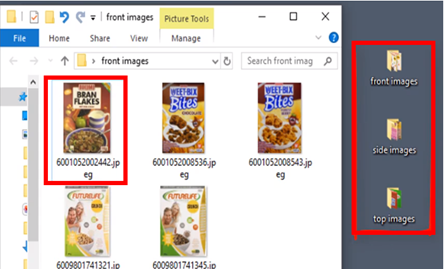
This method can be applied if your images are already saved as the Barcode name. If you use this method you need to ensure that the Front, Side, and Top images are saved in separate folders.
See below an example of this as well as the steps to follow.
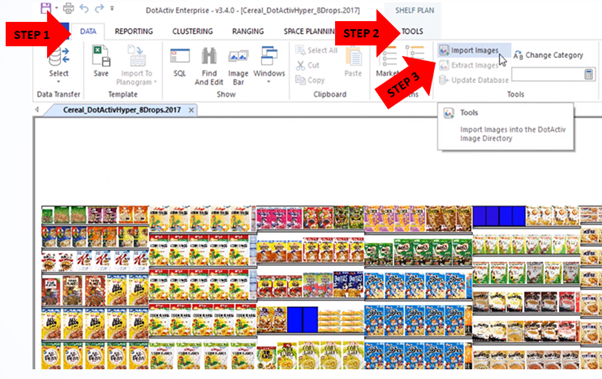
1. Go to the ‘Data’ tab in the DotActiv software, then ‘Tools’, and finally click on ‘Import Images’.
2. Select the source directory where the DotActiv software can find your saved images.

3. Select the file extensions of the images, as seen below.

4. Select the image type you’ll be importing, from the drop-down i.e. front orientation, as seen in the image below.
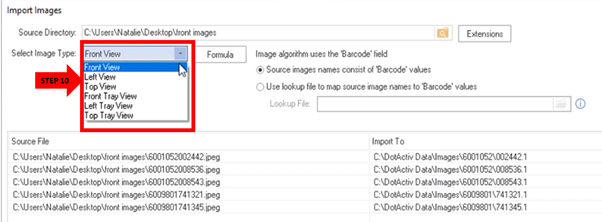
5. Select the directory to which the images should be saved to once it has been imported by clicking on the ‘Formula’ button, as seen in the image below.

6. Select how the DotActiv software can identify the image i.e. whether or not the image name is the barcode. If so, select the first option as indicated in the red square, and lastly click import.
Do not forget to complete the same steps for the Front, Side and Top Orientations.

What To Check If a Problem Occurs
Please find below a few things that you should double-check if your images are not uploading when using the bulk importing images.
Front, Side, and Top Views Not Imported
Please note that the above-listed steps should be repeated for all orientations. If you have done so, refresh the images by clicking on the refresh button found under the ‘Images’ icon.

Images can be uploaded by means of three different methods. Which you choose is entirely dependant on your business and its requirements. You can also learn how to format your product images in this article here.
Batch Update Product Database Images
The ‘Batch Update Product Database Images’ functionality is used for updating or uploading product images from your planogram to the database and downloading product images from the database to your local files.
How It Works
When you batch update product images from your planograms to the database, the images map to the corresponding product keys found on the database and the planogram.
Because the images map to the product keys, other users can download the images from the database to their planograms should they not have the images on their local computer.
Is the Batch Update Product Database Images functionality the same as the Batch Update Planogram Images functionality?
No, the Update Planogram Images functionality is used to upload an image of your planogram to the database for Storcomms and image recognition purposes only.
How To Batch Update Product Database Images
Step 1: Open the ‘Database Product Images Update’ window.
Navigate to ‘File’ in the top left corner of the screen and click on the drop-down.

Then, hover over ‘Batch’ and click on ‘Update Product Database Images.

Step 2: Select your target and overwrite option.
To select the target location click on the ‘Target’ drop-down. If you would like to update images on the database, select ‘Database’. If you would like to update images on your planogram, select ‘Local Files’.

To select the overwrite option click on the ‘Overwrite Option’ drop-down. If your planogram has many outdated product images and you would like to overwrite all existing product images, select ‘Overwrite Existing’. If you are missing only a few product images and you would only like to update images for those specific products, select ‘Keep Existing’.

Step 3: Select the planograms to use for the upload / update.
There are three ways that you can select the planograms to use for the upload / update.
If you have the relevant planograms open, tick the ‘Use Open Planograms’ box.

If you have specific planograms that you would like to use, select ‘Add Files’ and manually select the files you would like to use.

If you have a folder that has all relevant planograms, select ‘Add Directory’. Should you wish to remove a file again, highlight the file by selecting it and clicking on ‘Remove Files’.

Please note: You can use multiple of the aforementioned options to upload numerous planograms.
Once you are done with your selection, click ‘OK’. You should receive a message that the update has been completed.
Product Image Auto Sync
The ‘Product Image Auto Sync’ permission triggers in the background every time you open a planogram and is self-maintaining.
If you would like to auto sync product images to the database every time a planogram is opened, ensure you have the permissions ticked for your user.
To check whether this permission is ticked navigate to ‘File’ and hover over ‘Setup’. Then, Click on ‘Users’ and open your user profile by double clicking on your name. Scroll down until you see ‘Product Image Auto Sync’.

Please note: If you are unable to access ‘Users’, please ask the Admin User to assist in giving you the necessary permissions.
Should none of the above steps work for you, you can read more about the common issues faced regarding product images in the DotActiv software and what to do if they are not working.