This article will help guide you on how to add new users or delete existing users in Activ8 software.
Adding A New User
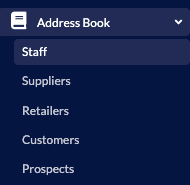
After opening Activ8, navigate to the ‘Address Book’ tab in the left-hand panel and select ‘Staff’.

In the ‘Staff’ window, click on the ‘Add Staff Member’ button to begin adding a new user.

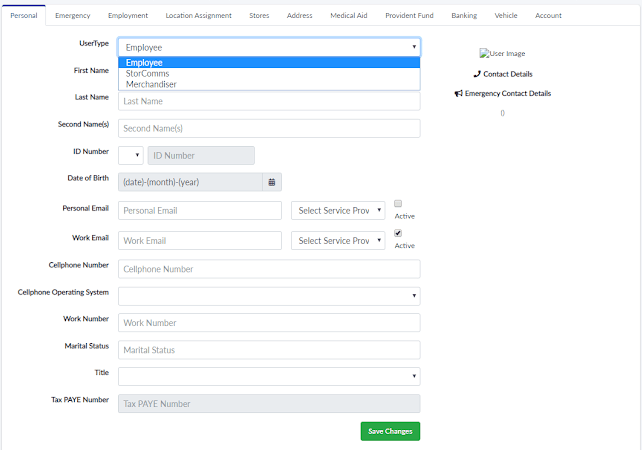
Various tabs and options can be chosen and populated to the new users profile. Under the personal tab, the first option is to select the user type. There are three types or users: Employee, Store Communications and Merchandiser, each of which has different uses and fields which have to be completed for the user to be saved.

Employee
This user type is used when a new Activ8 user is created which will be a contributor to documents, floor plans and planograms. The tabs and fields which must be completed for this user includes:
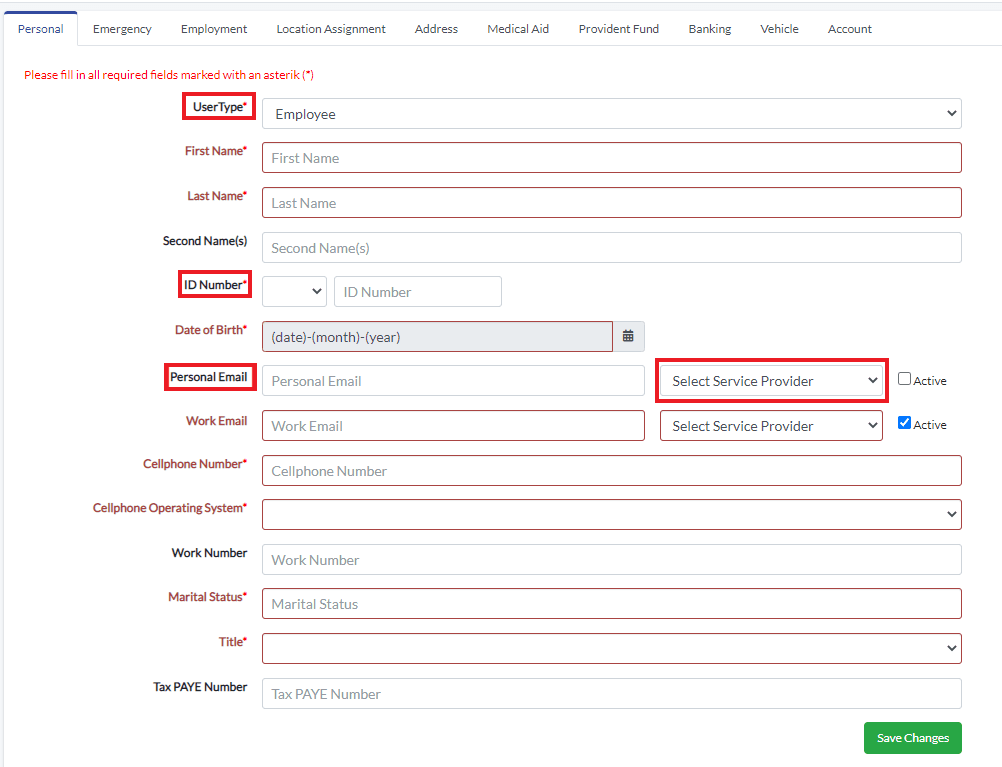
- Personal (Personal details of the user): User Type, First Name; Last Name; ID Number, Date of Birth; Personal and Work Email; Email Service Provider; Cellphone Number; Cellphone Operating System, Marital Status and Title.
- Emergency (Contact person and details of the users next of kin or emergency contact person): Contact Name; Contact Number; Contact Relationship.
- Employment (user employment type and working location): Job Title; Department; Region; Date of Employment; Working Hours (remember to select ‘Insert’), Assigned Companies and Based At (your location must have a ‘Based At’ ticked in order to allow this option from the drop-down menu).
- Address (user’s physical residential address): Complex / Building Details; Residential Address (start typing the address and then select the correct address from the drop-down menu).
- Account (the user’s access to Activ8’s functions): Username (Usernames can not be edited); Roles (roles include basic user, HR Administrator, line manager etc.) You will need to add the relevant Roles that this user will be able to access.
Please note that the fields listed below are not required fields. Only Personal, Emergency, Employment, Address and Account fields are required to be filled in.
- Location Assignment (working locations and site offices): Working locations are set as rules to allow a user to check into these locations.
- Stores (locations and sites which are linked to the new user e.g. if the new user is assigned to a retailer, all retail stores will be listed): Linking a specific store to a specific user.
- Medical aid (user’s medical aid details): These fields do not have to be completed to save the user and can be completed by the user at a later stage if they wish to do so.
- Provident Fund (user’s provident fund details): These fields do not have to be completed to save the user and can be completed by the user at a later stage if they wish to do so.
- Banking Details (account details for monthly remuneration): These fields do not have to be completed to save the user and must be completed by the user when they first log onto Activ8.
- Vehicle (user’s vehicle which they use as transportation to and from work): These fields do not have to be completed to save the user and can be completed by the user at a later stage if they wish to do so.

Select ‘Save Changes’ and the following message will only appear if everything has been added correctly:

Once all these have been completed and the changes saved, the new user will receive an email link to Activ8 which contains their username and allows them to set their password.
Merchandiser
The tabs for a merchandiser are the same as for an Employee but the fields which are compulsory to save the profile differ:
- Personal (Personal details of the user): First Name; Last Name; Date of Birth; Work Email; Service Provider; Cellphone Number; Cellphone Operating System.
- Employment (user employment type and working location): Working Hours and Based At.
- Account (the user’s username and roles can be given – roles include basic user, HR Administrator, line manager etc.): Username (Usernames can’t be edited) ; Roles
Please note that the fields listed below are not required fields. Only Personal, Employment and Account fields are required to be filled in.
- Location Assignment (working locations and site offices): Working locations are set as rules to allow a user to check into these locations.
- Stores (locations and sites which are linked to the new user e.g. if the new user is assigned to a retailer, all retail stores will be listed): Linking a specific store to a specific user.
All other fields and tabs can be completed by the user at their own discretion.
Store Communications
Here only 3 tabs are visible. The user type can be used for basic store communications users which will not contribute but only access the data which has been allocated to them.
Tabs and fields which are compulsory are:
- Personal (Personal details of the user): First Name; Last Name; Work Email; Service Provider.
- Stores (locations and sites which are linked to the new user e.g. if the new user is assigned to a retailer, all retail stores will be listed): Linking a specific store to a specific user.
Please note that Stores is not a required field. However, it is needed to view the retail stores planograms.
- Account (the user’s username and roles can be given – roles include basic user, HR Administrator, line manager etc.): Username (Usernames cannot be edited); Roles
Once all these have been completed and the changes saved, the new user will receive an email link to Activ8 which contains their username and allows them to set their password.
Fill in the required fields accurately of the new user with the necessary information. After clicking on ‘Save Changes’, if a required field is empty, it will be highlighted in red.
Click on ‘Save Changes’ to create your new user.
If you want to set up a specific role for your new user, you can read how to do that in this article.
Deleting A User
After opening Activ8, navigate to the ‘Address Book’ tab in the left-hand panel and select ‘Staff’.
In the ‘Staff’ window, you will find a list of the current users. Click on the user you would like to delete to open their profile. Once the profile has been opened, click on the ‘Employment’ tab.
Enter a termination date within the ‘Termination Date’ field.
Click on ‘Save Changes’. A new window will pop up. Fill in the required fields accurately and click on ‘Save’.
The user will be automatically archived once the termination date is reached. Should you need to reinstate the staff member, the termination date can be cleared.
Should the above steps not work for you, please create a support ticket. DotActiv support will assist you in uncovering the issue.
