The purpose of this article is to explain how you can create a planogram by using the Generate Planogram tool found in the DotActiv software.
Generate Planogram allows you to auto-generate a planogram through set criteria and specified products. It gives you a good idea of how much space each sub-category, brand or segment needs to perform optimally. Sustainability has now been included as a key factor, ensuring that the layout not only meets performance criteria but also aligns with sustainable product selections. This integration helps retailers optimize shelf space while promoting economic, social, and environmental sustainability, thereby reducing their carbon footprint.
Setting Up Your Planogram
To begin, click on the ‘Space Planning’ tab and select ‘New Gondola’ and choose your specifications.

After selecting the appropriate specifications, save your planogram with the correct naming convention to the desired folder. Always ensure that all naming conventions are exactly the same down to the last letter. Any reporting, importing or pulling of data is very sensitive to this. The slightest change to the name of either the planogram, category on the floorplan or in the classifications could cause the data to pull through incorrectly. Also, check for any spacing between letters or words. We recommend using the following naming convention – CATEGORY_CLUSTER_NOD.
Next, import your prepared data into the planogram you created. It is important to ensure that whatever criteria you use to merchandise your planogram (category, brand, segment, size etc. ) is complete and correctly filled out in the CSV since that is what the Generate Planogram feature will use to build your planogram.
Continue to import your data by clicking on the ‘Data’ and then ‘Select’ in the ‘Data Transfer’ section. From here, you can choose to import CSV to Shelf Plan, CSV to Database, Database to Shelf Plan or Shelf Plan to Database. Or, simply drag your CSV onto the planogram, make sure all of the information is correctly mapped, and select the ‘Import’ option.

If all of the products on your product report will be used on the planogram,
select the ‘Generate Planogram’ icon in the ‘Automation’ section under the ‘Tools’ tab.

If only certain products should be used, drag the specific products onto a floating shelf next to the planogram, and then continue to select the ‘Generate Planogram’ icon.
The products will display on a floating shelf as seen below.
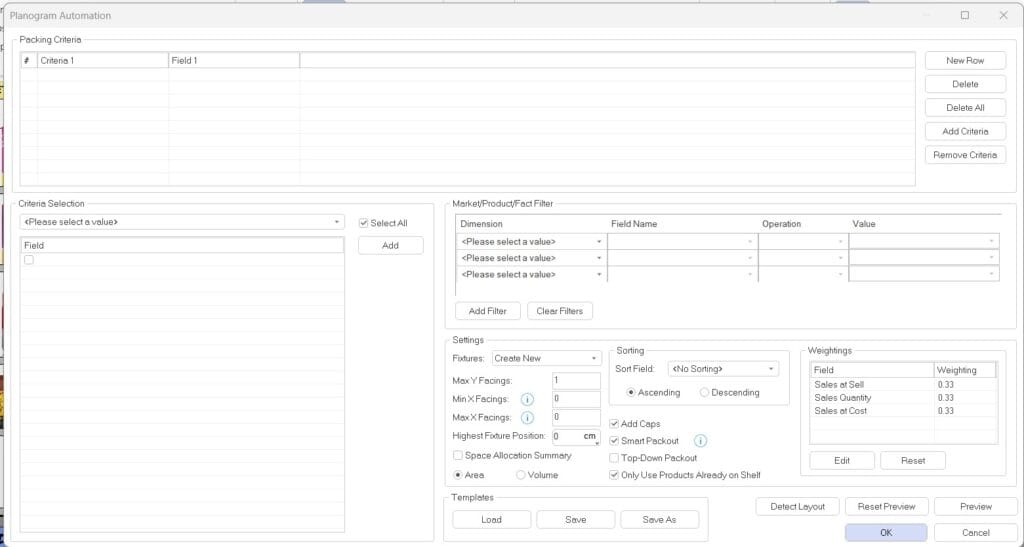
The Generate Planogram window pops up where you can begin adding in all the specifics to create your desired planogram, as seen in the image below.

Packing Criteria
First, you need to choose your ‘Packing Criteria’.
This is the first specification of how your products will be merchandised on the planogram. For example, if I select ‘Subcategory’ as Criteria 1 and ‘Brand’ as Criteria 2, products will be placed on the gondola according to their specific subcategories first, and then according to their various brands.
As seen in the image below, the packing criteria are a preview of your merchandising flow. You can select the criteria that you want to pack by and allocate fields to the criteria.
Select the criteria in the ‘Criteria Selection’ section as shown below. When clicking on the drop-down, you will find a list of fields by which you can pack.
For this example, we’ve chosen the first pack by Sub-Category.
After selecting the specific criteria, you will see the various fields that you can select. Tick the box next to the fields you’d like to use and then click ‘Add’. You can also select the ‘Select All’ box to make selection easier. Only selected fields are added to the planogram.
Once done, you can see the populated ‘Packing Criteria’.
Please note that we have introduced new criterion selection fields in line with our sustainability initiative. These include options such as Compostable/ Biodegradable, Imported, Is Refill, Locally Produced, Made Using Recycled Material, Organic-Certified, Overpackaging %, Plastic Grade, Recyclable, Recycled Materials %, Reusable, Unethical Production, Unethical Production Detail, and Vegan.
On the right-hand side of ‘Packing Criteria’, you can select a ‘New Row’, ‘Delete’, ‘Delete All’, ‘Add Criteria’ as well as ‘Remove Criteria’.
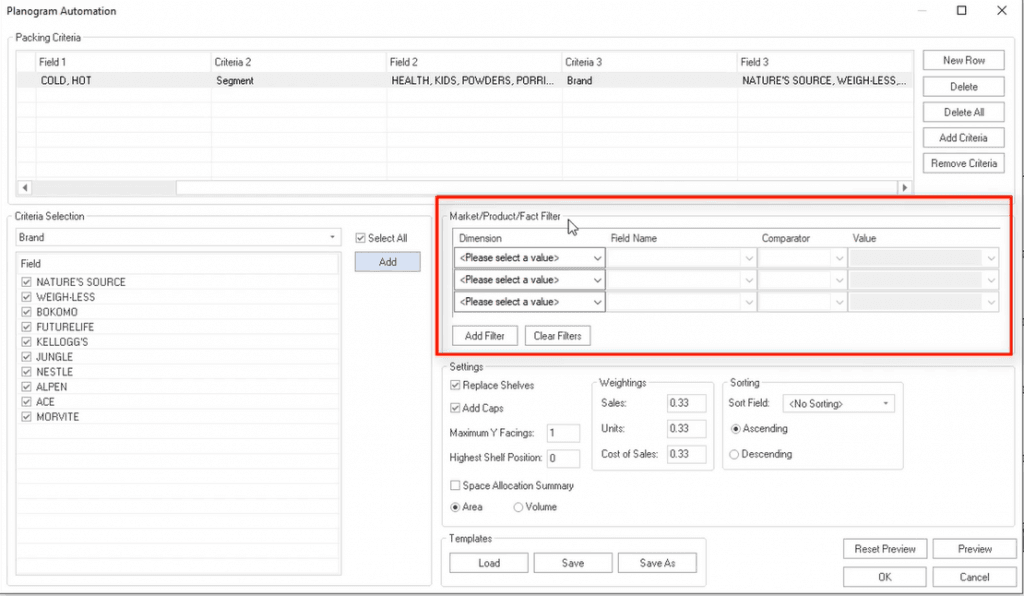
By adding a new row, you will add a new flow of products to which you can allocate space. By adding new criteria, you will be adding a secondary flow to the ones you have already created as you can see in the image below.
Selecting Your Settings
Once the desired packing criteria is complete, you can move onto the Market/Product/Fact filters. In this section, you can add filters to the planogram.
These filters can include or exclude data depending on your selection.

Here’s an example of how you would set up a filter:

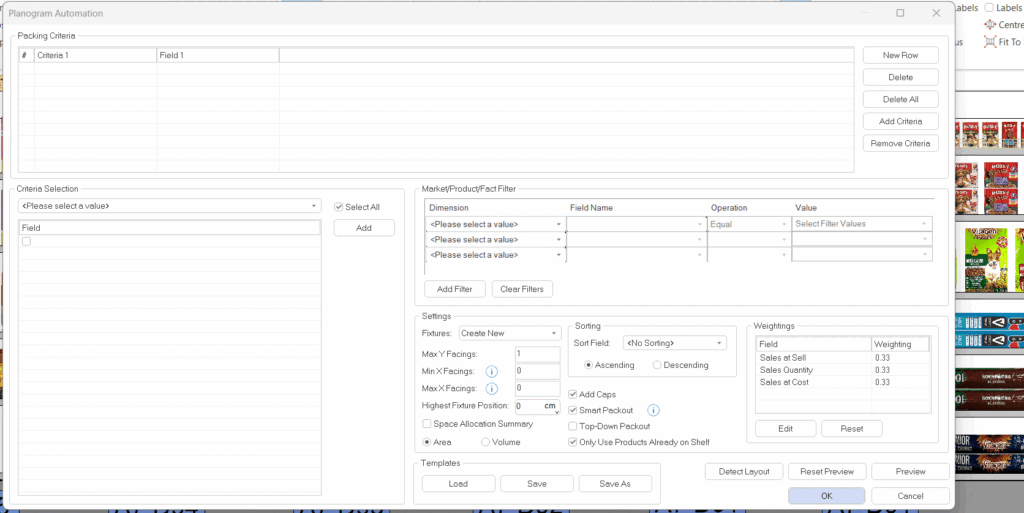
Moving on to the ‘Settings’ section, you will see that there are various options available to you. These include:
- Fixtures: With this setting, you can either choose to use your existing fixtures or for DotActiv’s software to create a new fixture. In order for Generate Planogram to work properly, select ‘Create New Fixture’ – this will ensure that the program adds new shelves to the planogram when more space is needed to pack the products.In the case where you have already created the specific fixture that should be used make sure to select the ‘Use Existing (Fixed)’ option.
- Add Caps: This setting dictates whether or not the automation process can add caps to the products on your shelf. You can set a ‘Maximum Y Facings’ and ‘Highest Shelf Position.
- Space Allocation Summary: When selected, this will give you a summary of how you allocated space on your gondola. Within the summary, you can view the data by area or by volume.
Please note that the Space Allocation Summary only displays after the automation process is complete.
- Weightings: These allow you to specify how you’d like to apportion space. In short, would you like your main packing criteria to be Sales, Units or Cost of Sales?
- Sorting: You can use this to sort the products at the lowest level of your criteria. You can select a sort by ‘Ascending’ or ‘Descending’ order.
For the above example, we selected Size & UOM and chose to sort in Ascending order (Smallest to Largest).
Once all has been set, you can click on ‘Save’ to save it as a template and it will be saved as a DPA file.
Next time, you will be able to simply drag this template onto the planogram, and it will give you all of the configurations you’ve just set up. You can also load the saved template if you want to work on it in the future. You can also make changes to a template after opening or loading it.
Detect Layout
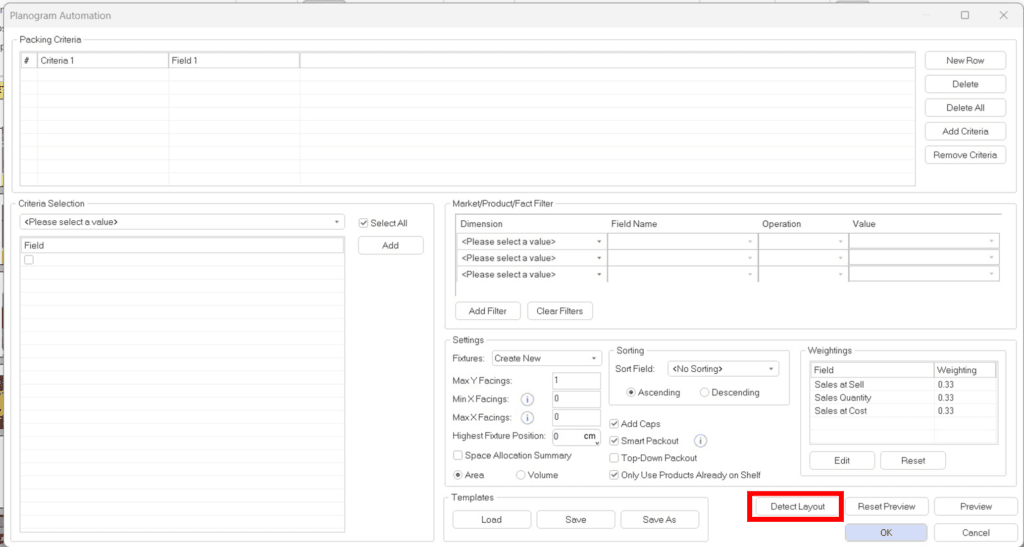
The’ ‘Detect Layout’ feature simplifies the process of organizing products by analyzing the current shelf arrangement. It groups products with matching values in selected fields, consolidating their occupied space into designated groupings—similar to planogram guides.

The ‘Detect Layout’ option should be used without setting up the planogram generation settings.
When using the feature you will have to select the data fields that will be used to group products together as seen in the image below.

Once the layout detection is complete, users have the flexibility to adjust the allocated spaces for these groupings. These adjustments guide the planogram generation process, ensuring that products are repositioned to align with the user-defined spacing configurations. Essentially, ‘Detect Layout’ serves as a starting point by creating an initial arrangement based on the existing product placement on the shelf.
The detect layout will be displayed in the ‘Packing Criteria’ on the ‘Planogram Automation’ window. Make the necessary adjustments to ensure your planogram is created according to your preferred configuration.
Previewing Your Planogram Flow
Next, click on ‘Preview. This opens the ‘Planogram View’ window where you can preview your flow and confirm if this is how you’d like to set up your planogram.
Within this window, you can preview the split on the planogram based on the criteria selected.
You can make your selection by clicking on the drop-down arrow. You will see that the preview window changes with each criterion you select, as seen in the gif above.
Please note that this is a guide as to how space will be apportioned on the planogram. You can amend it here before generating the planogram.
If you want to make amendments, select the criteria, then choose the specific area and change its size by using its markers. You can also add in some of the areas that didn’t have enough space (floating banners above the gondola).
You can also select to view the floating status to show the percentages of how space has been allocated as well as the deserved space, as seen in the gif below.
If you have made any changes, click ‘Save’ or ‘Save As’ and select ‘OK’.
Resetting the Preview
To reset the preview, you can just select the ‘Reset Preview’ in the Generate Planogram window.
A pop-up window appears indicating that the preview will reset the next time you view it. Calculations will be rerun and space realigned. When selecting ‘Reset Preview’, changes made will be thrown onto a floating shelf above the planogrammed area.
Click ‘OK’ to finish the Generate Planogram setup.
Viewing Your Automated Planogram
After running Generate Planogram, you can see that we have allocated space accordingly and the planogram has been generated. It provides you with a breakdown of all your data.
Using the drop-down arrows reveals each level/fields’ summary, thereby revealing the percentage of space that has been allocated and what space has been apportioned.
From here you can begin to make final changes and finish off the planogram to your specifications and merchandising principles. You can move shelves as well as products and change facings.
Should the above steps not work for you, please create a support ticket and our DotActiv support team will assist you in uncovering the issue.
