This article will provide you with a step-by-step process on how to apply for leave within the Activ8 desktop app. We also cover how to view your leave summary.
Applying For Leave (Desktop)
After opening Activ8, navigate to ‘HR’ located in the left-hand panel.
Under the ‘HR’ tab select ‘Leave’ from the drop-down list and then ‘My Leave”.

Next, click on the blue ‘+New Leave Application’ button to open a new leave application window.

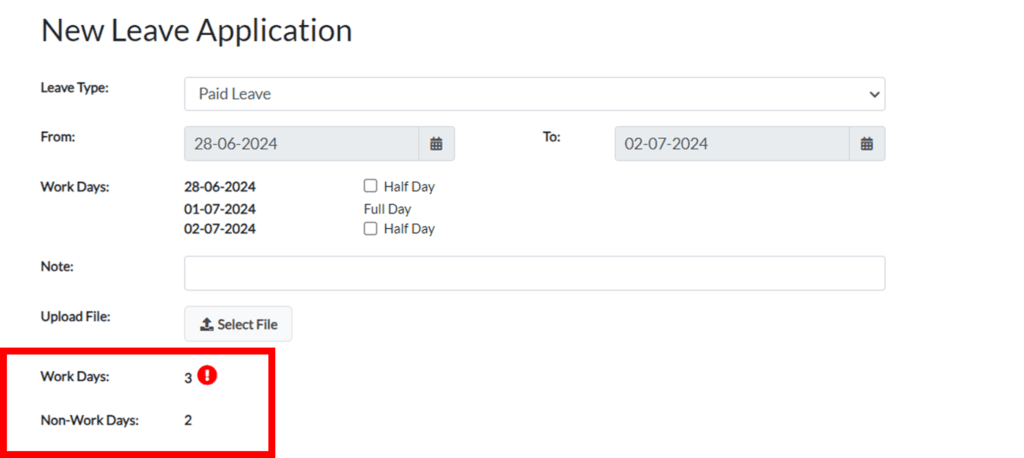
In the ‘New Application’ window, you can do the following:
- Select the type of leave;
- Select the leave period;
- Add leave notes; and
- Upload a file (sick note for example).
Leave Type
Activ8 has a variety of different leave types, which you can customise to your environment. Default leave types are Paid and Sick Leave.
There is no limit to the type of leave that you can have for your company. You can manage this yourself.
Leave Period
Once you have selected the time frame for your desired leave a ‘Work Days’ section will appear.

Here you can select whether you want to make your first or last day of leave a half day.
To do this, tick the ‘Half Day’ checkbox next to the desired day.

Once this is ticked, you can also select whether you would like the morning or the afternoon off. For afternoon leave, tick the ‘Afternoon’ checkbox. Leave the box unticked for morning leave.
Adding Notes
You can add any notes to an application for leave. The note will be seen by your line manager or whoever approves your leave.
To add a note, navigate to the field and add it.

Uploading Files
If you are applying for sick leave and a Doctor’s note is required, you can add this to your application.
To do this navigate to the ‘Upload File’ section and click on the ‘Select File’ button. You can then navigate to the selected file and upload it.

Work Days And Non-Work Days
Once you have selected the time frame for your desired leave Activ8 automatically calculates the number of workdays in this period. Activ8 will also consider the non-work days for this period (Weekends and Public Holidays).

It will also consider your leave balance and calculate accordingly. ‘Leave Balance’ indicates the amount of paid leave days you have remaining after deducting the period applied for in the new leave application.
If the amount of leave you want to take exceeds the amount of leave available, a red exclamation mark will appear with a warning.

Once you have filled in all the information, click on ‘Submit’.
Your leave has now been successfully submitted and is awaiting approval from your line manager.
Checking Leave Approval
To check if your leave was approved, first, navigate to ‘My Leave’ under the ‘HR’ tab.
Under the ‘Leave Transactions’ section, you can view the ‘Status’ of your leave applications.

If the leave application was successful, the ‘Status’ will show ‘Leave Approved’ in green. If the application is still awaiting approval, the ‘Status’ will show ‘Awaiting For Approval From [line manager/authorised user]’.
If the application was unsuccessful, the Status will show ‘Leave Declined’.

Please note that whenever a leave application has been approved or declined, you will receive a notification.
Navigate to your ‘New Task Activity’ icon (red flag) and click on it to view any new notifications. Then, click on the notification specific to your leave application to view the status.
Viewing Leave Application Details
To view the details of any leave application after applying, click on the Status. Doing so opens up a window where you can read more about the leave.

You can cancel your leave application in this window.
Viewing Leave Summary
To view your leave summary, first, navigate to ‘My Leave’ under the ‘HR’ tab.
Once there, you’ll be able to see a summary of your leave under the heading, ‘Leave Summary’.

The summary includes:
- Leave type,
- Accumulation Rate,
- Allocated Days,
- Days Accumulated,
- Leave Taken,
- Balance,
- Leave Reset (Date), and
- Leave Start Date.
The Leave Summary section allows you to track and maintain your leave days.
Checking Leave Availability
In the ‘Leave Summary’ section, you can also see the amount of available leave for both ‘Paid Leave’ and ‘Sick Leave’.

Here, ‘Balance’ is the amount of leave you have accumulated.

I Am Unable To Apply For Leave
When applying for leave in Activ8, it is important that you fill out all the necessary information. If you fail to include all the required information, Activ8 will prevent you from applying.
To help you understand which fields to fill in, click on ‘Submit Expense’ A red box will appear around the fields where you need to add information.

Once you have filled in all the necessary information and clicked on ‘Submit’, your line manager or the authorised user will receive a task to approve or decline your application.
You will receive a notification (both in Activ8 and via email) informing you of whether your leave was approved or declined.
