The purpose of this article is to help guide you on how to use display banners while working in the DotActiv software. It also explains how to create and manage display banners.
You can use display banners when you want to add information like educational or promotional blocks into your planogram.
Creating Display Banners
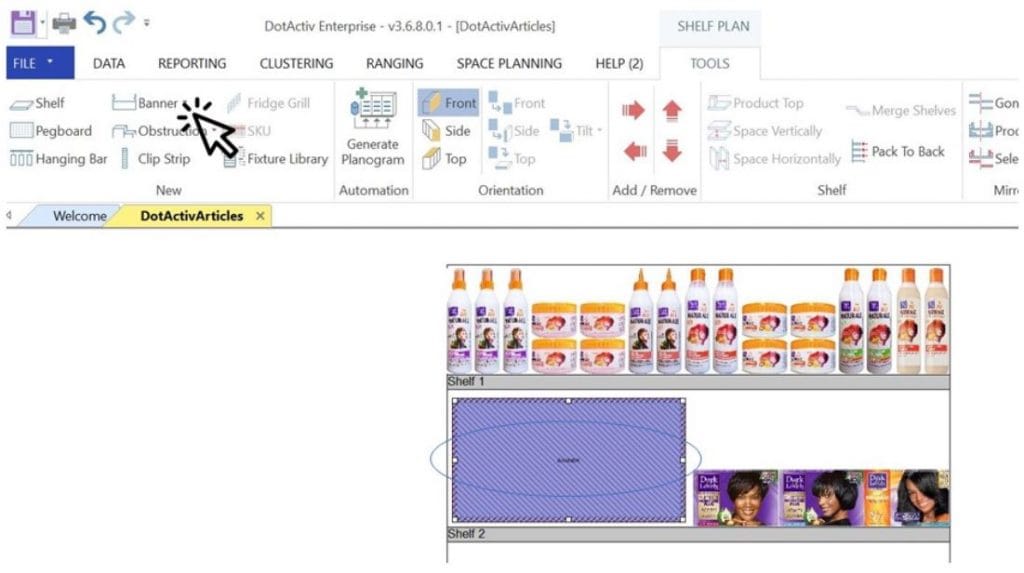
After opening your planogram, navigate to the ‘Tools’ tab and select ‘Banner’ in the ‘New’ section as seen below.

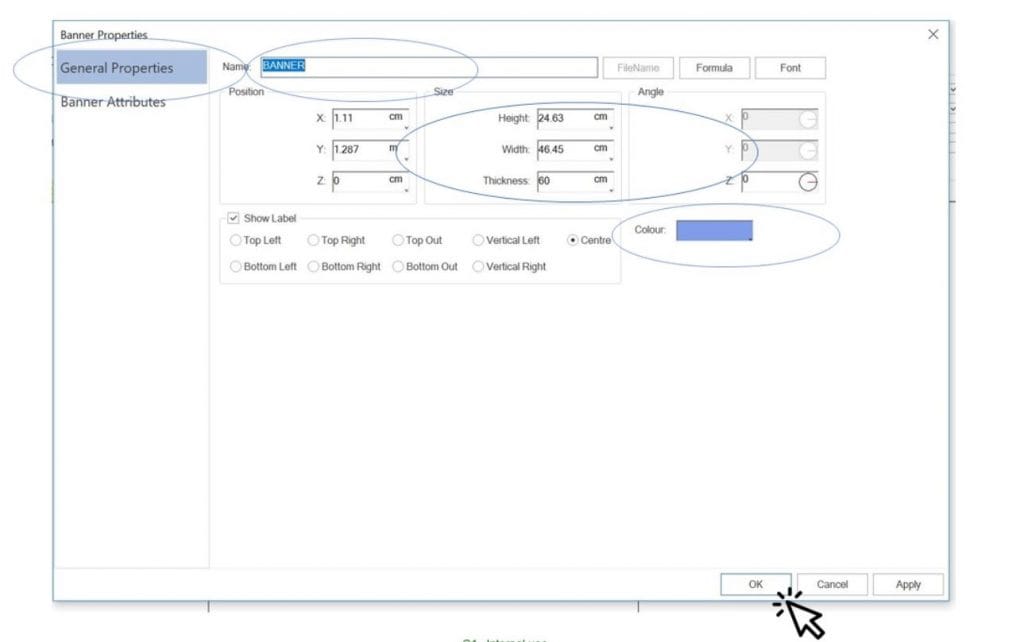
After clicking on ‘Banner’, click on the planogram to place it. Next, double-click on it to open the ‘Banner Properties’ window.
Here, you can make changes, including choosing a name for your banner, adjusting the position, size, angle as well as changing the colour.

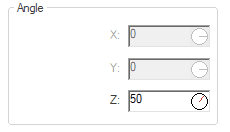
You can rotate your banner by simply changing the angle of the banner in the window above. In the example below, I have rotated the banner by 50 degrees.

You can also make changes to the banner by inserting an image to showcase, for example, the promotional block that you want to use within your planogram.
To do that, go to ‘Banner Attributes’ in the ‘Banner Properties’ window. Then, select and open your directory where the image has been saved.
Remember to apply your changes and click ‘OK’.
Ensure that your images are turned on for your display banner to update accordingly.

Display banners are useful as it makes the life of a merchandiser a lot easier when packing products in-store by using your planogram as a guide.
How To Use Banners To Indicate Segment/Drop Numbering
When you would like to add a banner to the segment/drop, navigate to the ‘Tools’ tab, and select ‘Banner’ in the ‘New’ section as seen in the gif below.
After you have clicked on ‘Banner’, click on the planogram where you would like to place it.
To change the size of the banner, you can drag the sides of the banner and change the dimensions manually, as seen in the gif below. Alternatively, you can double click on the banner and change the dimensions within the ‘Size’ block by manually entering the appropriate dimensions in the ‘Banner Properties’ window.
Once you have placed your banner, you can move the banner around to the area which you most prefer. Alternatively, you can double-click on the banner and the ‘Banner properties’ window will appear where you will be able to adjust the position according to the specific X, Y, and Z position. Please see the gif below.
Once you are happy with the size and position of your banner, you can change the name displayed on your banner, by using a combination of numbers and words, as shown in the gif below.
In the example below, we have used the banner to indicate the segment/drop number on our planogram. In this case, the planogram has 6 segments/drops and the first segment is, therefore, ‘1 of 6’.
To create multiple banners, repeat the steps set out above. Alternatively, click on the existing banner and hold in ‘Ctrl’ to duplicate the banner. Now you can move the new banner to the desired location and change the wording, etc.
