This article will act as a guideline on how to open an existing range plan within the Range Optimizer tool found in the DotActiv software.
Opening An Existing Range Plan
- Open the DotActiv software and click on the ‘Ranging’ Tab.
- Click on ‘Optimizer’.
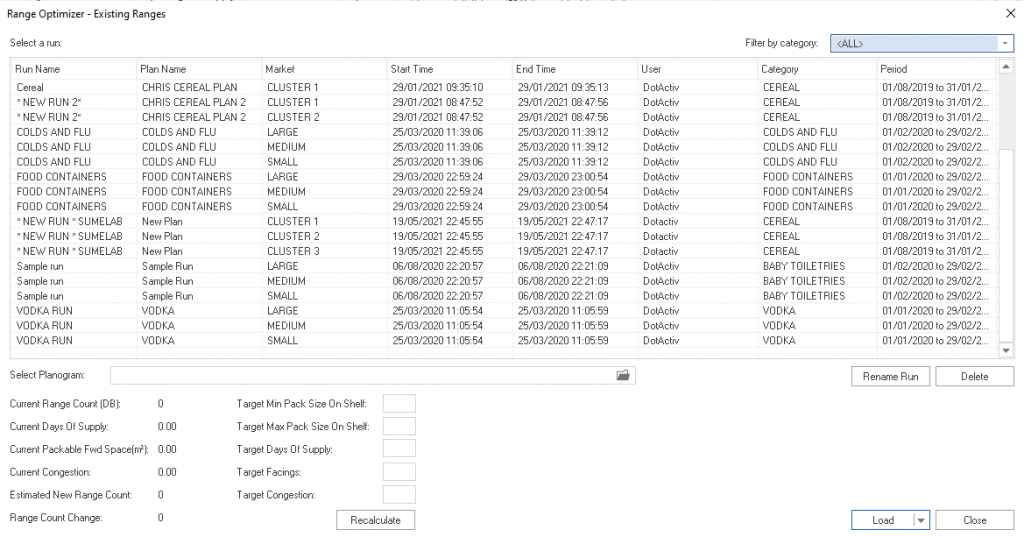
- Click on the drop-down button and then on ‘Open Existing’. The following window will appear:

Here you can see all the existing plans you have run using the optimizer tool.
When naming your range plan, you must name it in a way that you recognise the name when searching for it in this window.
This window also allows you to review the following:
- Run Name,
- Plan Name,
- Market,
- Start and End times,
- User that worked on the range,
- Category Name, and
- Period of data used.
In the top right-hand corner, you will see ‘Filter by Category’ with a drop-down button. This allows you to narrow down your search.
To use this feature, click on the dropdown arrow and choose the category to filter by.
At this stage, you can rename the run by clicking on the ‘Rename Run’ icon, as seen in the screenshot above. Once done, click ‘OK’.
You can also delete runs by clicking on the ‘Delete’ button. You can confirm deleting by clicking on ‘Yes’ or ‘No’.
With the run selected, you can see that the ‘Select Planogram’ view has been populated with the file directory in which the FLP of the specific category and cluster is saved. The last used planogram will be automatically mapped.
If you want to change it, you can use the browse icon to locate the correct planogram for the run.
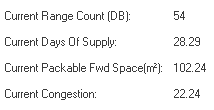
At the bottom of the window, you can see basic information about the planogram such as:
- Range Count from the database,
- Current Days of Supply on the planogram,
- Available forward packable space on the planogram, and
- Current congestion on the planogram.

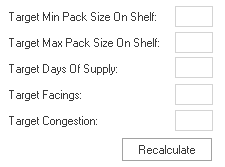
You can amend and add in the ”The Target Pack Size on Shelf’, ‘Target Days of Supply’ , ‘Target Facings’ as well as the ‘Target Congestion’ as seen below.

Lastly, you can see the ‘Estimated Range Count’, the ‘Range Count Change’, and a ‘Recalculate’ button. These fields are populated by the DotActiv software based on your inputs.
The ‘Estimated New Range Count’ refers to the range count suggested for the cluster.
And the ‘Range Count Change’ lists the number by which the range has changed.
The ‘Recalculate’ button allows you to change the inputs and recalculate the range changes.
To continue, click on ‘Load Range’.

From this drop-down menu, you will be able to choose if you would like to open the analysis and ‘Cap Review’ window or the main ‘Results’ grid.
Please note that if the ‘Results’ option is greyed out, this means that you have not yet completed your caps review and would need to do so before continuing.
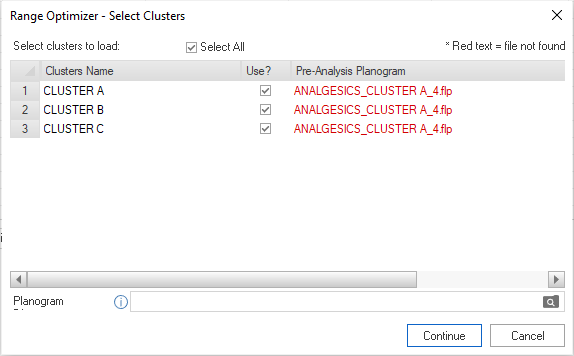
If there is more than one cluster linked to the plan, the ‘Range Optimizer – Select Clusters’ window will open, as seen below. Alternatively, you will be taken to the results grid.

In this window, you will see all the clusters that are linked to the existing plan that you have selected. You can now choose the specific clusters that you would like to load by simply ticking or unticking the ‘Use?’ box or the ‘Select All’ box to load all of the linked clusters.
You can also select the planogram you would like to use for each of the clusters by choosing a directory where you have saved all your planograms at the bottom of the window.
Please note that if the software was unable to find the file on your device, it will be highlighted in red as seen in the image above.
Once you have linked your files to the applicable clusters, you can click on ‘Continue’ to load the saved run.
Should the above steps not work for you, please create a support ticket and the DotActiv support team will assist you in uncovering the issue.
