The purpose of this article is to discuss how you can save your reports to a CSV, XLS (Excel file), XML and PDF format for easy sharing. In addition, we show you how to print multiple reports at the same time.
You can save the following reports in a CSV, XLS (Excel File) or XML format:
- Product Report;
- Fixture Report;
- Shelf Report;
- Changes Report;
- Demand Report;
- Congestion Report;
- Product Performance;
- Cross Merchandising;
- Clustering Report; and
- Availability Report.
Saving A Report To CSV, XLS Or XML
First, open the report that you want to save to CSV, XLS (Excel file) or XML. Navigate to the block in the upper left-hand corner of your report, right-click in the block and select ‘Save Grid’ from the pop-up menu. From here you can choose to save it as a CSV, XLS or XML file.
You will be provided with a pop-up window to name the file and select the file destination as shown below.
Saving A Report To PDF
To save a Shelf, Plano, Stretch, Plano and Shelf, Split Shelf and Plano, Changes, Plano Performance, Custom and Advanced Report to PDF format, open the report you want to save to PDF.
When selecting the relevant report, a pop-up will appear asking you how you would like the planogram to be presented, as seen in the image below.
Please note that ‘NOD per page’ refers to the number of drops of the planogram you would like to see per page.
You have the option to display the ‘Info Block’ found on the left-hand side of your report. You can choose to display this block by ticking the ‘Show Info Block’ box.
In addition, should you choose to display this box, you can configure which details are displayed in which position in this info block. To do so, click on the ‘Info Details’ button and the ‘Plano Report – Info Select’ window will appear, as seen below.
You can configure the fields you would like to display and the position of them in this window. Once done, click ‘OK’.
PDF Planogram Report Examples
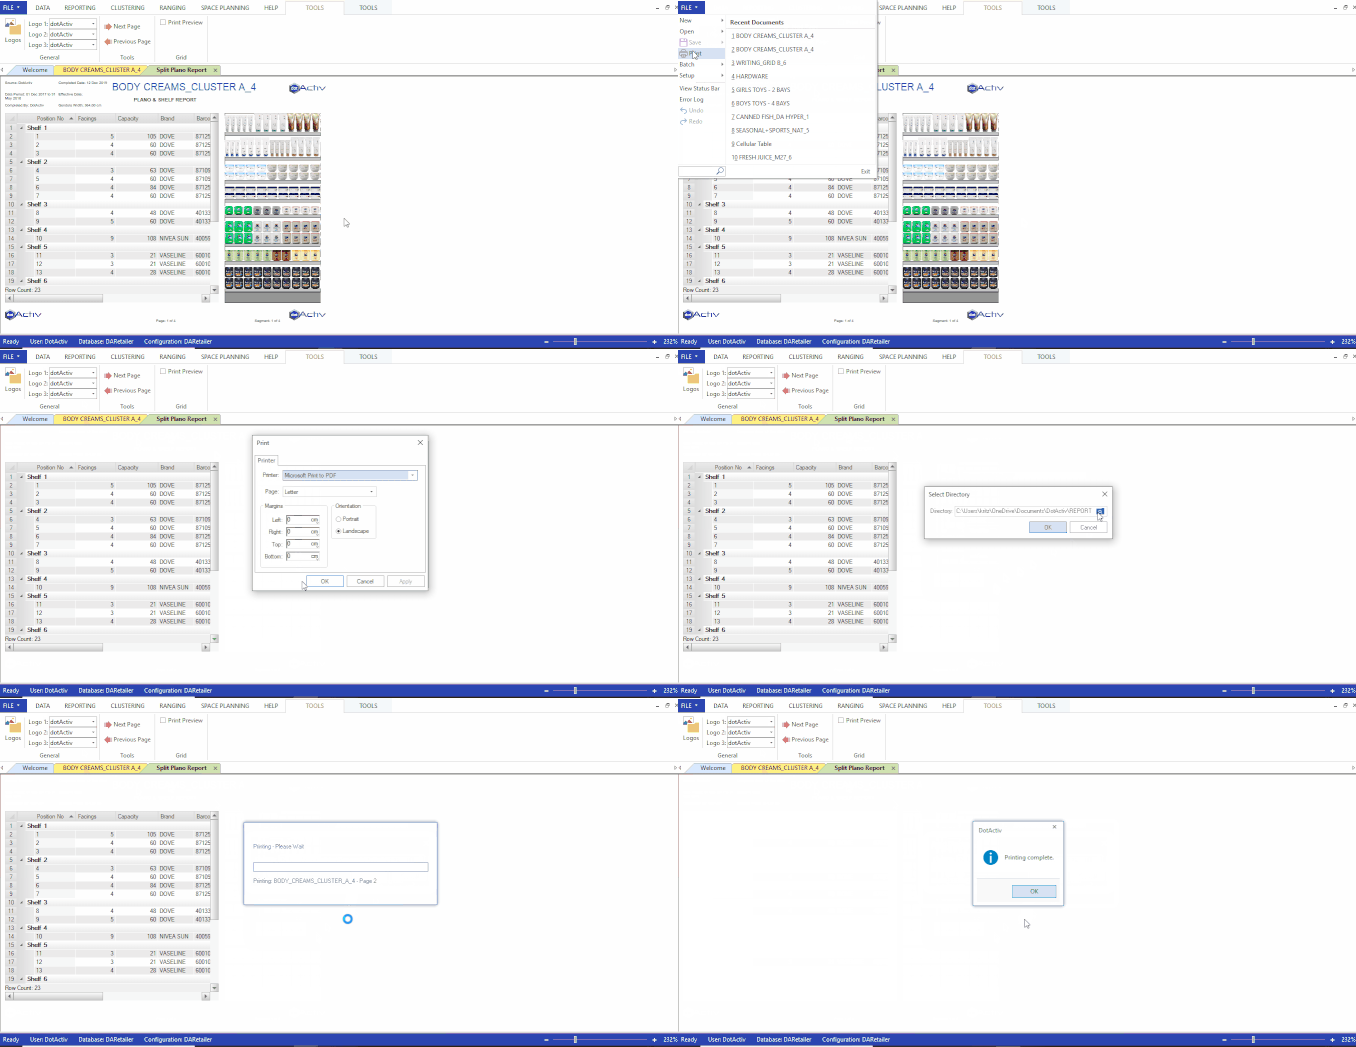
If you are happy with the report you have generated and have worked through the PDF Print Checklist, you can navigate to ‘File’ and select ‘Print’.
From the drop-down menu, choose ‘Print to PDF’. The shortcut to get to this step is to hold ‘Ctrl’ and ‘P’ on your keyboard. Select your file destination and save. You can follow the steps below.

We recommend that you select A4 and Landscape orientation when printing to PDF.
Planogram PDF Print Checklist
Before you print your planogram to PDF, there is a list you can check to ensure consistency. That includes having the necessary information displayed.
Please follow the below steps before printing:
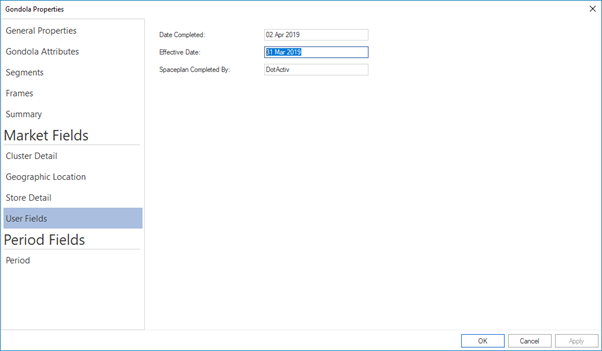
Step 1: Set the planogram’s effective date. The effective date is usually set after the ‘Date Completed’

The effective date indicates when you can practically implement the planogram in-store.
Step 2: Ensure that the name of the planogram is correct and in line with your company’s naming convention. For example, ‘Category Name_Store Name_Nr of Drops’.

Step 3: Make sure the logo setup is correct (where applicable).

Step 4: Always print in ‘Landscape’ and not ‘Portrait’. You can check the orientation once you are in the print screen view. The default is set to ‘Landscape’. However, it’s worth noting before printing.

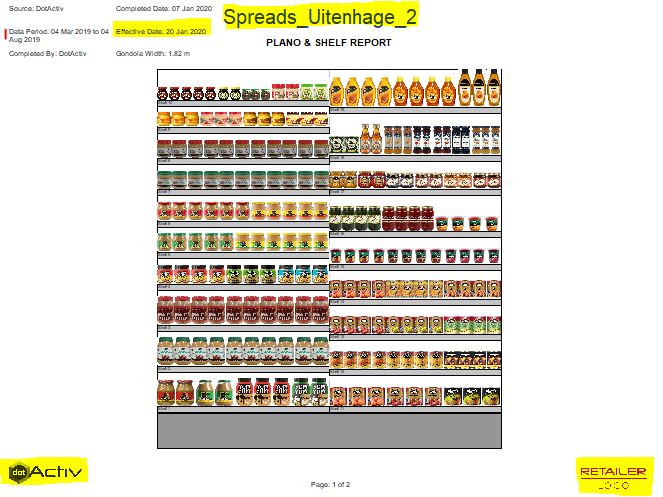
Your final product should have the following elements as highlighted in yellow. In the below example, we’ve used a Shelf Report.

Please note that the ‘Date Period’ is important as it indicates whether you have used up to date data.
The ‘Date Period’ is influenced by the dates you set for ‘Period From’ and ‘Period To’ in your CSV which is mapped to those respective fields when importing the CSV into the DotActiv application.
How To Batch Print To PDF
In the DotActiv application, you have the option to print multiple reports that you’ve created at the same time. This is especially useful when you have to print a lot of planograms as it may save you a lot of time just printing once.
To do this, ensure that you have all the planograms that you want to print reports for open in the DotActiv application. Reports that can be batch printed include the Shelf Report, Plano Reports, or Split Shelf & Plano Reports.
For this example, we will create Split Shelf & Plano Reports for four existing planograms that we would like to print all at once.
As seen in the image above, start by clicking on the report you wish to create. As mentioned before, for this example we want to create Split Shelf and Plano reports for all four open planograms.
Once you click on the report type you wish to create, a popup window will appear prompting you to select which planogram(s) you want to create this report for. Go ahead and select all the applicable ones, as seen in the image below.
Once you have selected all the planograms that you would like to create this report for, click ‘OK’. Next, all your reports will show up in the Split Plano Report tab.
You can navigate through the report pages by right-clicking your mouse to go forward a page or left-clicking to go back one page.
You can now click and hold ‘Ctrl’ and ‘P’ at the same time to print your reports.
Please note that all reports created will be printed once you’ve clicked on ‘OK’ in your relevant Printer Dialog window. However, reports for each planogram will still be saved separately if you choose to print them to PDF.
PDF Custom Report Examples
In order to export a Custom Report as a PDF, follow these steps:
Step 1: Open the Custom Report that you want to export in the DotActiv software.
Step 2: Navigate to the ‘File’ dropdown menu in the top left-hand corner.
Step 3: Click on ‘Print’.
Step 4: In the pop-up, ensure that the Printer Name is set to PDF.
Step 5: Click ‘OK’.
Step 6: Next, select the folder directory that the PDF should be exported to.
Step 7: Click ‘OK’
The report will now be exported as a PDF file and will be located in the selected directory folder. The steps above are shown below.

Should the above steps not work for you, please create a support ticket. DotActiv support will assist you in uncovering the issue.
