The purpose of this article is to help guide you on how to use and manage target facings while working in the DotActiv software.
What Are Product Facings?
Product facings allow you to create the look of a perfectly stocked store (even when it is not) by placing all of the products on a display or shelf to the edge. It is done to keep the store appearing neat and organised.
It can also be defined as both the orientation and the number of products placed on the shelf. For example, placing products on singular or multiple facings.
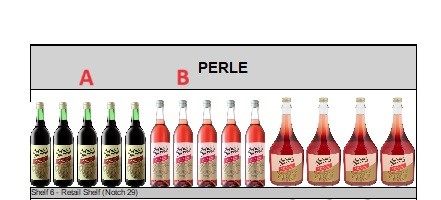
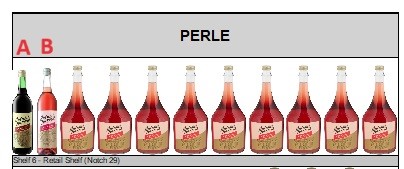
In the above image, Products A and B both have five facings whereas in the image below they have one facing each.
There are three different types of facings, namely X, Y, and Z facings. X facings refer to the number of front horizontal facings of a product in an area, as per the example above. Y facings are known as facings high and can be defined as the number of front vertical facings of a product in an area. Lastly, a Z facing, or facings deep, is the number of facings of a product moving to the back or depth of the shelf.
Understanding Target Facings
Target facings can be used when you want to set a standard value of facings on a product or products in your gondola.
A perfect example would be setting target facings to two on any new products to combat you not having to manually set facings each time you are placing new products.
How To Use And Manage Target Facings
First, highlight products on the gondola that you want to have target facings.
Then, ensure that you are in the ‘Tool’ tab and scroll to the ‘Target Facings’ section as seen below.
Under the ‘Target Facings’ section, you’ll find three options:
- Custom,
- Preset, and
- Indicator
Click on ‘Custom’ and a pop-up window will appear. Click the drop-down arrow in the Field box to find ‘Actual Facings’.

Fill in the number of facings you want in the ‘Value’ box and click ‘OK’.
You can use the ‘Target Facings’ function to cut down on time spent reducing or adding facings when creating your planogram.
The next step is the ‘Preset’ option. The ‘Preset’ option enables you to set a specific number of facings for all the products on the gondola.

You have the option to set a target for any of the following options

If you want to set a specific target for all the products on the gondola. You select the drop-down button and select ‘Set Target’ and follow the steps as shown in the example below by making use of the ‘Specific Value’ option.

The ‘Preset’ option also allows you to set the facings of the product depending on a field value. For example, according to the ‘Sales Quantity’.

The ‘Indicator’ option is used to see how many facings are needed for each product on the gondola to meet the target facing of the specific product. Just like shown in the example below.

The target facings set in the ‘Product Properties’ tabs under ‘Product Attributes’ will be used to determine how many facings are needed to meet that target facing.