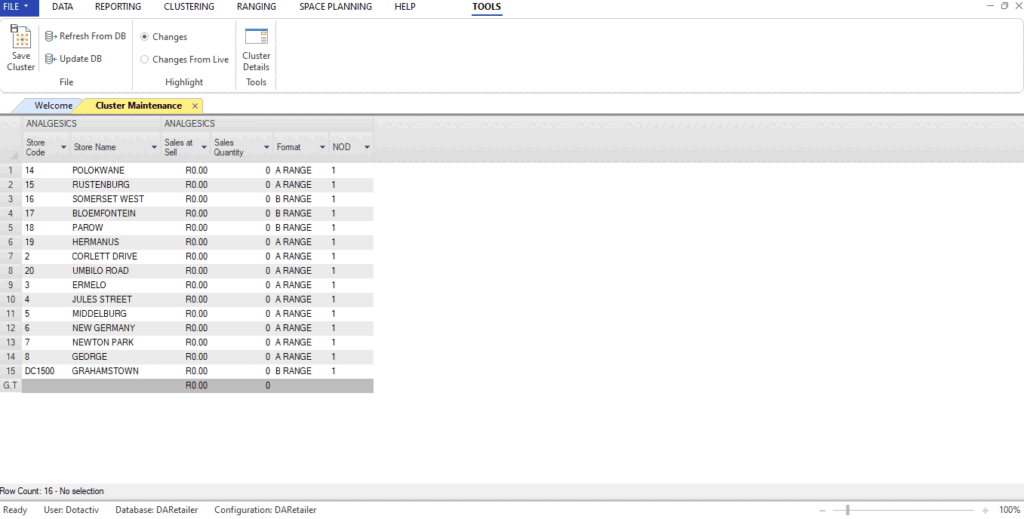
This article will help you to set up, update and maintain your store or category-based clusters using the Cluster Maintenance feature of the DotActiv software.
Category-based clustering can be implemented when you want to group together different stores with similar customer bases for a particular product category.
Data Prerequisites
To be able to start with cluster maintenance, a few data prerequisites are needed. With an integrated environment, market fields like store detail have to be populated with data received from the customer.
This will allow you to match the correct stores to the next step, which is setting up the display hierarchy. The main store detail fields you will need include: ‘Store Name’, ‘Store Code’ and ‘Store Format’.
To capture any category clusters, ‘Merchandise Group’, ‘Department’ and ‘Categories’ have to be classified within the display structure. This can be done for primary or secondary display structures. You will also need your category space allocations (NODs) to input into the software at this step.
Setting Up Clusters
To get started, open the DotActiv software, click on the ‘Clustering’ tab on the toolbar and select the ‘Cluster Maintenance’ option.

Step 1: From the ‘Cluster Maintenance’ drop-down menu, you can choose whether you would like to create a new cluster, open an existing or open a backup.
If you click on create new, the screen below will appear.

To set up a new cluster plan, you must first select the cluster set that you would like to work with.
Then you can select the fields to display in your cluster plan.
You can also add filters to include or exclude certain data. Thereafter, select the data period that will be used when retrieving any selected fact information into your cluster plans.
Please note that once you have set up Steps 2, 3 and 4, it will not have to be completed each time as they are saved configurations. However, these can be changed at any time.
Step 2: You can set up the fields by clicking on ‘Field Setup’. You can select the market or fact fields you would like to include in your cluster table by double-clicking them or selecting the field and clicking on the forward arrow.
To remove a field, double-click it or select it and click the backward arrow.
Step 3: You can set up the filters by clicking ‘Filter Setup’. At this point, you will select a field name, operation, and value to apply a filter.
Please note that it is important to have the store code populated when doing a clustering exercise.
Step 4: You can set up the time period by clicking ‘Period Setup’. You can check the boxes of the months you would like to include in your cluster plan. We recommend a minimum of six months.
Step 5: Once you have completed the setup, select your cluster set and then the stores and click ‘Run’ to generate the cluster plan, as seen in the image below.
Please note if you would like the software to highlight store or category combinations which have not had a cluster change within a set number of months, you can do so by toggling the box at the bottom of the window. This is set to 6 months by default.

Selecting Stores When Running The Cluster Plan
When you would like to run a cluster plan for a particular category, you may want to select certain stores to include, as highlighted in the image above. At this step, you can either select ‘All Stores’ (excluding DCs), ‘All Stores (including DCs)’ or ‘Filtered Selection’ which refers to a custom list of stores. This may be because you only want to work with a certain cluster, store format or selection of stores.
To select certain stores, click on the ‘Filtered Selection’ button. You can then choose to filter your stores by category format, the number of drops, cluster detail, geographic location, store detail, trading detail and user fields.
Based on the section you select, you will need to choose a column and field that is applicable. Once you have made these selections, a list of stores that fit the criteria will appear in the box alongside the selection criteria where you can tick each store that you would like to run a cluster plan for.
Selecting Categories When Running The Cluster Plan
As seen in the image above, when you would like to select the category to work with you will need to select a merchandise group first, followed by the department. This will show a list of all applicable categories and allow you to select one or more to add to the cluster plan.
Opening Existing/ Backups
When opening an existing cluster, navigate to the ‘Clustering’ tab and select ‘Open Existing’ or ‘Open Backup’ from the drop-down menu.
If any stores have been added or removed since the existing plan was last opened, the system will notify you of the updates, as seen below.
Please note that if new stores have been added, you will be prompted to choose if you’d like to apply it.
Updating And Maintaining Clusters
Step 1: You also have the option to edit or update the cluster plan once it has been generated.
Clusters can be utilised in store-specific and cluster formats at the same time. Typically within a retail store, stores that fall into the same cluster receive a national range. Stores that receive a store-specific range are marked with their store code or store name.

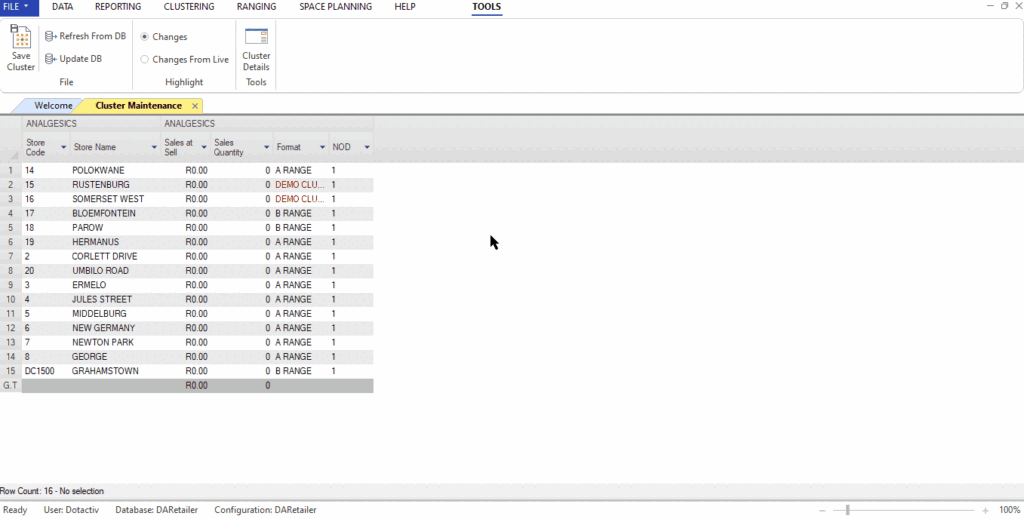
Step 2: When you want to update the cluster plan, double click a section that you would like to edit and input the new information. This section will appear in red until the cluster plan is updated to the database or the cluster is saved.
For example, if you are changing the number of drops allocated to a certain store, you can simply click on the relevant box and type in the new value. The updated value will appear in red until the cluster plan is updated to the database or the cluster is saved.

If you would like to revert your changes, click on the ‘Refresh From DB’ button in the ‘File’ section.
Step 3: Cluster Maintenance allows you to view different column options to facilitate a detailed cluster plan. You can right-click on the table and tick the boxes that you would like to appear on your cluster plan.
Step 4: Once you have edited your cluster plan, you can update the cluster on the database and/or save the cluster plan.

The repercussions of not updating the database when adding new or changed information will cause the information to be lost and not reflected when the information is linked to a fixture or report.
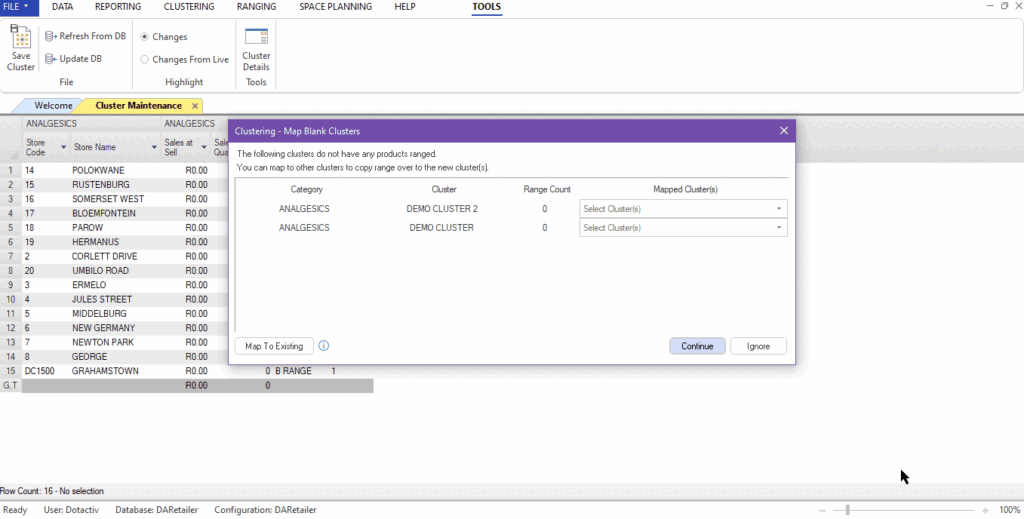
If you have made changes in the cluster format, you are able to copy an existing range to the stores in the new cluster that you have created. The ‘Map Blank Clusters’ window will pop up once you update the database, as seen below.
After setting up your clusters, you are now able to use Range Optimizer to determine the range for each cluster. See how to set up a new range through Range Optimizer here.
Map New Clusters To Existing Ranges
When updating clusters with a new cluster name, within a category that contains other clusters with assigned ranges, you can map one of the existing ranges to the new cluster. This facilitates initializing the cluster with the same range. In cases where multiple existing ranges are applicable for selection, you can choose to map the new cluster to multiple existing ranges. Consequently, the range of the new cluster will encompass the full distinct set of SKUs present in the selected ranges.
Step 1: Open a cluster in Cluster Maintenance.
Step 2: Insert the new cluster name(s) in the ‘Format’ column. Your changes will appear in red.

Step 3: Select ‘Update DB’ to save the changes to the database. A pop-up window will appear to confirm your changes to the database. Click on ‘Update’.

Step 4: Another pop-up window will appear asking you to map the blank clusters. You can map the clusters by selecting the drop-down next to each new cluster or selecting ‘Map To Existing’.

Should the above steps not work for you, please create a support ticket and the DotActiv support team will assist you in uncovering the issue.
