The purpose of this article is to provide you with a step-by-step process to manually scan products (SKUs) to fixtures in DotActiv. Fixture types include shelves, hanging bars, clip strips and pegboards.
Before adding any products onto a fixture, you must first add your product lines or data via a CSV/XLS file. Please read this article on how to import a CSV/XLS to a shelf plan.
Please note that if you’re adding multiple products at a time, its better to import your data via a CSV/XLS file as this will save you time.
If you only want to add one or two products at a time to your planogram, you can use the function mentioned below.
Adding Products Manually To Fixtures
If there is no data, you can create products/SKUs and add them manually.
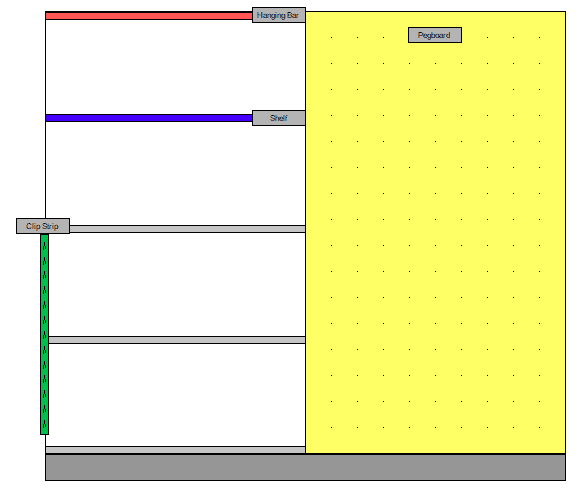
In the image below, the red fixture illustrates a hanging bar. The blue is a shelf. The green fixture signifies a clip strip while the yellow fixture is a pegboard. Read this article on how to create each fixture.
Please ensure that your gondola is facing the right direction when adding products to pegboards.
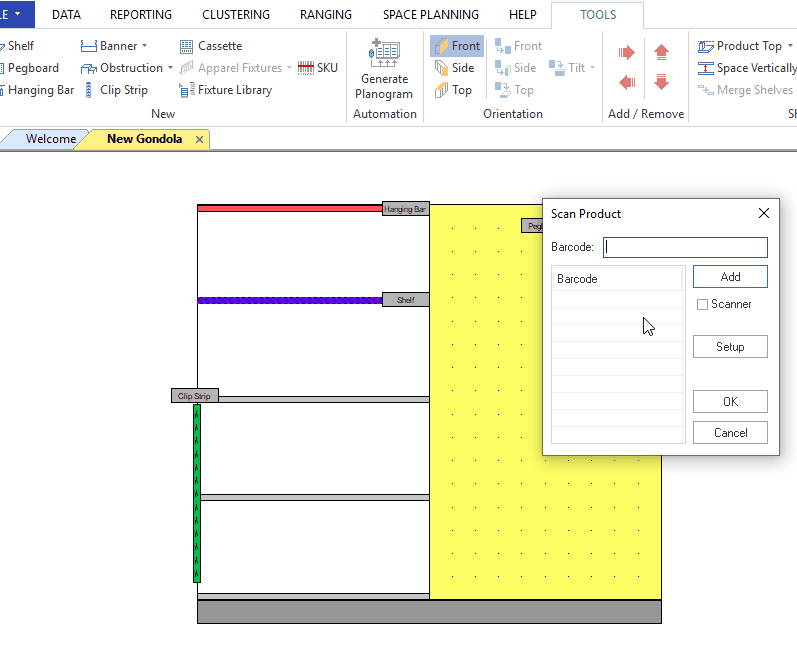
To add a new SKU to a fixture, you’d have to first select the fixture before selecting the ‘SKU’ icon in the ‘New’ section in the ‘Tools’ tab.
Please note that until you select a fixture, the ‘SKU’ icon will appear greyed out.

A shortcut for this is to select the fixture and hold down ‘ALT-S’ on your keyboard. Doing so brings up the ‘Scan Product’ window as seen above.
Once the ‘Scan Product’ window appears, you can insert the barcode of the product you’d like to add. You can also add a product by using a retail scanner.
When adding a product via a retail scanner, ensure it is plugged into your computer. Also, if you want to use a retail scanner, you must first have the ‘Scan Product’ window open.
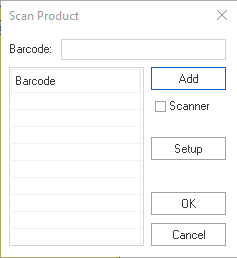
After you have inserted the barcode or scanned the product, you can select ‘Add’ and ‘OK’. The software will then recognise if DotActiv has images for that product. If not, it will ask if you’d like to capture the front, side and top view image. Select ‘Yes’ or ‘No’.
The product will be added to the fixture, as seen above.
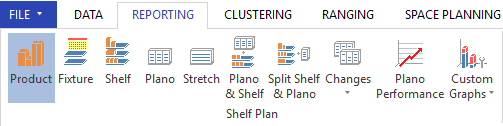
If you’d like to add a product that has already been imported on the shelf, you can do so by selecting the ‘Product Report’ icon under the ‘Reporting’ tab.
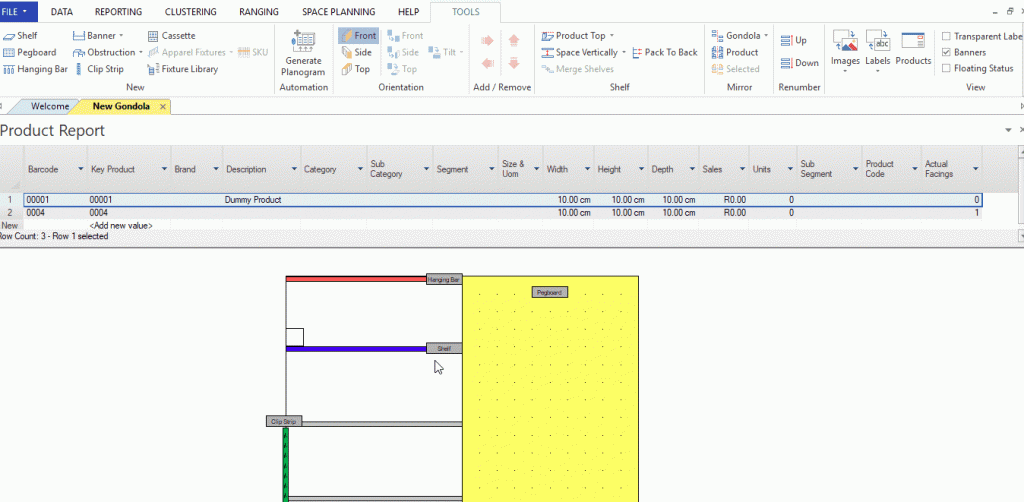
Once the Product Report has been selected, all of your imported product data will show. In the example below, you can see that there are only two products. A product we have added by selecting the SKU icon (0004) and a previously imported dummy product (00001).
Please note that it’s important that you map your key product if you want to save your planogram.

For this example, to add the dummy product onto a fixture, click on the number row of the product you want to add. Next, drag and drop it onto the planogram where needed. You can also use this method to add other products onto your planogram.
The process to add products onto a fixture (SKU or ALT-S) is the same for shelves, hanging bars as well as pegboards.
Adding Products To Clip Strips
A clip strip is the only fixture where you cannot add products as explained above. The ‘Scan Products’ option doesn’t apply to clip strips as you’d usually use this function to bring products onto a shelf.
Instead, to manually add a product to a clip strip, you need to first create the product (SKU / ALT-S) or drag and drop the product from the Product Report onto a different fixture. From there, you can drag it onto your clip strip.
You can also watch this video on DotActiv Academy for more context on how to work with the various fixtures in DotActiv software.
Should the above steps not work for you, please create a support ticket. DotActiv support will assist you in uncovering the issue.