The Purpose
This article will help guide you on updating planograms and the database with new ranges when using DotActiv Pro and DotActiv Enterprise. The purpose of updating planograms and the database is to ultimately refresh a planogram. Meaning: Adding newly listed products and removing discontinued lines from the planogram.
By refreshing planograms with new ranges one ensures correct implementation in stores because, without correct planograms, products might be merchandised in the wrong places. It will also aid in communicating the buyer’s strategy with the specific products to the store managers.
The Process
So you have created your range by using range maintenance and range optimizer, now what? Read the articles linked above, as a reminder of how to use both these functions within the DotActiv application.
Below is a step by step guide on how to update a planogram and database with new ranges and what to do if it’s not working.
Step 1: Optimise Or Maintain The Range
First, read this article on how to open an existing range in Range Maintenance. If you’d like to open an existing range in Range Optimizer, you can read more about it here.
Maintaining your range means ensuring your range stays current and up to date by adding newly listed products and removing discontinued lines from the planogram in order for it to be sent out to stores for implementation.
Products can have the following statuses and should be maintained accordingly: active, discontinued and suspended. See below for a description of each.
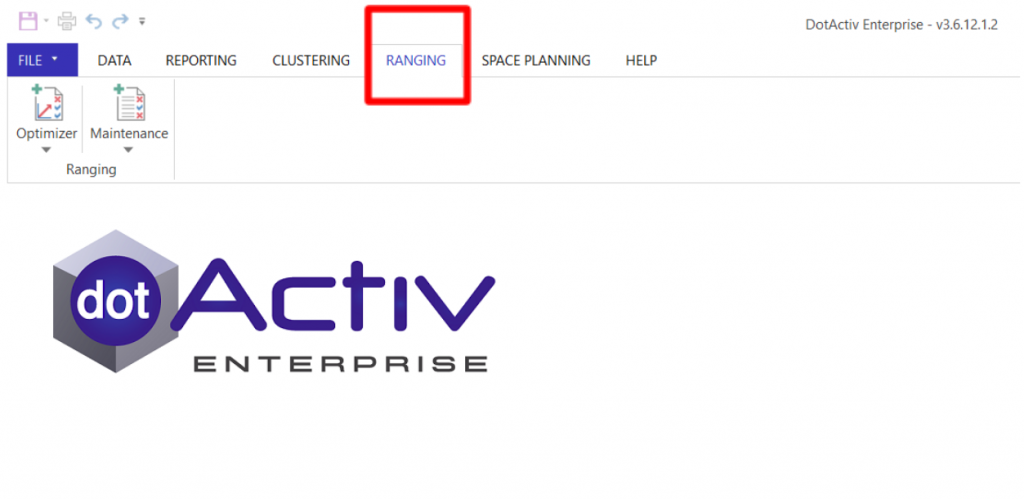
1.1 Open DotActiv and click on the ‘Ranging’ tab.
- Active means the product is actively being sold in store, there is stock either in the warehouse, store or both and more orders will be placed for this product in the foreseeable future.
- Discontinued means the product is not being ordered again from the supplier, but in most cases, it should stay on the planogram until stock runs out. (Always confirm with the buyer first)
- Suspended means the product is suspended by the supplier and will not be produced again.

1.2 Click the ‘Optimizer’ or ‘Maintenance’ button, and select ‘Open Existing’ from the drop-down menu. Now you can select the range you would like to load.

1.3 Once you have loaded the range, the Results Grid will be opened.
1.4 Add newly listed products.
Newly listed products will be indicated as Active/Re-orderable and will not have ‘ticks’ in the ‘POG’ and ‘Supply’ columns. In order to add them to the range and later to the planogram tick them in the aforementioned columns. It will be highlighted in green as an indication that it will be added.
1.5 Remove discontinued or suspended products.
Discontinued or suspended products will be indicated as ‘Discontinued’ or ‘Suspended’ and will have ‘ticks’ in the ‘POG’ and ‘Supply’ columns. In order to remove them from the range and later from the planogram untick them in the aforementioned columns. It will be highlighted in blue as an indication that it will be removed.
1.6 Use Highlights to quickly view any changes made, Warnings or Cross-Merchandised products.

Step 2: Update The Database
2.1 Click ‘Update DB’ and all changes will be made to the range on the database.

Please note that this will not take cross-merchandised products into account as only the products within the category are part of the actual range.
Step 3: Update Planogram
Please note that the same steps are followed for Range Optimizer.
3.1 Click ‘Update Plano’ in order for all changes to be made to the range on the planogram.

3.2 Select if you either want to update one planogram by clicking on the circle next to ‘Plano’ OR if you would like to update more than one planogram select the circle next to ‘directory’.

3.3 After you’ve chosen to either update one planogram (Plano) or more than one (Directory), choose the file where these planogram(s) are currently located in. Click on the folder icon and navigate to the applicable folder on your PC.

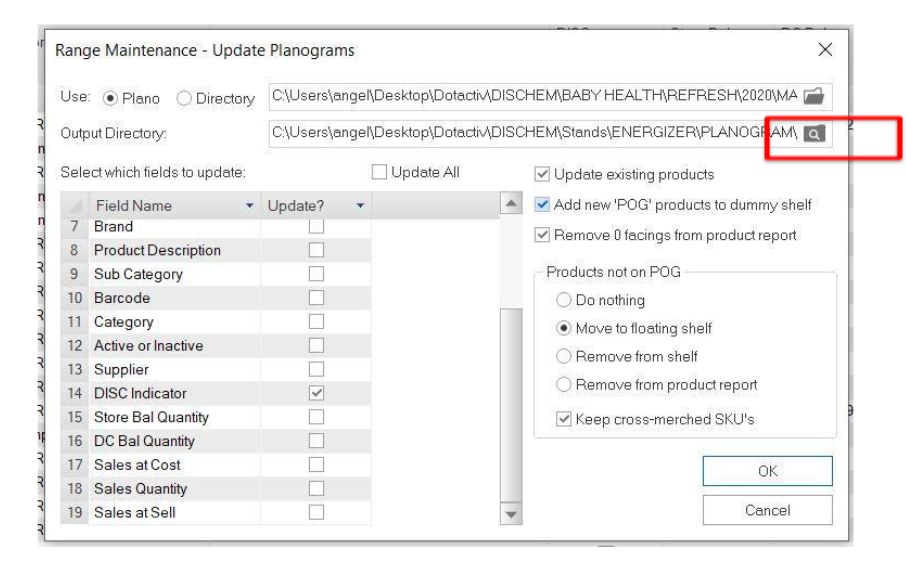
3.4 Now choose where the updated planograms should be stored. Click on the folder icon in the ‘Output Directory’ and navigate to the applicable folder on your PC. NB: It’s advised not to choose the output directory to be the same as where your current planograms are stored as it will be overwritten and one might want to refer back to them in the future.

3.5 The next step would be to select the fields you would like to be updated on the planogram by simply ‘ticking’ them. It is advised to update all fields since this will ensure that the latest data reflects on your planogram. It will also update data such as classifications that were changed on the DB etc.

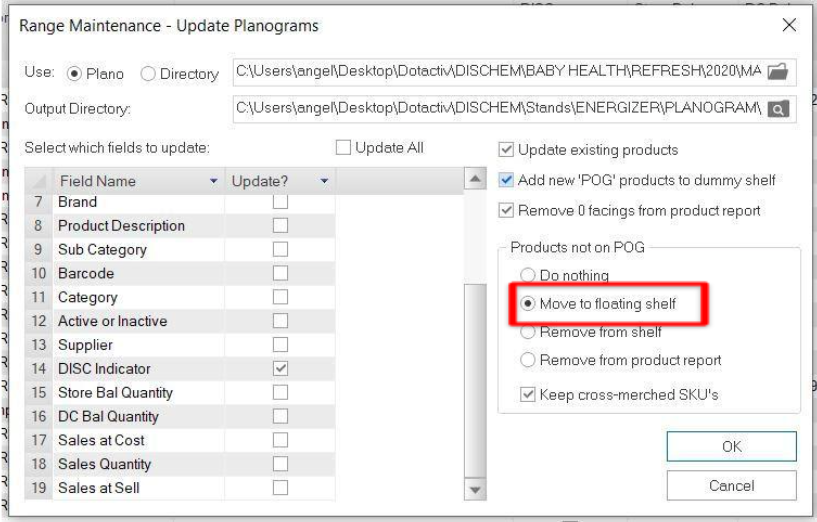
3.5 Now select what should be done to the products not on the POG. When updating a range one should always click on the circle next to ‘move to floating shelf’ as it will automatically place all newly listed products (i.e. products that you ticked on RM) on a green shelf above the planogram when it’s updated and all the discontinued lines (i.e. products that you unticked on RM) on a red shelf.

3.6 Click ‘OK’.

3.7 Select planograms you want to update by simply ticking in the ‘Update/Create?’ column. The ‘planogram name’ column indicates all the planograms that can be located in the folder you chose in step 3.3 and maps it to the clusters that are entered in cluster maintenance. Thus it is very important to ensure that the planogram name corresponds to what is entered in cluster maintenance. If it doe not, it cannot be mapped and ranges cannot be updated.

3.8 Click ‘OK’ and voila your planograms will be updated with the new range and can be located in the folder you chose in step 3.4.
Step 4: Ensure That Update Was Successful
When the updated planograms are opened there should be a green and red shelf allocated above the gondola. The new and delisted products will appear on the green and red shelves respectively and will be sorted by brand and then by height.
Now all the newly listed products which are on the green shelf can be added to the planogram and all discontinued lines have automatically been removed from the planogram and are presented on the red shelf.
If this is not the case, below are possible reasons for the error.
- Not able to open Range Maintenance?
- Ensure that you are connected to a DB.
- Some of the products that you are aware of should be added or removed and are not displaying in Range Maintenance?
- No data pulling through?
- Ensure that you select ‘Update All’ as in Step 3.5.
- Red and green shelf does not appear on the updated planogram?
- Did you update the database as per step 2 before you updated the planograms?
The repercussions of not updating the database when adding new or changed information will cause the information to be lost and not reflected when the information is linked to a fixture or report.
If the above steps do not work for you, feel free to contact our Support Team who is always willing to help.
