Introduction
Luna, the Planogram Refresh Automation feature, is designed to streamline and simplify the process of updating planograms. Luna allows users to configure specific parameters, enabling the system to automatically adjust planograms based on predefined instructions. It’s important to note that these automated updates are limited to planogram refreshes within a specific category.
This article provides a step-by-step guide on setting up the wizard for planogram automation and outlines the approval process across various roles, including Category Planners, Account Managers, and Buyers.
Note that the Planogram Refresh Automation forms part of user permissions linked to the user roles. Ensure that you have the correct permission before attempting to use Luna. Read the linked article on more information pertaining to user roles and permissions.
How To Setup Planogram Refresh Automation
Once you’ve opened your DotActiv software, the Planogram Refresh Automation can be accessed through the ‘Automation’ tab in the ribbon. We will start with setting up the Automation feature. To do so, simply click on the ‘Setup’ icon, as seen in the image below.

The Setup feature will be the first step to creating an automated planogram. Once you click on ‘Setup’, the Planogram Automation Wizard will open where you can set specific parameters on the changes that should be made to your category’s planograms.
Step 1: Select the ‘Cluster Set’ that you would like to set up.
The options include ‘Primary’ and ‘Secondary’.
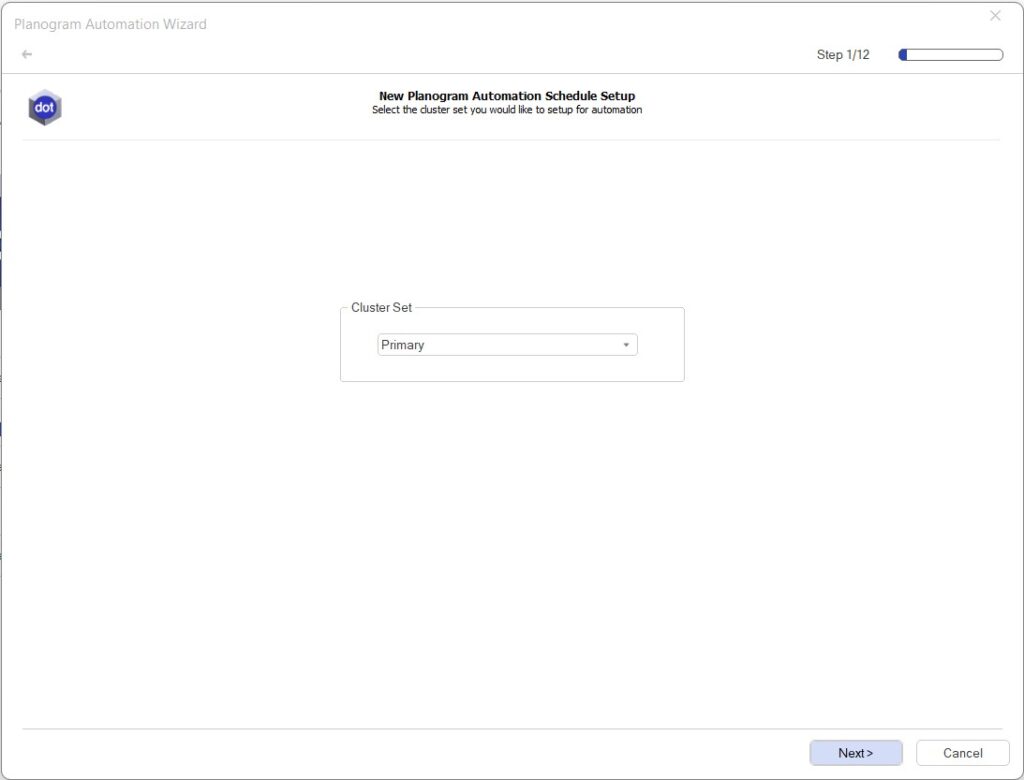
After each page is complete you can use the Next option to continue to the next page.
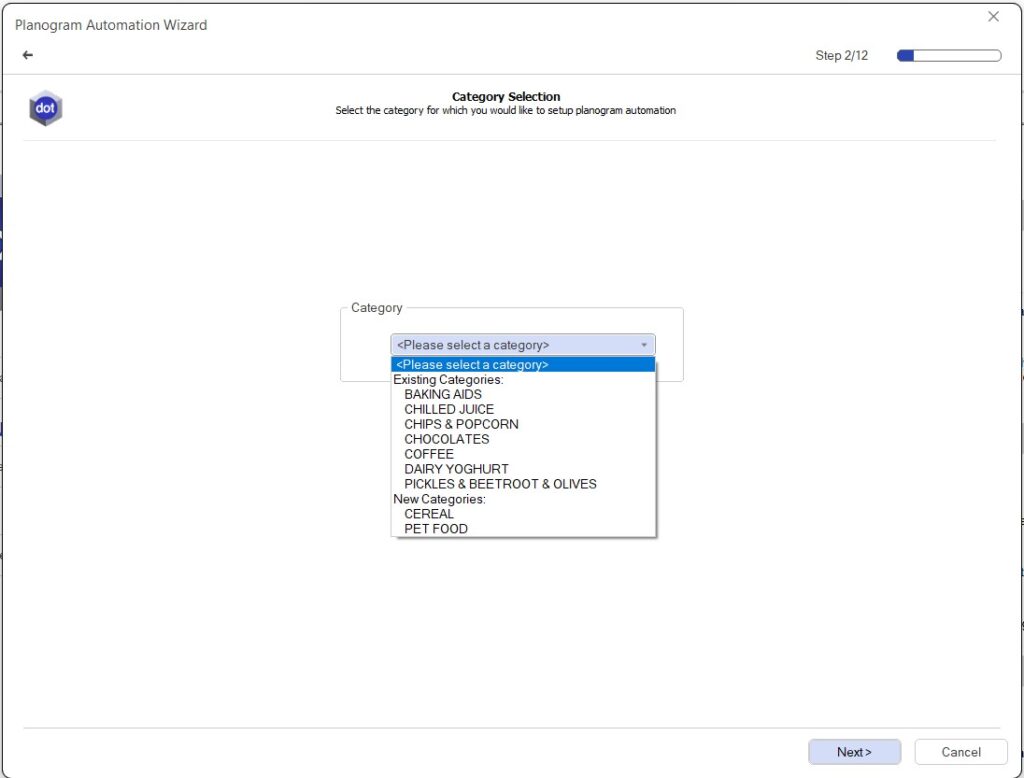
Step 2: The second page is for the ‘Category Selection’. Here you can select the relevant category that you would like to set the planogram automation for, as seen in the image below. Your categories will be divided into two groups, existing categories and new categories. The ‘Existing Categories’ include all the categories that already have a planogram automation setup in the system. The ‘New Categories’ include all the categories with no previous planogram automation setup.
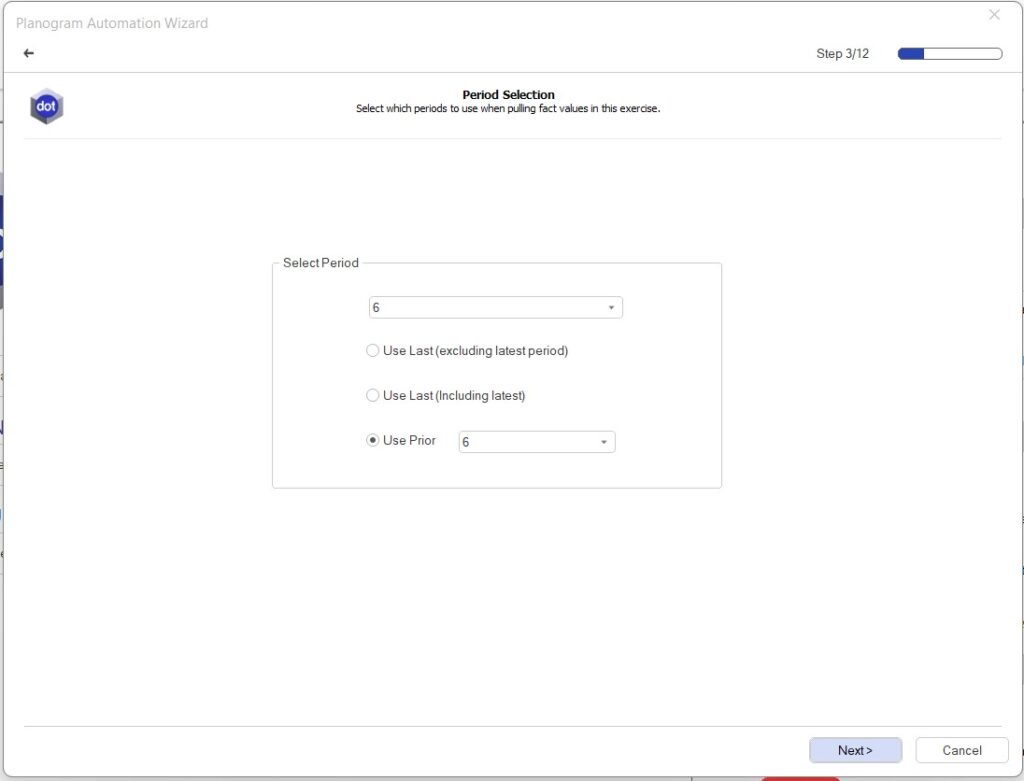
Step 3: After selecting the category we move on to the ‘Select Period’ page that allows you to select which periods to use when pulling fact values in this exercise. You have the option to select the period that is specific to the month period that should be pulled. It’s important to note that specific dates cannot be selected as the software will make use of the most recent periods based on the number of months that will be pulled.
Here you have three options to choose from. Firstly, you can select to use the last period excluding the last month. Secondly, you can select the last period, including the last month. Lastly, you also have the option to pull prior periods. For example, if the user selects 6 periods (at the top) and then uses 12 as the prior, that means the automation will use the 6 periods that are 12 months prior to the latest 6.
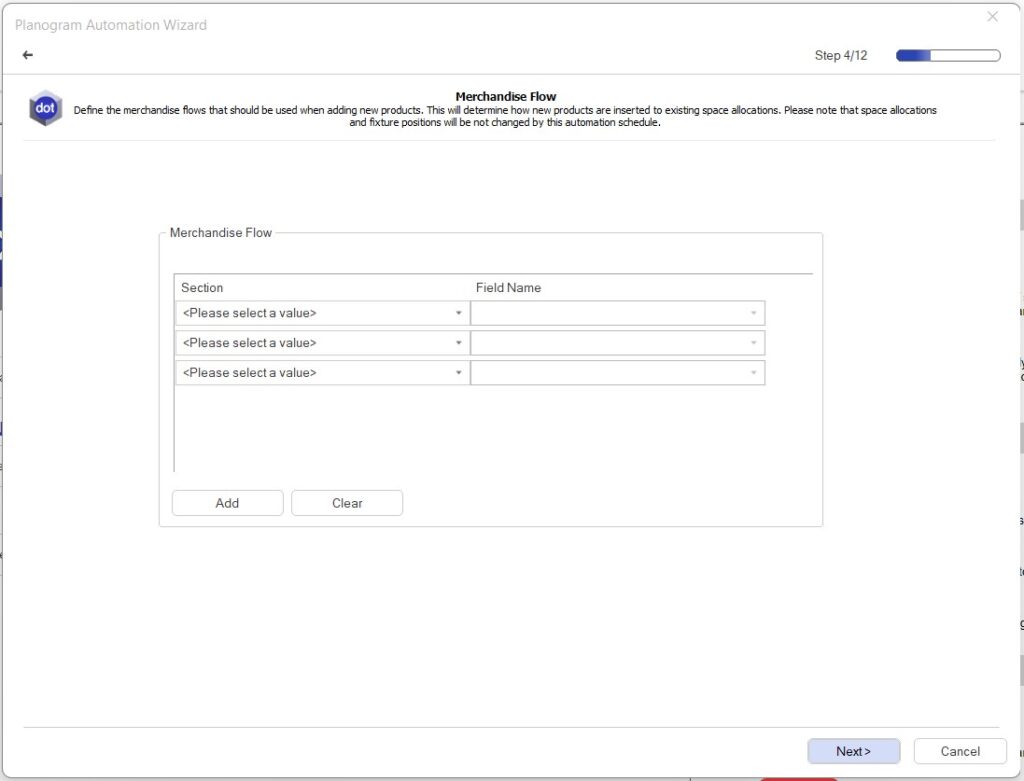
Step 4: Next up is the Merchandising Flow, which is a very important part of the setup. This page is dedicated to determining the merchandising flows that should be used when adding new products. This will provide a guideline on how new products will be inserted into the existing space allocation.
Please note that space allocation and fixture positions will not be changed by the automation schedule.
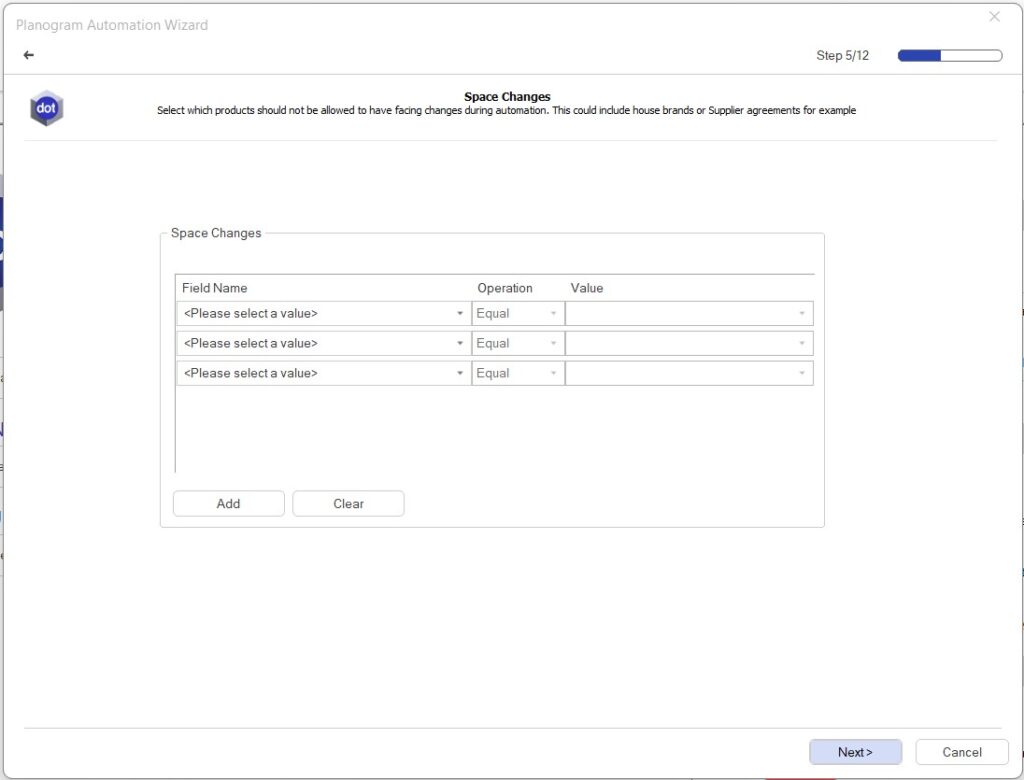
Step 5: The Space Changes page is dedicated to ensuring any trade agreements are kept and that products which should not receive any facings changes can be identified. On this page, you are able to determine the specific brand, or products that fall within this bracket. You can group these products through a variety of fields, such as brand, brand profile, sustainability fields, barcode or fact fields.
Step 6: Next, the Discontinued Products page outlines the specifications on how to deal with discontinued products and when to remove the products from the shelves. Here you have the option to use the ‘System Default’ or set up your own metrics based on the required stock on hand and the Store Coverage Percentage.

Step 7: On the wizard, the next step would be to identify what should happen to New Products. This step is important to ensure your merchandising principles are met and that new products without fact data can be cloned. This ensures that the system is able to provide the correct facings to each product and that Days Of Supply can be equalized, should that be one of your goals.
The Merchandising section allows you to determine where the new products should be placed amongst the existing products on the fixtures. You have different options to choose from, for example, Premium to Economy, Highest Low to High etc.
Product clones can be used when you have new products in your database with no sales data. To ensure that Luna doesn’t recommend delisting the products based on ‘poor performance’, cloning can be used to assign the sales data of a similar or substitute product to the new listing for a period of time.
The product clone feature works on the same logic as DotActiv’s Transfer of Demand report. This means that it will find the closest, top-performing substitute for the new product and recommend this as the clone.
The percentage of the sales that should be cloned can be done by stipulating the percentage in the window below based on your comparison of the substitute product. In the case that the product’s brand profile and product description (meaning the type of product) are the same the percentage would be high and if not the clone percentage would be lower.

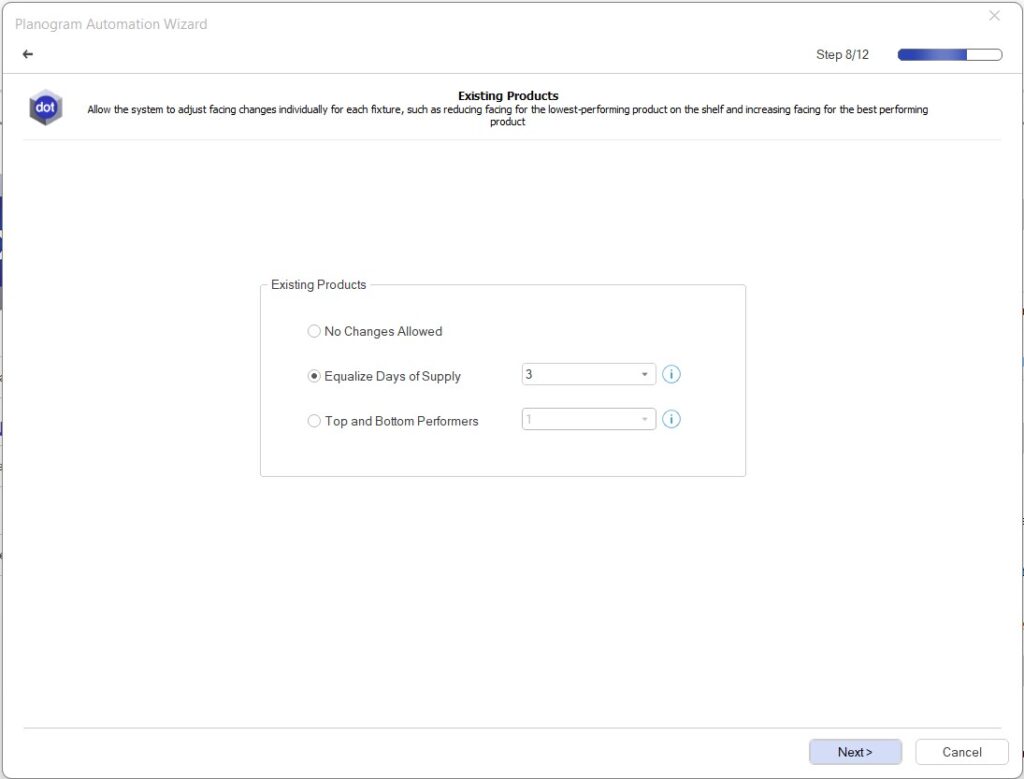
Step 8: Not only do we have to provide instruction for new products but also for Existing Products. On this page, you have three options. The first option will be that no changes are allowed for the existing products, meaning only new products will be added. The second is to ‘Equalize Days Of Supply’ for the existing products. This option will reduce or increase the product’s facings to meet the days of supply instructions you provided.
Please note that it is specific to your account or the desired outcome of the planograms.
The last option will be ‘Top And Bottom performers’. This option is specific to making changes to the top and bottom performers on the planogram (per fixture). The number selected will be used to determine the amount of products that should be changed. For example, if you select 2, the top two and bottom two performing products will be adjusted on the planograms.
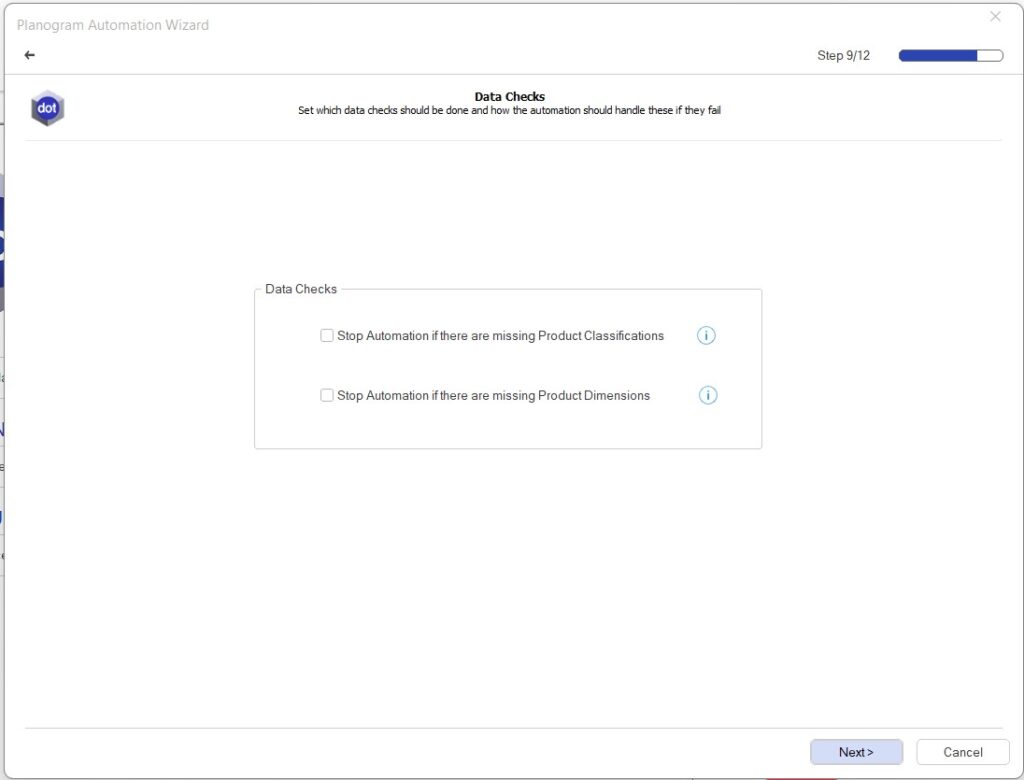
Step 9: Next up is the Data Checks page. This ensures that the planograms can be refreshed based on the correct information. This page allows you to cancel the automation whenever there are product classifications or product dimensions missing. If any of these two data checks are enabled, the system will not run the automation until all product information specified here is completed. You will receive a message that the automation was unsuccessful and that will provide you with an opportunity to complete the missing product classifications or dimensions before rerunning the automation.
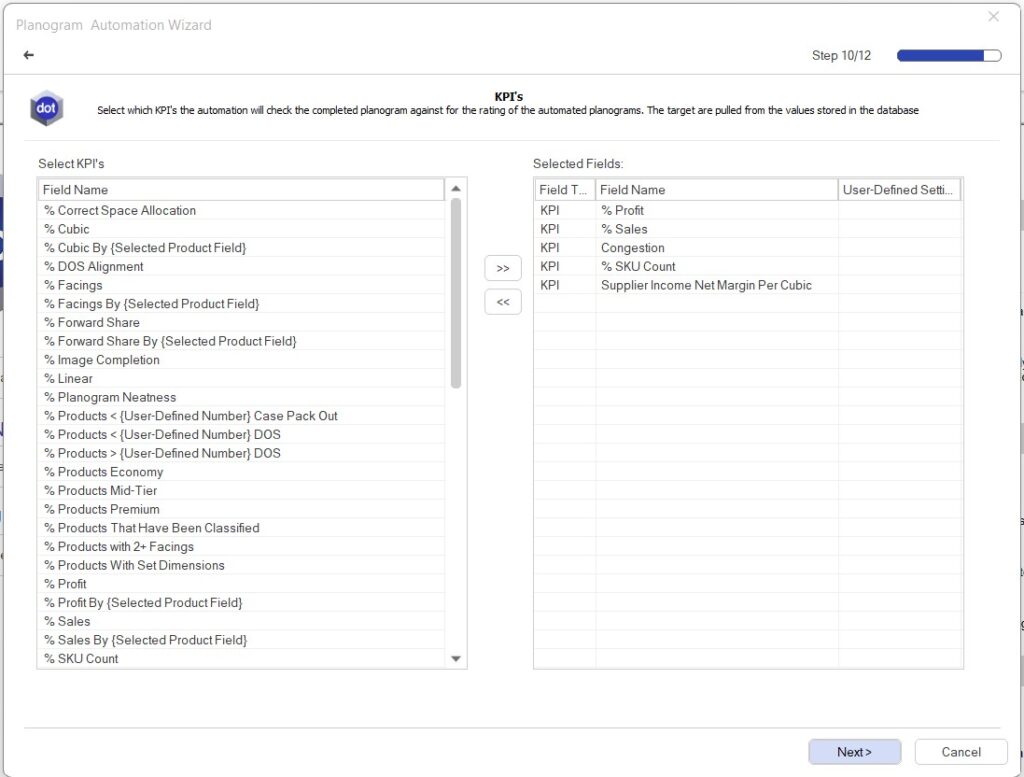
Step 10: Here you need to select which KPIs the automation will reference to complete planograms for the rating of the automated planograms. If you have set targets that need to be achieved, ensure that they are set up on your database. These targets are pulled directly from the database.
On this window, you will select all the KPIs which you want to measure when viewing the automated planogram for approval.
Ensure that all KPI’s have targets set in your software as this will impact your KPI Analyzer when approving planograms. For more information on setting KPI targets, you can read the article linked here.
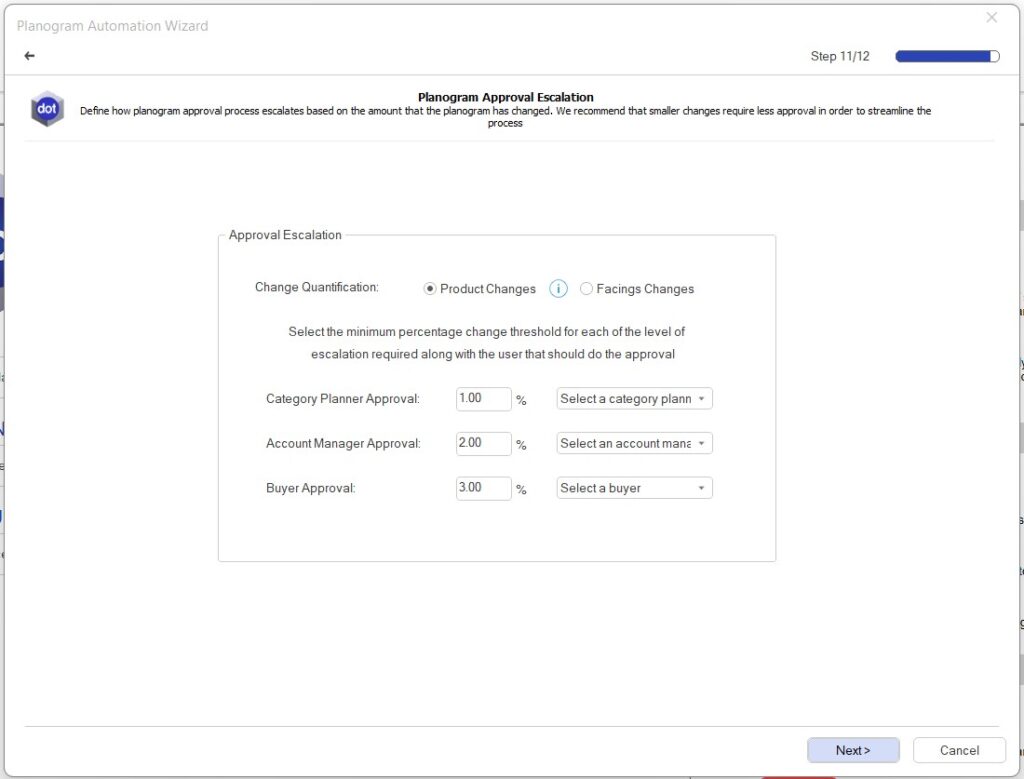
Step 11: Planogram Approval Escalation will define how the approval process escalates based on the percentage changes on the planogram.
It is recommended that smaller changes require less approval in order to streamline the process.
Determine the ‘Change Qualification’ that should be applied. Do you want to follow the approval process when product changes take place or facing changes? This will be determined by the rest of your planogram automation setup.
Here you will need to determine the percentage of changes that would require approval from the relevant role players, namely the Category Planner, Account Manager and Buyer.
Step 12: The final page will set up the Schedule on which the automation should run in the future.
On this page determine how often the schedule should be repeated. This can be on a daily, weekly or monthly basis. The interval will determine the span of time between each run. For example, if you select a weekly schedule and set the ‘Interval’ to ‘2’, the automation will run every second week.
In the ‘Repeat Every’, you are able to determine a specific day during the week that you would want automation to run. Lastly, you should specify when the automation should stop running the schedule. This can be either never or on a specific day in the future.
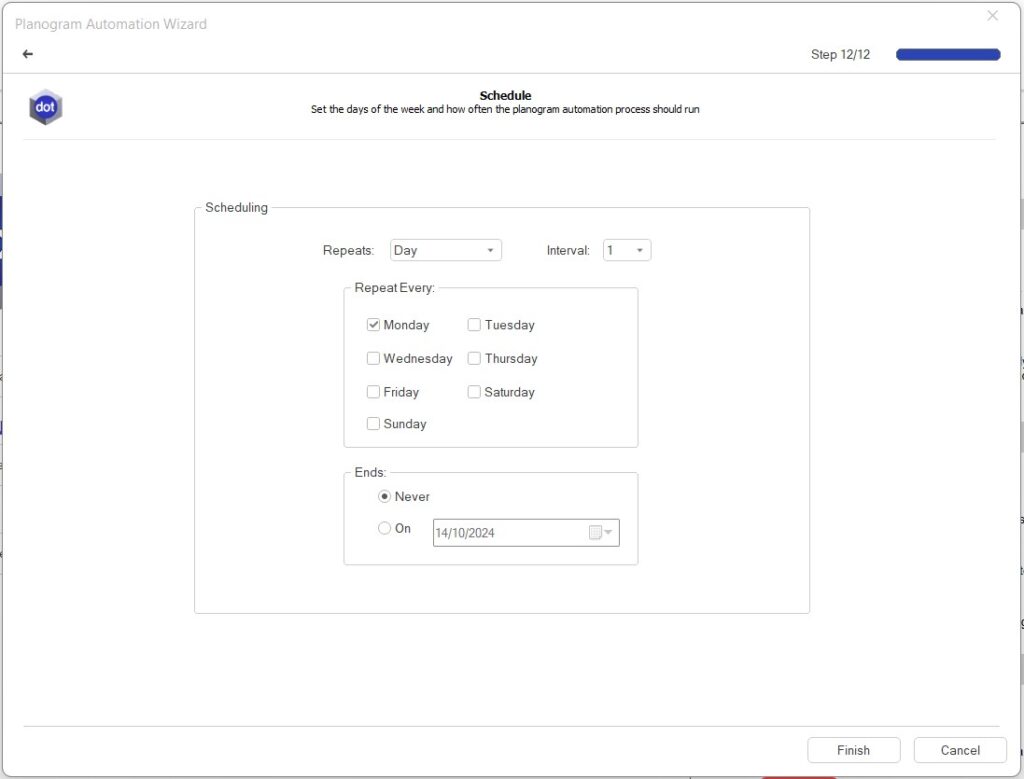
After creating your setup you can complete the setup with ‘Finish’ and Save.
How To Edit Your Setup And Run Luna Manually
All setups can be managed through the ‘View and Edit’ feature on the Automation tab as seen below.

After selecting the ‘View and Edit’ button you will see a tab displaying the following information:
- The category that has a Setup in the process of running.
- The Cluster Set selected.
- The Frequency the setup will be run.
- The period selected during the setup.
- The last run date
- The last run status.
- The number of planograms waiting for approval.

The menu icon, represented by a 3-line button, provides three key options for managing your setup:
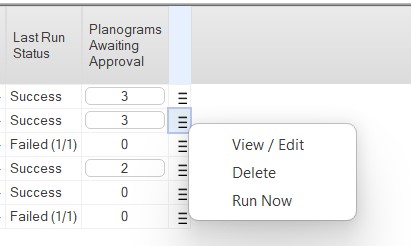
- View/Edit: This option reopens the setup window, allowing you to review, modify, or update any information previously configured.
- Delete: Select this option to remove the entire setup for the chosen category.
- Run Now: This option enables you to execute the setup immediately, bypassing any scheduled frequency. By choosing “Run Now,” you can instantly generate refreshed planogram automation based on the latest setup changes or newly created configurations.
How To Open, Review And Approve Planogram Automation
Planograms developed by Luna can be approved in two different ways. First, we have the ‘Action Centre’ that is updated continuously to identify new reports or planograms that need attention. This is an easy and convenient way to quickly review and approve planograms.
Then we have the Approval option when you navigate to the Automation tab. Here you will see more information regarding the planogram that needs to be reviewed and approved.
It is important to note that the approval process depends on the percentage allocated to Category Planners, Account Managers and Buyers when approval is required. For example, if the planogram has fewer changes than identified by the user in the setup, not all users will have to complete the approval process.
Action Center
The Action Centre approval list will be displayed whenever you open the DotActiv software. Refer to the image below to identify how the action center will present on the software.
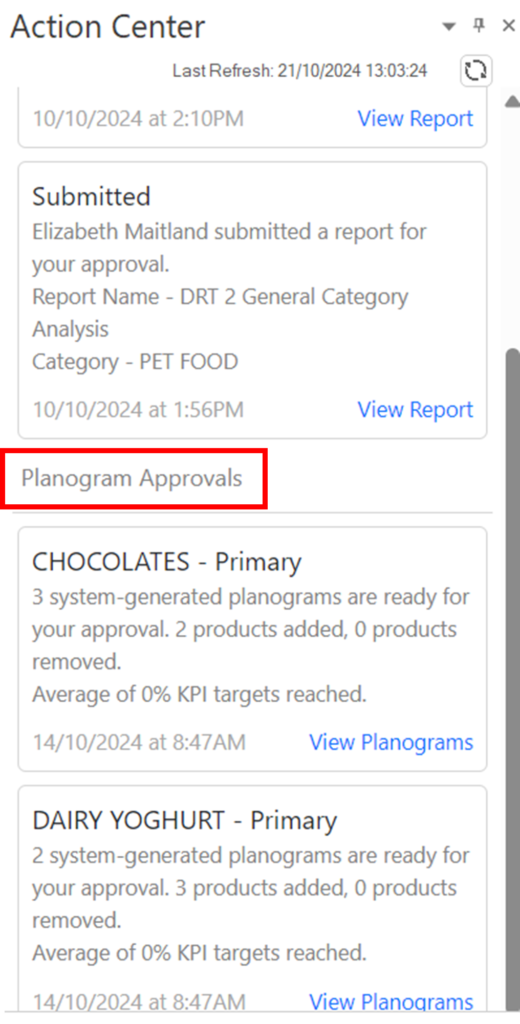
In the case that the action center is not open when opening the software. You can navigate to the Help tab and select Action Center to open the Action Center.

It’s important to note that the Action Center will display when opening the software if there are no planograms or reports to be actioned.
The Action Center will include a heading for the files that require attention. For the Planogram Refresh Automation feature the heading will be ‘Planogram Approvals’. Each planogram waiting for the specific user’s attention will be presented in its own block. This block includes the planogram category and changes that were made to the planogram specifically to products added and removed. It will also include an overview of the KPIs that were met during the refresh of the planogram. Please see the image below for reference.

By selecting ‘View Planograms’ the software will open the planogram(s) that needs to be reviewed and approved.
Approvals Tab
The planograms waiting for approval can also be accessed through the Automation tab as seen below under ‘Approvals’.

Selecting ‘Approvals’ will open up the Planogram Automation Approvals tab. This includes a list of all the planograms awaiting approval. This list shows more detailed information regarding the time the planogram was uploaded, at which stage the approval process is, what last action was done on the approvals, and who needs to approve or action the planogram refresh.
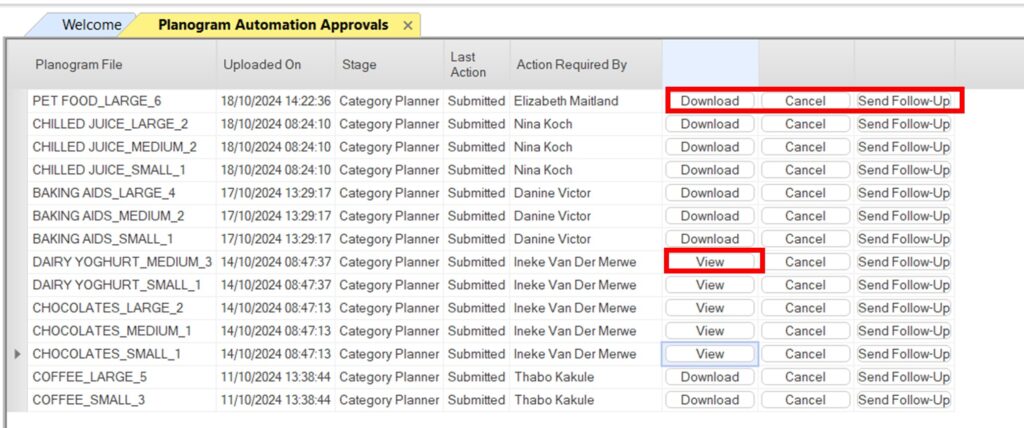
On this page, you have the options to Download, Cancel or Send Follow-Up.
Please note that the options available are dependent on the user permissions. Only admin users will be able to send follow-up emails or cancel.
In the instance where you are ready to review and approve the planogram, you will select ‘Download’. If you’d like to cancel the automated planogram you can select ‘Cancel’ and when you want to remind a user to action their approval you can select ‘Send Follow-Up’. The latter will send an email to the relevant user reminding them that they have a planogram awaiting approval.
After downloading the planogram you will notice that you will have the option to ‘View’. This enables you to open the planogram awaiting your approval.
Review And Approval Of Planograms
The approval process is designed to make it quick and easy to get sign-off from all the relevant approvers.
When opening the planogram, you will be presented with the following ribbon.

In the ribbon, you have various options which we have broken down below.
Images
The Images button allows you to enable or disable the images.
Labels
The Labels button allows you to enable labels for products, fixtures, banners and obstructions.

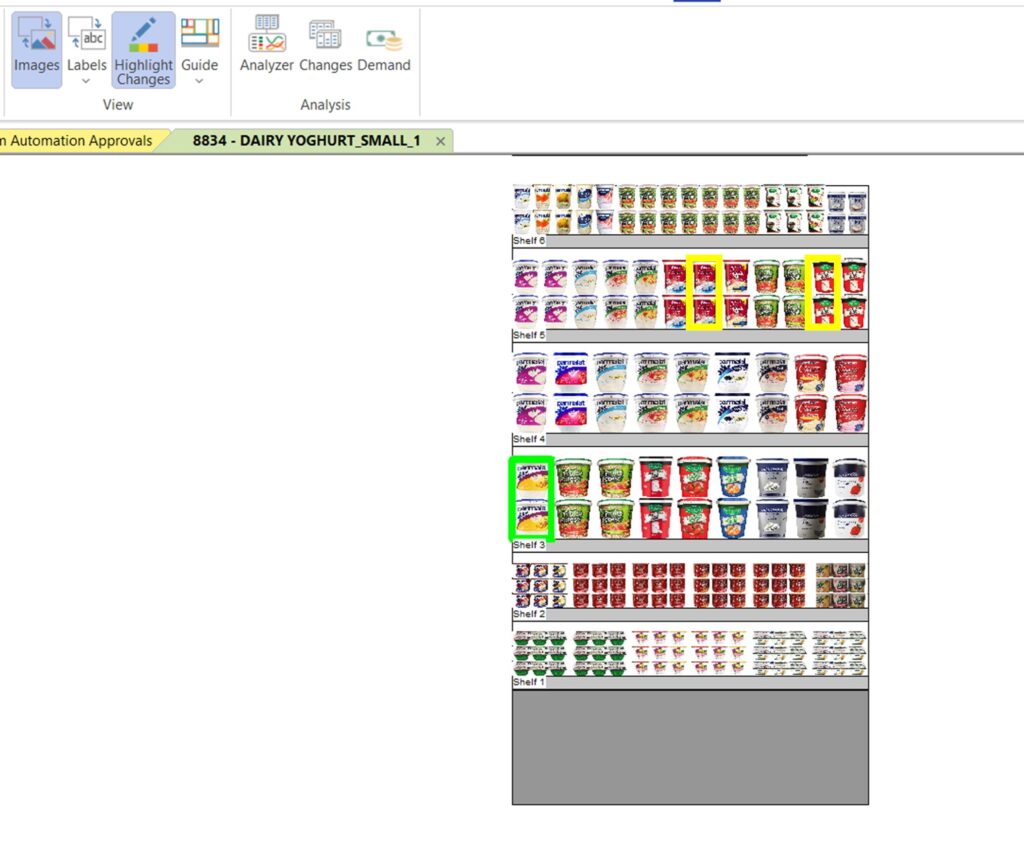
Highlight Changes
The highlight button enables the highlights for all changes made to products. The yellow highlight identifies images where the software made changes to facings. The green highlight shows new products that were added.
It’s important to note that the ‘Highlight Changes’ and ‘Images’ features can be used together.
How To Review Planogram Data
When reviewing the updated planograms you are able to analyse the changes through the DotActiv Analyzer, Changes Report and Demand Report. We have unpacked them below.
Analyzer
The Analyzer will show the KPI’s selected during the setup. The Analyzer makes use of specific colour indicators to identify which KPI’s are met and which are not.
Red will indicate that the target for the KPI was not met whereas green identifies KPI’s where targets were met. Yellow gives an indication of where you are if you did not meet the target but the values fall within the range of not failing.

You are able to double-click on any of the KPI’s to open the KPI information for more detail as seen below.

Find out more about how to read the KPI Analyzer in this article linked here.
Changes Report
The Changes report will compare the previous planogram created by the Planogram Automation. In the case where this is your first planogram refresh on Luna, the software will compare the changes to the planogram uploaded to the database.
The changes report gives you specific information on all changes that were made.
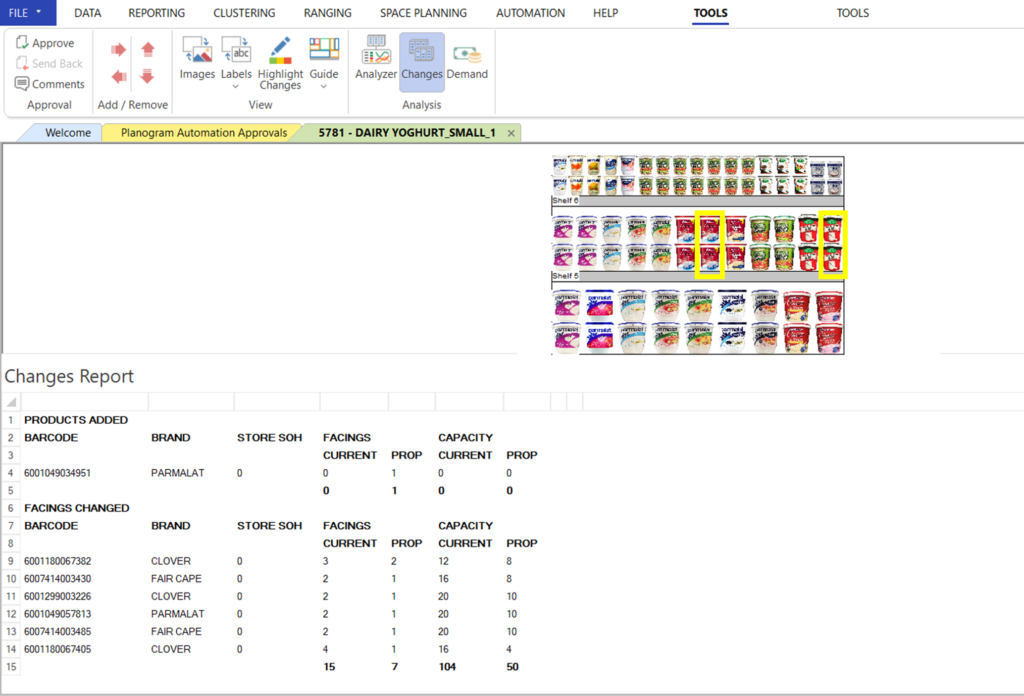
Please note that the changes report is specific to the changes that were made on the planogram and does not include all the information captured by a changes report created in the software when opening a planogram.
The changes report highlights added or removed products, facings and capacity changes that took place. Not all products will be shown on the changes report if there are no changes made to them.
Demand Report
The Demand report refers to the ADDM report comparing the current and proposed planograms.
The Demand report includes all relevant fields that will be used to determine if the changes made by Luna are accurate. The information shown includes the DC on order, Cross-Merch Facings, Pack size, MAC, Selling Price and MDQ for specific product information.
You will also be able to take a look at your MDQ-only information and the Store Stock plus GIT information.

For more information regarding the ADDM report and how to read the report, navigate to the article linked here.
Comments And Facing Changes
When reviewing a planogram it is important to add comments to changes that need to be made. These comments are valuable when the planogram is being reviewed by the Account Manager or Buyer and the facings or product changes that should be made by the Category Planner.
Make comments by selecting the product or fixture that requires changes and right-click. You will be able to select ‘Add Comment’ in the menu. This enables you to add comments to specific products, fixtures and banners as seen in the gif below.

In addition to adding comments, you are able to change facings for the products.
This can be done in the ribbon under ‘Add/ Remove’. The arrows can be used to increase facings for the x-facing and y-facing of each product, as seen in the gif below.

Approve Planogram
After all information was reviewed the planogram can be approved in the ribbon by selecting ‘Approve’. In the instance when an Account Manager or Buyer has a change request they are also able to send the report back to the previous approver by selecting ‘Send Back’.

After the final approval took place the planograms will be sent to the stores through storecomms to be implemented.
It’s important to note that the planograms will not always follow the full process of approval by the Category Planner, Account Manager and Buyer. In the case where changes are very small, only some users will need to approve the planograms.
Data Security
Luna runs in the background on the same server as the Import Utility and manages the full automation process. Using the same means of connection to the database as a user would with the DotActiv application using a permission-specific user name and password, she is able to pull all the needed fact data as well as automation scheduling and configurations from the database in order to understand how to process the automation correctly.
Once the automation process is complete, the resulting planograms are uploaded into the database which allows only the relevant users to access them for approval based on the configuration of which users should be required to handle the approval. Since Luna will be processing on the same machine as the Import Utility, she can easily extract the approved planograms and pass them over to the Import Utility without any added security concerns.
Conclusion
Luna is an efficient solution for automating small changes when planograms need to be refreshed. It helps minimize manual work and ensures planograms are consistently updated according to specific business requirements.
