The purpose of this article is to explain how you can set up, and manage the settings of any tasks that you create in Activ8. We also unpack setting up your task types and task reviews.
Setting Up Task Types
After logging into Activ8, navigate to the ‘Administration’ tab in the left-hand panel and click on ‘Application Settings’.

In the ‘Activ8 Application Settings’ window, find and click on the ‘Tasks’ tab.

Here, you’ll find two tabs – ‘General’ and ‘Reviews’.
General
In the ‘General’ section, you have various options that allow you to set up the limitations of any given task.
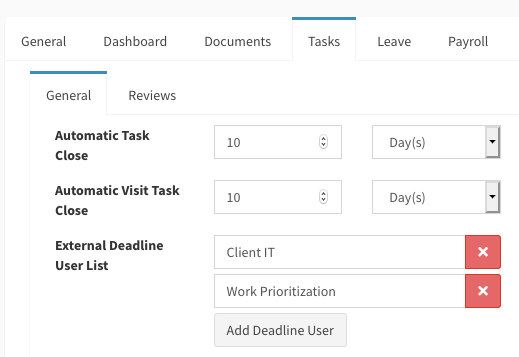
As you can see above, the limitations include ‘Automatic Task Close’, ‘Automatic Visit Task Close’ and ‘External Deadline User List’. Next to each are time fields where you can input a period.
Once the period has expired, Activ8 will automatically close the task and send you an email notification informing you. This is only if there has been no activity on the task during that period.
For ‘External Deadline User List’, you can remove or add users who will be informed.
Task Severities
In the next section, you can set your task severities or task urgency levels. Here, you can create, edit or delete any task severities.
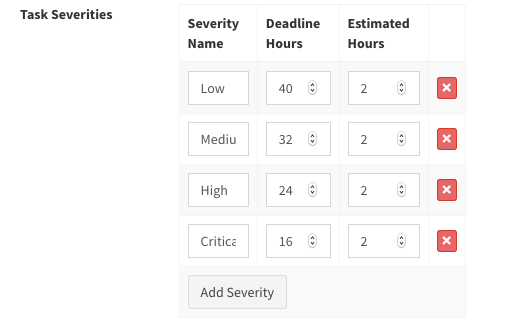
Once saved, these will be available to any user who can create a task. When logging a task, a user can find it in the ‘Urgency’ field of the ‘New Task’ window.
Task Types
In the last section of the ‘General’ tab, you can create, edit and delete your task types.
You can fill in ‘Type Name’, decide if you want to ‘Auto-Assign Tasks’ or ‘Assign To All’. Finally, you can fill in the ‘Auto-Assign Permission’ field with a user role.
‘Auto-Assign Permission’ is only if you want a specific user role to auto-assign this newly created task type.
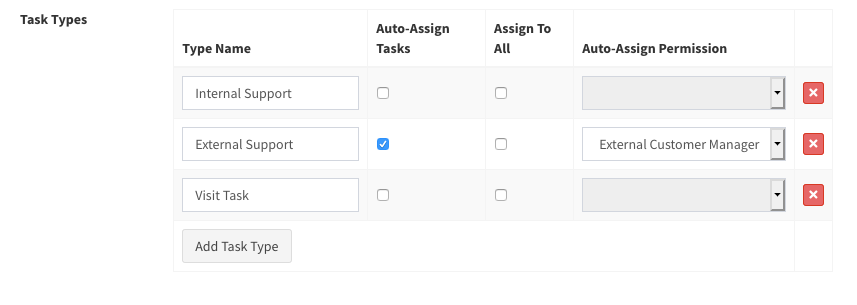
Once saved, these will be available to any user who can create a task. When logging a task, a user can find it in the ‘Task Type’ field of the ‘New Task’ window.
Reviews
Under the ‘Reviews’ tab, you can set up your various task review limitations.

They include:
- Task Review Request Delay: This will be the amount of time that will pass after a task was completed before a review request will be sent to the user that originally logged the task.
- Task Review Request Expiry: This will be the amount of time after a task was completed before the review request will not be sent for that task.
- Task Review Response Expiry: This will be the amount of time the reviewer has to respond to the review request before it expires.
- Task Review Lower Warning: The lowest amount a task can be rated where it will send a warning/notification to the user who worked on the task.
- Task Review Upper Warning: The highest amount a task can be rated where it will send a warning/notification to the user who worked on the task.
- Task Review Questions: Questions you can add to the review that users can add some feedback. E.g: Has the task been completed fully?
Once you have made your changes and are satisfied, click on ‘Save’. You’ll receive a message indicating that the task deadline scores were saved successfully.